


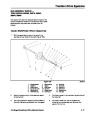


Traction Drive Systems
4.
If the pivot assembly was repaired, now is the time
to assemble it.
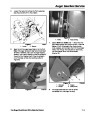
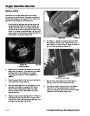
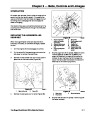
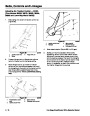
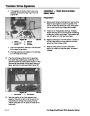
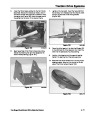
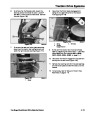
F. Hook the long end of the spring in the hole in
the left front corner of the frame (Figure 84).
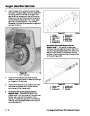
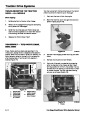
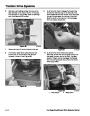
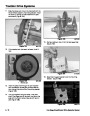
A. Secure the friction wheel to the hub with four
cap screws and locknuts. If the locknuts are
worn, apply a drop of Loctite™ Red #271 or
equivalent to the threads.
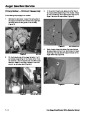
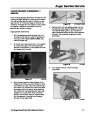
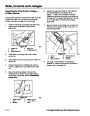
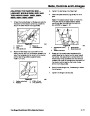
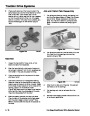
B. Slip a slider ring on either side of the eyebolt
and slide it on the hub. Install the spacer and
snap ring. Note the snap ring must be installed
with the sharp edge facing outward (away from
the friction plate) (Figure 83).
Figure 84
2773-051
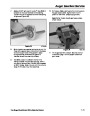
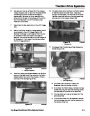
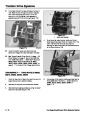
G. Slide the spacer on the right hand side. Clean
the bushings and install them in the sprocket
with a light coat of oil. Lightly oil the inside of
the bushing and slide the sprocket on with the
gear to the outside.
2
H. Now insert the key into the keyway and slide
the small sprocket on. Align the sprockets and
tighten the setscrew in the small sprocket.
Install the chain. Lubricate the chain with chain
oil. If you use engine oil, use a very light coat,
as it will be thrown around the drive system
(Figure 84).
1
Figure 83
2.
2773-049
1.
Eyebolt
Hex shaft
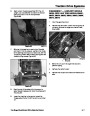
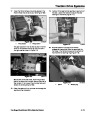
C. If the hex shaft is rusty, now is the time to clean
it with a wire brush or emery cloth. Apply a very
light coat of engine oil to the shaft. A thin coat
will prevent rust, but too much will be flung
around the drive system during operation. A
very thin coat of Lubriplate™ MAG-1 could be
use here as an alternative to oil. Ordinary
grease will thicken in cold weather and cause a
hard shifting problem.
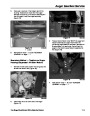
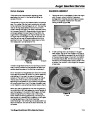
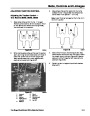
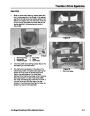
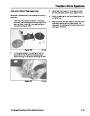
5.
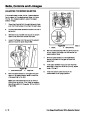
The pivot assembly is installed by first feeding the
flat arm through the slot in the center frame. Align
the pivot assembly with the holes in the side
plates. Note that there are special shoulder bolts.
The shoulder must pass through the side plate
and bottom on the end of the shaft (Figure 85).
After securing the bolts, check to be sure the pivot
assembly can rotate. If not, check the pivot bolts
to see if the side plate was pinched between the
bolt and pivot shaft.
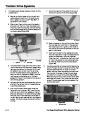
D. To assemble the pivot shaft assembly, hold the
shaft with the flat bar that the linkage attaches
to pointing towards you.
E. The hub and friction wheel goes inside the
frame with the hub to your left. Insert the hex
shaft into the hub with the keyway on the left.
Slide the bearings on the hex shaft (Figure 83).
Note the hub on both bearings should face to
the left. Secure both bearings with self-tapping
screws. The friction wheel should spin without
binding.
1
Figure 85
Shoulder bolt
2768-033
1.
3 - 6
Two Stage Snowthrower Drive Systems Manual
| Categories | Snow Blower Manuals, Toro Snow Blower |
|---|---|
| Tags | Toro 38051, Toro 38052, Toro 38053, Toro 38054, Toro 521, Toro 522, Toro 824 |
| Model Number | 38051, 38051 38052 38053 38054 38062 38605 38607 |
| Model Year | 1990, 1991, 1992, 1993, 1994, 1995, 2000, 20012002, 2003 |
| Download File |
|
| Document Type | Service Manual |
| Language | English, Français |
| Serial Number | 210000001 - 210999999 |
| Product Name | 522, 622, 38062 Snowthrower |
| Product Brand | Toro. Customer Service Representatives are available by phone:
Monday - Friday 7:30 a.m. to 9:00 p.m. (CDT) - Saturday 8:00 a.m. to 8:00 p.m. (CDT) - Sunday 10:00 a.m. to 8:00 p.m. (CDT)
Canada 1-888-225-4886 USA 1-888-384-9939, Snow Blower |
| Product Type | Snowthrower |
| Product Series | Snowthrower, Two Stage Intermediate Frame |
| Swath | 22 inch |
| Discharge | Two Stage |
| Engine Manufacturer | Tecumseh |
| Engine Oil Type | 21 oz. (.62l) 5w-30 or 10w / API SH or higher |
| Gearbox Lubricant | 7 oz. (198gm) Lubriplate MAG-1 |
| Engine Motor Model # | HSSK50-67401S |
| Engine Motor Size | 5 hp |
| Engine Motor Type | 4 Cycle CARB1, EPA1 |
| Transmission Speed | 3 Forward/1 Reverse |
| Transmission Type | Friction Disc |
| Document File Type | |
| Publisher | toro.com |
| Wikipedia's Page | Toro Company |
| Copyright | Attribution Non-commercial |
(0 votes, average: 0 out of 5)