


4.
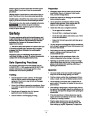
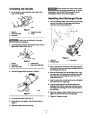
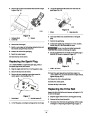
Remove the two self-tapping screws, three cap screws,
one washer, and three locknuts that secure the drive belt
cover to the snowthrower frame (Fig. 20). Set the drive
belt cover aside.
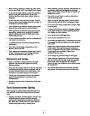
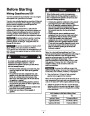
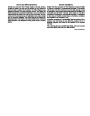
8. Push down on the idler pulley and route a new drive
belt around the rotor pulley (Fig. 21).
9.
Release the idler pulley and route the new drive belt
over the two belt guides, around the engine pulley, and
between the idler pulley and the roller (Fig. 21).
3
Important
The drive belt must be on top of the roller
and the two belt guides as shown in Figure 21.
2
1
10.
11.
Install the left rotor guard.
Install the drive belt cover. Tighten the fasteners
securely, but do not overtighten.
4
12.
13.
14.
Connect the wire to the spark plug.
Install the control panel.
Insert the key in the switch.
5
m-5064
Checking the Tire Pressure
Figure 20
Inflate both tires to between 15 and 20 psi (103 and
1.
2.
3.
Drive belt cover
Left rotor guard
Washer
4.
5.
Snowthrower frame
Self-tapping screws
137
kPa).
Emptying the Fuel Tank
5.
Remove the left rotor guard (Fig. 20) and save it for
installation in step 10.
1.
2.
Stop the engine and wait for all moving parts to stop.
Remove the key from the switch.
Important
The left rotor guard acts as a water seal for
the drive. Do not assemble the drive cover without
installing this part or the drive belt will slip and fail.
Danger
6.
Remove the old drive belt from the engine pulley and
the idler pulley (Fig. 21).
Gasoline is highly flammable; it can ignite and
cause serious personal injury.
•
•
•
Drain gasoline outdoors.
Drain gasoline from a cold engine only.
Wipe up any gasoline that may have spilled.
1
2
7
3
4
• Do not drain gasoline near any open flame or
where gasoline fumes may be ignited by a spark.
Do not smoke a cigar, a cigarette, or a pipe when
•
handling gasoline.
3.
4.
Remove the fuel tank cap and use a hand pump to pump
the fuel into an approved fuel container.
6
Start the engine and allow it to run until it stops. Repeat
this step two more times to ensure that the fuel tank and
the carburetor are empty.
5
m-5063
Figure 21
1.
2.
3.
4.
Brake arm assembly
Idler pulley
5.
6.
7.
Belt guides
Rotor pulley
Left rotor guard
Roller
Engine pulley
7.
Push down on the idler pulley and remove the old drive
belt from the rotor pulley (Fig. 21).
16
| Categories | Snow Blower Manuals, Toro Snow Blower |
|---|---|
| Tags | Toro 38600, Toro 38602, Toro Snow Commander |
| Model Year | 2002 |
| Download File |
|
| Document Type | Operator's Manual |
| Language | English |
| Serial Number | 220000001 - 220999999 |
| Product Name | 38600, 38602 |
| Product Brand | Toro. Customer Service Representatives are available by phone:
Monday - Friday 7:30 a.m. to 9:00 p.m. (CDT) - Saturday 8:00 a.m. to 8:00 p.m. (CDT) - Sunday 10:00 a.m. to 8:00 p.m. (CDT)
Canada 1-888-225-4886 USA 1-888-384-9939, Snow Blower |
| Product Type | Snowthrower |
| Product Series | Single Stage, Single Stage Snow Commander, Snowthrower |
| Swath | 24 inch |
| Discharge | Single Stage |
| Engine Manufacturer | Toro |
| Engine Oil Type | Toro 2 cycle / NMMA-TCW3 |
| Engine Motor Size | 7 hp |
| Engine Motor Type | 2 Cycle EPA1 |
| Document File Type | |
| Publisher | toro.com |
| Wikipedia's Page | Toro Company |
| Copyright | Attribution Non-commercial |
(1 votes, average: 5 out of 5)
Lawn and Garden readers have rated Toro Snow Commander 38600 38602 Snow Blower Operators Manual, 2002 5.0 out of 5.0 based on 1 product reviews. Great snow blower. Would certainly buy another.