
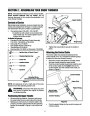
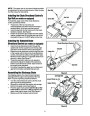

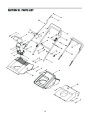
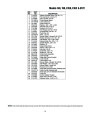
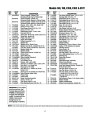


Shave Plate
•
To check the adjustment of the shave plate, place
the unit on a level surface. The wheels, shave plate
and augers should all contact the level surface.
Note that if the shave plate is adjusted too high,
snow may blow under the housing. If the shave
plate wears out excessively, or the unit will not self-
propel, the shave plate may be adjusted too low.
NOTE: On new units or units with a new shave plate
installed, the augers may be slightly off the ground.
•
To adjust, tip the snow thrower back so that it rests
on the handle. Loosen the lock nuts from the
carriage bolts which secure the shave plate to the
housing. See Figure 10.
•
Move the shave plate to desired position and
retighten the nuts and bolts. Make certain all four
nuts are securely tightened.
Shave Plate
Carriage Bolts
Figure 10
SECTION 6: MAINTAINING YOUR SNOW THROWER
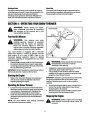
WARNING: Before servicing, repairing, or
inspecting, disengage all clutch levers and
stop engine. Wait until all moving parts have
come to a complete stop. Disconnect spark
plug wire and ground it against the engine to
prevent unintended starting.
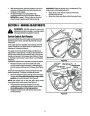
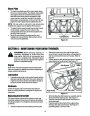
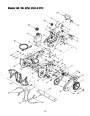
•
Remove the belt cover from the left side of the
snow thrower’s auger housing by unthreading the
five hex screws which secure it in place. Refer to
Figure 8.
Gently grasp the idler bracket and pivot it upward to
ease tension on the drive belt. See Figure 11.
•
Engine
Pulley
Engine
Idler Bracket
Refer to the Tecumseh Engines manual packed with
the snow thrower for detailed instructions regarding all
engine-related maintenance.
Lubrication
•
Lubricate pivot points on the control handle and the
extension spring at the end of the clutch cable with
a light oil once every season and before storage of
the snow thrower at the end of the season.
Hardware
Check the engine and snow thrower frequently for
loose or missing hardware, and tighten or replace as
necessary.
Drive Belt
Auger Pulley
Figure 11
Replacing the Drive Belt
•
•
•
While holding the idler bracket up, carefully slip the
drive belt off the engine pulley. See Figure 11.
Carefully release the idler bracket and allow it to
pivot downward.
Carefully slip the drive belt off the auger pulley,
freeing it from the snow thrower. See Figure 11.
preceding steps in reverse order.
The snow thrower’s drive belt is subject to wear and
should be replaced if any signs of cracking, shredding
or rotting is present. To change the drive belt, proceed
as follows:
•
Install the replacement drive belt by following the
10
| Categories | MTD Snow Blower Manuals, Snow Blower Manuals |
|---|---|
| Tags | MTD 140, MTD 150, MTD E150, MTD E162, MTD E172, MTD Snow Blower Manual |
| Download File |
|
| Document Type | Owner's Manual |
| Language | English |
| Product Brand | MTD, Snow Blower |
| Document File Type | |
| Publisher | mtdproducts.com |
| Wikipedia's Page | MTD Products |
| Copyright | Attribution Non-commercial |
(0 votes, average: 0 out of 5)