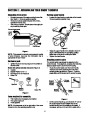
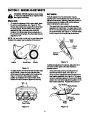

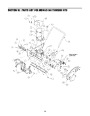
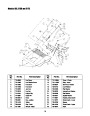
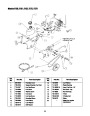


SECTION 3: KNOW YOUR SNOW THROWER
Read this owner’s manual and safety rules and labels before operating your snow thrower. Compare the
illustrations in Figure 9 with your equipment to familiarize yourself with the location of various controls and
adjustments. Save this manual for future reference.
The operation of any snow thrower can result in foreign objects being thrown into the operator’s eyes and
causing severe eye damage. Always wear safety glasses while operating the snow thrower, or while
performing any adjustments or repairs on it.
Auger
Control
Handle
Upper Handle
Auger Control Handle
Extended
Chute
Crank
Chute Crank
Ignition
Key
Spark
Plug
Cover
Primer
Button
(Models 142,152, 172 & 173)
Discharge Chute
Electric
Starter
(Optional)
Starter
Handle
Choke Lever
Plug for
Electric
Starter
Off
On
(Optional)
Shave
Plate
Auger
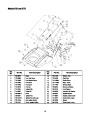
Figure 9
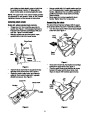
IMPORTANT: This unit is shipped without gasoline or
oil. See separate engine operator’s manual for proper
fuel and engine oil recommendations.
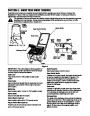
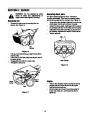
Spark Plug Cover
Spark plug located under the cover.
Auger Control Handle
Choke Lever
Located on the upper handle, the auger control handle
is used to engage and disengage the augers. The
snow thrower is designed to be propelled by the
rotation of the augers. Pull the control handle back
against the upper handle to engage the augers;
release to disengage.
Place choke lever in “ON” position to start a cold
engine.
Primer Button
Used to inject fuel directly into the carburetor to insure
fast starts in cold weather.Follow engine manual to
prime engine.
Chute Crank
Located on right side of dash panel, the chute crank
determines the direction that snow will be discharged.
Turn clockwise to discharge snow to the left; turn
counterclockwise to discharge to the right.
Ignition Key
Used to start engine. Put key in “ON” position to start.
Starter Handle
Used to manually start the engine.
Discharge Chute
Electric Starter (Optional)
The angle of the discharge chute controls the distance
that the snow is thrown. Tilt the discharge chute up for
greater distance; tilt down for less distance. Loosen
the hand knob on the side of the discharge chute to
adjust. Tilt the chute to the desired position, and
tighten the knob.
Used to start engine with a 120V power source
Plug for Electric Start (Optional)
Requires use of a two prong outdoor extension cord
and a 120V power source
7
| Categories | MTD Snow Blower Manuals, Snow Blower Manuals, Yard Machines Snow Blower Manuals |
|---|---|
| Tags | MTD 140, MTD E173, MTD Snow Blower Manual, Yard Machines 140, Yard Machines E173 |
| Download File |
|
| Document Type | Owner's Manual |
| Language | English |
| Product Brand | Yard Machines, 140, E173, Snow Blower |
| Document File Type | |
| Publisher | mtdproducts.com |
| Wikipedia's Page | MTD Products |
| Copyright | Attribution Non-commercial |
(0 votes, average: 0 out of 5)