
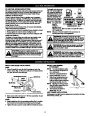

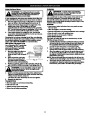


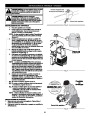
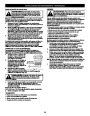


OPERATING INSTRUCTIONS
Craftsman Convertible™ Feature
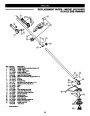
To Install Attachments
The coupler allows you to convert this unit for use with the
following add-on attachments:
NOTE: To make installation easier, place the unit on the ground
or on a workbench.
•
•
•
•
•
Cultivator
Blade Edger
Blower
Brush Cutter
Pruner
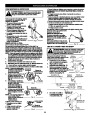
1.
2.
3.
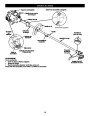
Make sure the unit is turned completely off.
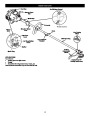
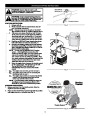
Turn the knob counterclockwise to loosen the coupler (Fig. 11).
While firmly holding the add-on, push it straight into the
coupler until the release button (Fig. 12) snaps into the
primary hole (Fig. 12). The primary hole is on the opposite
side of the coupler from the knob (Fig. 12). Align the release
button with the Guide Recess (Fig. 12) to help installation.
WARNING: To avoid serious personal injury and
damage to the unit, shut the unit off before
removing or installing add-ons.
4.
Turn the knob clockwise to tighten (Fig. 13).
CAUTION: These add-on attachments are to be
snapped into the primary hole only. Using the wrong
hole could lead to personal injury or damage to the unit.
To Remove Attachments
1.
2.
3.
4.
Make sure the unit is turned completely off.
Turn the knob counterclockwise to loosen the coupler (Fig. 11).
Press and hold the release button (Fig. 12).
While firmly holding the upper shaft housing (Fig. 13), pull
the attachment out of the coupler.
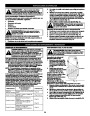
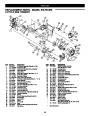
MAINTENANCE & REPAIR INSTRUCTIONS
MAINTENANCE SCHEDULE
AIR FILTER MAINTENANCE
WARNING: To prevent serious injury, never
perform maintenance or repairs with unit running.
Always service and repair a cool unit. Disconnect the
spark plug wire to ensure that the unit cannot start.
WARNING: To avoid serious personal injury,
always turn your unit off and allow it to cool before
you clean or service it.
Perform these required maintenance procedures at the frequency
stated in the table. These procedures should also be a part of any
seasonal tune-up.
NOTE: Some maintenance procedures may require special
tools or skills. If you are unsure about these procedures
take your unit to any non-road engine repair
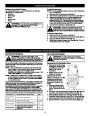
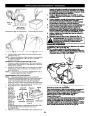
Removing the Air Filter/Muffler Cover
1.
Remove the four (4) screws
securing the air filter/muffler
cover (Fig. 14). Use a flat
blade or T20 Torx bit
screwdriver.
establishment, individual or authorized service dealer. Call
2.
Pull the cover from the
engine. Do not force.
1-800-4-MY-HOME
NOTE:
®
for more information.
Maintenance, replacement, or repair of the emission
control devices and system may be performed by a Sears
Cleaning the Air Filter
Screws
Failure to maintain your air filter
properly can result in poor
performance or can cause
permanent damage to your
engine.
or other qualified service dealer. Call 1-800-4-MY-HOME
for more information.
®
In order to assure peak performance of your engine, inspection of the
engine exhaust port may be necessary after 50 hours of operation. If
you notice lost RPM, poor performance or general lack of
acceleration, this service may be required. If you feel your engine is in
need of this inspection, refer service to a Sears or other qualified
1.
Remove air filter/muffler
cover. Refer to Removing
the Air Filter/Muffler Cover
above.
service dealer. Call 1-800-4-MY-HOME
®
for more information. DO
Fig. 14
NOT attempt to perform this process yourself as engine damage may
result from contaminants involved in the cleaning process for the port.
2.
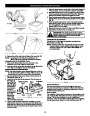
Turn cover over and look inside to locate the air filter. Remove
the air filter from inside the air filter/muffler cover (Fig. 15).
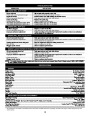
FREQUENCY
MAINTENANCE REQUIRED
Fill fuel tank with fresh fuel
Clean and re-oil air filter
SEE
p. 6
3. Wash the filter in detergent and water (Fig. 16). Rinse the filter
thoroughly. Squeeze out excess water. Allow it to dry completely.
Before starting
engine
4.
5.
Apply enough clean SAE 30 oil to lightly coat the filter (Fig. 17).
Squeeze the filter to spread and remove excess oil (Fig. 18).
Every 10 hours
Every 25 hours
p. 9 & 10
Check and clean spark arrestor
Check spark plug condition and gap
p. 10
p. 11
Inspect exhaust port and spark
arrestor screen for clogging or
obstruction
Every 50 hours
p. 10
9
| Categories | Craftsman Lawn Mower Manuals, Lawn Mower Manual |
|---|---|
| Tags | Craftsman 316.791870 |
| Download File |
|
| Document Type | Operator's Manual |
| Language | English |
| Product Brand | Craftsman. Customer Service Representatives are available by phone: Canada 1-888-225-4886 USA 1-888-384-9939, Lawn Mower |
| Document File Type | |
| Publisher | craftsman.com |
| Wikipedia's Page | Craftsman (tools) |
| Copyright | Attribution Non-commercial |
(0 votes, average: 0 out of 5)