
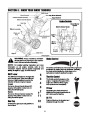


To Engage Drive
IMPORTANT: Do not release the handle and allow it to
snap back. Keep a firm hold on the starter handle and
allow it to slowly recoil.
•
Move shift lever into one of the six forward (F)
positions or two reverse (R) positions. Select a
speed appropriate for the snow conditions and a
pace you’re comfortable with.
•
As the engine warms, slowly rotate the choke
control to the OFF position. If the engine falters,
quickly rotate the choke control back to the FULL
position and then slowly into the OFF position
again.
IMPORTANT: Use the slower speeds until you are
comfortable and familiar with the operation of the snow
thrower.
Stopping The Engine
•
Squeeze the drive control against the handle the
snow thrower will move. Release it and drive
motion will stop.
•
Run engine for a few minutes before stopping to
help dry off any moisture on the engine.
To help prevent possible starter freeze-up, proceed
as follows:
•
IMPORTANT: NEVER reposition the shift lever (change
speeds or direction of travel) without first releasing the
drive control and bringing the snow thrower to a
complete stop. Doing so will result in premature wear to
the snow thrower’s drive system.
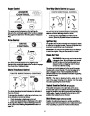
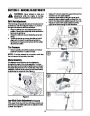
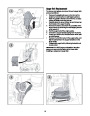
Electric Starter (on models so equipped)
1.
Connect extension cord to the electric starter outlet
on the engine, then to 120 volt AC outlet.
With the engine running, push the starter button
and allow the starter for spin for several seconds.
The noise made by the starter is normal. The
engine’s starter is not being harmed.
When disconnecting the extension cord, always
unplug the end at the three-prong wall outlet before
unplugging the opposite end from the snow
thrower.
2.
To Engage Augers
•
To engage the augers and start throwing snow,
squeeze the auger control against the left handle.
Release to stop the augers.
3.
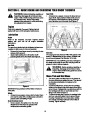
Auger Control Test
IMPORTANT: Perform the following test before
operating your snow thrower for the first time and at the
start of each winter season.
4.
5.
6.
Move throttle control to STOP position.
Remove the ignition key.
Wipe all snow and moisture from the carburetor
cover in the area of the drive control and auger
control. Also, engage and release the controls
several times.
Check the adjustment of the auger control as follows:
•
When the auger control is released and in the
disengaged “up” position, the cable should have
very little slack. It should NOT be tight.
NOTE: Keep the key in a safe place. The engine
cannot start without the ignition key.
•
In a well-ventilated area, start the snow thrower
engine as instructed earlier in this section under the
heading Starting the Engine. Make sure the throttle is
set in the FAST position.
Recoil Starter
1.
With engine running, pull starter rope with a rapid,
continuous full arm stroke three or four times.
Pulling the starter rope will produce a loud
clattering sound, which is not harmful to engine.
Move throttle control to STOP position.
Remove the ignition key.
•
•
While standing in the operator’s position (behind
the snow thrower), engage the auger.
Allow the auger to remain engaged for
approximately ten (10) seconds before releasing
the auger control. Repeat this several times.
With the throttle control in the FAST (rabbit)
position and the auger control in the disengaged
“up” position, walk to the front of the machine.
Confirm that the auger has completely stopped
rotating and shows NO signs of motion.
2.
3.
•
•
NOTE: Keep the key in a safe place. The engine
cannot start without the ignition key.
4.
Wipe all snow and moisture from the carburetor
cover in the area of the drive control and auger
control. Also, engage and release the controls
several times.
IMPORTANT: If the auger shows ANY signs of rotating,
immediately return to the operator’s position and shut
off the engine. Wait for ALL moving parts to stop before
re-adjusting the auger control.
•
•
•
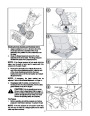
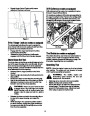
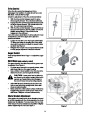
To readjust the control cable, loosen the hex jam
nut on the auger control cable “Z” fitting.
Rotate the coupling end of the cable
counterclockwise to provide more slack.
Retighten the hex jam nut. See Figure 1.
11
| Categories | MTD Snow Blower Manuals, Snow Blower Manuals |
|---|---|
| Tags | MTD 769-01276A, MTD Snow Blower Manual |
| Download File |
|
| Document Type | Owner's Manual |
| Language | English |
| Product Brand | MTD, Snow Blower |
| Document File Type | |
| Publisher | mtdproducts.com |
| Wikipedia's Page | MTD Products |
| Copyright | Attribution Non-commercial |
(0 votes, average: 0 out of 5)