


5
Blade Care
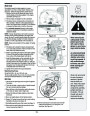
Periodically inspect the blade adapter for cracks,
especially if you strike a foreign object. Replace when
necessary. Follow the steps below for blade service:
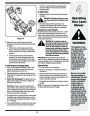
1.
Remove the bolt and the blade bell support which
hold the blade and the blade adapter to the engine
crankshaft. See Figure 13.
Maintenance
2.
3.
Remove blade and adapter from the crankshaft.
The blade may be resharpened by removing it and
either grinding or filing the cutting edge keeping as
close to the original bevel as possible. Do not attempt
to sharpen the blade while it is still on the mower.
It is extremely important that each cutting edge
receives an equal amount of grinding to prevent an
unbalanced blade.
4.
NOTE: Improper blade balance will result in excessive
vibration causing eventual damage to the engine and
mower. Be sure to carefully balance blade after sharpen-
ing. Possible damage resulting from blade unbalance
condition is not the responsibility of the manufacturer.
NOTE:balance.Always remove blade from the adapter for testing
WARNING
Figure 13
When removing the
cutting blade or belt,
protect your hands
with a pair of heavy
gloves or use a heavy
rag to hold the blade.
!
5.
The blade can be tested for balance by balancing it
on a round shaft screwdriver. Remove metal from the
heavy side until it balances evenly.
"
6
Before reassembling the blade and the blade adapter
to the unit, lubricate the engine crankshaft and the
inner surface of the blade adapter with light oil.
An unbalanced blade
will cause excessive
vibration when rotat-
ing at high speeds. It
may cause damage
to mower, and could
break causing per-
sonal injury.
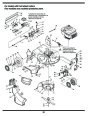
7.
Install the blade adapter on the crankshaft with the
“star” away from the engine. See Figure 13. Place
the blade with the side marked “bottom” (or with part
number) facing away from the adapter. Align the blade
bell support over the blade with the tabs in the holes
of the blade and insert the hex bolt.
8
. Tighten the hex bolt to the torque listed below:
Figure 14
Blade Mounting Torque
Center Bolt 450 in. lb. min., 600 in.lb. max.
To insure safe operation of your unit, ALL nuts and bolts
must be checked periodically for correct tightness.
We do not recommend
the use of pressure
washers or garden
hose to clean your
Belt Care
1.
2.
3.
4.
5.
theDisconnectengine. the spark plug wire and ground it against
unit. These may cause
damage to electrical
components, spindles,
pulleys, bearings, or
the engine. The use
of water will result in
shortened life and
Drain the fuel tank or place a piece of plastic beneath
the cap to prevent gasoline leakage.
Place shift lever in the first position and tip the mower
on its side. (air cleaner side of engine up).
!
Removepreviously.the blade and blade adapter as described
Move rear height adjuster to the highest position.
"
reduce serviceability.
6
. Uthesingbafflea 3/8to” stheockdeck.et remSeeoveFigurethree h13.ex screws holding
Figure 15
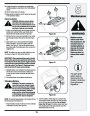
9.
Tilt the transmission forward and loosen the idler
pulley bolt and locknut ½ turn using two 7/16”
wrenches. See Figure 15.
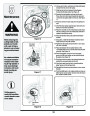
7.
8.
Pivot baffle towards the rear of the mower. See Figure 14.
Removemower housing.the hex boltSeeholdingFigure 14.the transmission to the
11
| Categories | Lawn Mower Manual, MTD Lawn Mower Manuals, Troy-Bilt Lawn Mower Manuals |
|---|---|
| Tags | MTD 900, Troy-Bilt 900 |
| Download File |
|
| Document Type | Owner's Manual |
| Language | English |
| Product Brand | MTD, Lawn Mower |
| Product Type | Walk Behind Mower |
| Document File Type | |
| Publisher | mtdproducts.com |
| Wikipedia's Page | MTD Products |
| Copyright | Attribution Non-commercial |
(0 votes, average: 0 out of 5)