
Installation Procedure
Caution: Plastic pipe threads will be damaged by the use of pipe dope or other plumbing sealants and
must be avoided. If a thread sealant is needed, use only Teflon tape or equivalent.
1.
Install a 3/4" male thread elbow Funny Pipe fitting into each lateral line female threaded tee. Tighten the fitting
by hand to a snug fit, positioning the barbs toward the intended location of the sprinkler.
Installation Tip: Placing Funny Pipe in the sun to
warm for several minutes prior to installation will soften
the plastic, making it easier to install onto the barbed
fittings.
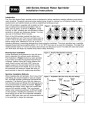
Figure 3 – Installation with Funny Pipe and Fittings
3/4"
Male Elbow
2.
3.
Install a 2' (61cm) section of Funny Pipe onto each
barbed fitting. Rock the Funny Pipe back and forth,
working it onto the fitting until all barbs are covered.
Clamping the pipe connection is not required.
At each sprinkler location, position the end of the Funny
Pipe out and away from the trench. Open the zone con-
trol valve momentarily to run water through the system,
flushing out all dirt and debris.
Funny Pipe
Shrub
Riser
Lateral Line
Note: Flushing the system thoroughly prior to
installing the sprinklers is very important. Small par-
ticles of sand and debris entering the sprinkler can stop
nozzle rotation and/or clog the nozzle orifices.
4.
5.
For Shrub sprinklers, install a 90° elbow onto one end
of the schedule 80 PVC or galvanized iron threaded
riser pipe. Install the sprinkler onto the remaining end
of the pipe. See Figure 3.
Note: Either 1/2" or 3/4" riser pipe can be used.
Install a 3/4" male thread elbow into each sprinkler body
inlet or shrub riser elbow. Tighten by hand to a snug fit.
Note: On High-Pop models, if the side inlet is used,
install the threaded pipe plug removed from the side
inlet into the bottom inlet. See Figure 3.
Pipe Plug
90° Elbow
Figure 6 – Adjust Radius
(Omni Nozzle Only)
Figure 4 – Install Arc Disk
and Nozzle (Omni Nozzle
Shown)
Cap
Adjustment Ring
Increase
Decrease
Nozzle
6.
7.
Using the same installation method as in Step 2, install
the sprinkler or shrub riser pipe fitting into the Funny
Pipe section.
Position the top of the Lawn or High-Pop sprinkler at
finish grade level. Position perimeter sprinklers approxi-
mately 2" (5cm) in from the border edge. Position the
shrub riser perpendicular to the finish grade. Backfill
and compact the soil thoroughly to maintain the sprin-
kler or riser position.
Arc Disk
Figure 5 – Watering Area
Note: Ensure the top of the sprinkler is free of dirt and
sand prior to removing or installing the nozzle.
8.
9.
Remove the debris plug (or nozzle) from the top of the
sprinkler.
Remove the desired arc disk from the tree. Note the
guide ring on the bottom of the disk. Place the disk into
the top of the sprinkler assembly with the guide ring
side facing down. Align the arc pattern opening with the
intended watering area. See Figures 4 and 5.
180° Arc Disk
10.
11.
Remove the nozzle cover. Install the nozzle into the sprinkler and tighten just until resistance is felt.
Over-tightening the nozzle can prevent it from rotating freely.
Apply water to the sprinklers and observe the spray pattern alignment and radius. Adjust pattern alignment by
either turning the sprinkler body slightly or removing the nozzle and rotating the arc disk.
Note: Use of the Omni Nozzle will allow radius adjustment as shown in Figure 6. All other Stream Rotor
nozzles have a fixed, non-adjustable radius.
©
2001 The Toro Company, Irrigation Division
Form Number 373-0036 Rev C
- 2 of 2
- « Previous
- 1
- 2
| Categories | Lawn Mower Manual, Sprinkler and Irrigation Manuals, Toro Sprinkler and Irrigation Manuals |
|---|---|
| Tags | Toro 340 |
| Download File |
|
| Document Type | Catalog |
| Language | English |
| Product Brand | Toro. Customer Service Representatives are available by phone:
Monday - Friday 7:30 a.m. to 9:00 p.m. (CDT) - Saturday 8:00 a.m. to 8:00 p.m. (CDT) - Sunday 10:00 a.m. to 8:00 p.m. (CDT)
Canada 1-888-225-4886 USA 1-888-384-9939, Lawn Mower |
| Document File Type | |
| Publisher | toro.com |
| Wikipedia's Page | Toro Company |
| Copyright | Attribution Non-commercial |
(0 votes, average: 0 out of 5)