Sentinel External Antenna Kit
Installation Instructions
WARNING
Figure 1
DO NOT INSTALL THE ANTENNA NEAR OVERHEAD POWER
WIRES – SERIOUS INJURY OR DEATH DUE TO ELECTROCUTION
CAN RESULT.
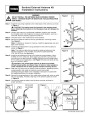
Step 1 - Install the mounting brackets to the metal base of the antenna as shown
in Figure 1.
CAUTION: The bracket must be secured to the antenna metal
base. Attaching the brackets to the fiberglass mast will damage the
antenna.
Step 2 - Position the antenna in the desired installation location and mark the
four bracket screw hole locations. Choose a sturdy location, such as a
wall stud, that can properly support the antenna.
Step 3 - Drill pilot holes in the marked screw hole locations.
Step 4 - Secure the external antenna with the provided four mounting screws.
See Figure 2.
Note: If installing on drywall or masonry, install the appropriate size and
type screw anchors.
Step 5 - Install the provided antenna surge protector to the antenna cable as
shown in Figure 3.
Note: The antenna cable that connects the external antenna to the
Sentinel controller is not provided. Use antenna cable assembly
(P/N 102-2378) for this application.
Figure 2
Step 6 - Install the provided ground lug to the antenna surge protector. Use a
6
AWG (10 mm ) solid-core, bare copper ground wire to connect the
2
ground lug to an earth ground. A copper-clad ground rod is best suited
for the earth ground application. See Figure 4. Avoid wire bends of less
than 12" (30.5cm) radius.
Important: The ground path must be as direct as possible,
without sharp bends, and should have 10 ohms or less resistance
(when measured with an earth ground resistance testing device).
Step 7 - Slide the vinyl boot over the antenna lead connection. Weatherproof the
surge protector and cable connections using the provided
weatherproofing kit. Refer to the installation instructions included with
the weatherproofing kit for proper installation.
Step 8 - Secure the surge protector to the metal antenna base with wires or cable
ties (not provided). Provide a drip loop in the antenna cable as shown
in Figure 4.
Step 9 - Connect the antenna cable to the Sentinel controller and test for
proper operation.
Figure 3
Antenna Cable
P/N 102-2378
(Not Provided)
Figure 4
Finished Grade
Antenna Surge
Protector
12"
(30.5cm)
(Provided in the kit.)
Drip Loop
©
2002 The Toro Company, Irrigation Division
Form Number 373-0212 Rev. A
| Categories | Lawn Mower Manual, Sprinkler and Irrigation Manuals, Toro Sprinkler and Irrigation Manuals |
|---|---|
| Download File |
|
| Document Type | Catalog |
| Language | English |
| Product Brand | Toro. Customer Service Representatives are available by phone:
Monday - Friday 7:30 a.m. to 9:00 p.m. (CDT) - Saturday 8:00 a.m. to 8:00 p.m. (CDT) - Sunday 10:00 a.m. to 8:00 p.m. (CDT)
Canada 1-888-225-4886 USA 1-888-384-9939, Lawn Mower |
| Document File Type | |
| Publisher | toro.com |
| Wikipedia's Page | Toro Company |
| Copyright | Attribution Non-commercial |
(0 votes, average: 0 out of 5)