Weather-Resistant Controller Cabinet
Model GK212-CAB-01
Installation Instructions
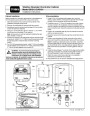
Cabinet Installation
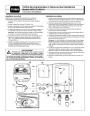
Wiring Installation
Select a location for controller cabinet which is accessible to a
VAC power source and 24 VAC valve control wires.
1. Using #12 or #14 insulated solid copper wire, route hot
(black), neutral (white), and equipment ground wires through
conduit (F) from the power source into the cabinet.
120
1.
Open the cabinet cover and remove the contents of the
installation package stored inside.
2. Carefully remove ⁄2" (13mm) of insulation from ends of wires.
1
To secure wires to AC receptacle, insert the neutral (white)
wire into a bottom connection port and the hot (black) wire into
a top connection port. Secure the ground wire to green ground
screw.
2.
3.
Remove mounting plate (A) secured with four screws.
Carefully remove the wiring knockout plugs (C) from bottom
or back of cabinet as required.
4.
Using a ⁄ " (7mm) drill bit or punch, remove 1, 2, or 3 lower
3
16
mounting screw hole plugs (D) as required.
3.
4.
5.
Position AC receptacle plate (B) into the cabinet and secure
with four screws as shown.
Note: Screw anchors must be installed if installing the cabi-
net to drywall or masonry.
Route the valve control wires through the conduit (G) into the
cabinet.
5.
6.
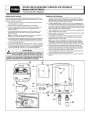
Position the cabinet on the wall positioning the keyhole slot (E)
1
at eye level. Install #10 x 1 ⁄ " (38mm) wood screws (provided)
2
through top portion of keyhole slot and lower mounting
hole(s).
Position mounting plate (A) while routing the valve control
wires out through the slots provided. Secure with four screws.
Note: If installing an alternate brand of controller, install the
mounting plate with the reverse (smooth) side facing out. Fas-
ten the controller to the mounting plate as required. Several
pilot screw holes are provided in mounting plate for this pur-
pose.
For 120 VAC power/ground wires, install
conduit adapter and conduit (F). For valve control wires install
⁄4" (19mm) conduit adapters and conduit (G).
1
⁄ " (13mm) threaded
2
3
6.
7.
Install the GreenKeeper controller (H) by aligning the slotted
TM
openings on the back of controller housing with the tabs on
the mounting plate. Lower controller on tabs to engage.
WARNING: To prevent electrical shock hazard,
disconnect power source by switching off circuit
breaker or removing fuse prior to making any wire
connections. Do not apply power until installation
has been completed. All installation materials and procedures
must comply with applicable electric codes.
Attach the valve control wires referring to the installation
instructions provided with the controller,
8. Plug transformer (I) into the AC receptacle and apply power.
+
ON
Next
–
OFF
TM
AC Receptacle Wiring Detail
Hot (Black)
Ground
Neutral (White)
©
1999 The Toro Company, Irrigation Division
Form No. 373-0086 Rev. A
| Categories | Sprinkler and Irrigation Manuals, Toro Sprinkler and Irrigation Manuals |
|---|---|
| Tags | Toro GK212 |
| Download File |
|
| Language | English |
| Product Brand | Toro. Customer Service Representatives are available by phone:
Monday - Friday 7:30 a.m. to 9:00 p.m. (CDT) - Saturday 8:00 a.m. to 8:00 p.m. (CDT) - Sunday 10:00 a.m. to 8:00 p.m. (CDT)
Canada 1-888-225-4886 USA 1-888-384-9939 |
| Document File Type | |
| Publisher | toro.com |
| Wikipedia's Page | Toro Company |
| Copyright | Attribution Non-commercial |
(1 votes, average: 3 out of 3)
Lawn and Garden readers have rated Toro Weather Resistant Controller Cabinet Model GK212 CAB 01 Sprinkler Irrigation Owners Manual 3.0 out of 3.0 based on 1 product reviews. trying to locate the gk212-cab-01, to replace mine, which is falling apart.........PLEASE HELP ME FIND ONE !!! THANKS
Bill