


5
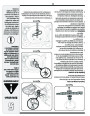
7.
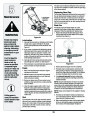
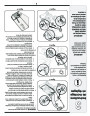
Install the blade adapter on the crankshaft with the
“star” away from the engine. See Figure 5-2. Place
the blade with the side marked “bottom” (or with part
number) facing away from the adapter. Align the blade
bell support over the blade with the tabs in the holes
of the blade and insert the hex bolt.
8.
Tighten the hex bolt to the torque listed below:
Maintenance
Blade Mounting Torque
Center Bolt 450 in. lb. min., 600 in.lb. max.
To insure safe operation of your unit, ALL nuts and bolts
must be checked periodically for correct tightness.
Belt Care
1.
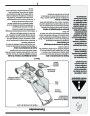
Remove two shoulder screws securing front drive cover
to mower deck. See Figure 5-3. Press inward on sides
of front drive cover and release tabs that secure it to
the height adjuster brackets. Remove drive cover from
mower.
WARNING
Figure 5-3
Figure 5-4
Figure 5-5
2.
3.
Loosen screw holding belt tension spring to transmission.
See Figure 5-3 inset. Do not remove screw completely.
As you loosen it, tension on the belt will be released.
When removing the
cutting blade or belt,
protect your hands
with a pair of heavy
gloves or use a heavy
rag to hold the blade.
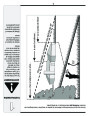
Tip mower on its side with the air filter up to access belt
from underside of mower and remove blade as described
in the previous section. Refer to Figure 5-3.
4.
5.
Pressfrom theinwardbaffleonbracket.tab on Seethe engineFigurebaffle5-4. to release it
Slide belt off of engine pulley and thread through the
An unbalanced blade
will cause excessive
vibration when rotat-
ing at high speeds. It
may cause damage
to mower, and could
break causing per-
sonal injury.
opening in the deck. See Figure 5-5.
NOTE: When removing belt on units with a 25mm adapter,
the pulleys and washers may also break free from the
crankshaft. Be sure to make note of the orientation of these
items for reassembly.
6.
Replace with new belt, making sure belt is firmly seated
on engine pulley while pulling from the other side and
sliding it around the transmission pulley.
7.
Reattach engine baffle and reassemble blade as
described in the previous section.
8.
Turn mower back over and make sure belt is seated on
the transmission pulley. Pivot the belt keeper wire back
into its operating position and snap into the slot provided.
We do not recommend
the use of pressure
washers or garden
hose to clean your
9.
10.
Reassemble front drive cover.
Tighten screw loosened earlier to secure belt tension
spring to the transmission. Reassemble front drive cover.
unit. These may cause
damage to electrical
components, spindles,
pulleys, bearings, or
the engine. The use
of water will result in
shortened life and
Off-Season Storage
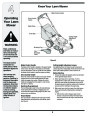
The following steps should be taken to prepare your lawn
mower for storage.
1.
2.
3.
4.
5.
Cleanthe lubricationand lubricateinstructions.mower thoroughly as described in
Weor gardendo nothoserecommendto cleantheyouruseunit.of a pressure washer
reduce serviceability.
Refer to engine manual for correct engine
storage instructions.
NOTE: When storing any type of power equipment in
a poorly ventilated or metal storage shed, care should
be taken to rust-proof the equipment. Using a light oil or
silicone, coat the equipment, especially cables and all
moving parts of your lawn mower before storage.
Coat mower’s cutting blade with chassis grease to
prevent rusting.
Store mower in a dry, clean area. Do not store next to
corrosive materials, such as fertilizer.
11
| Categories | Lawn Mower Manual, MTD Lawn Mower Manuals, Yard Machines Lawn Mower Manuals, Yard Man Lawn Mower Manuals |
|---|---|
| Tags | MTD 500, Yard Man 500 |
| Download File |
|
| Document Type | Owner's Manual |
| Language | English |
| Product Brand | Lawn Mower, Yard-Man, 500 Series |
| Product Type | Walk Behind Mower |
| Document File Type | |
| Publisher | mtdproducts.com |
| Wikipedia's Page | MTD Products |
| Copyright | Attribution Non-commercial |
(0 votes, average: 0 out of 5)