
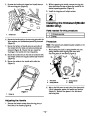


Servicing the Bedbar
5.
Tighten the spring tension nut until the spring is
collapsed, then back it off 1/2 turn.
Removing the Bedbar
6. Adjust the bedbar; refer to Adjusting the Bedknife
to the Reel.
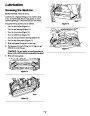
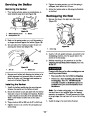
1.
Turn bedbar adjuster screw, counterclockwise, to
back bedknife away from reel (Figure 48).
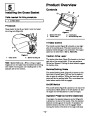
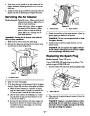
Backlapping the Reel
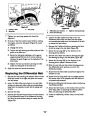
1.
Remove the plug in the right reel drive cover
(Figure 50).
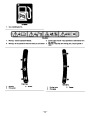
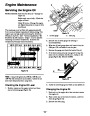
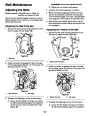
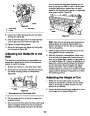
Figure 48
1.
Bedbar adjusting screw
Spring tension nut
3. Bedbar
2.
2.
Back out the spring tension nut, until the washer is
no longer tensioned against the bedbar (Figure 48).
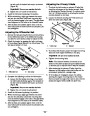
3.
On each side of the machine, loosen the jam nut
securing the bedbar bolt (Figure 49).
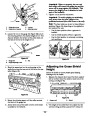
Figure 50
1.
Cover plug
2.
3.
Insert a 1/2 inch socket extension, connected to the
backlapping machine, into the square hole in the
center of the reel pulley.
Backlap according to the procedure in the Toro
Sharpening Reel and Rotary Mowers Manual, Form No.
80-300
PT.
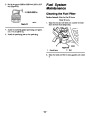
Figure 49
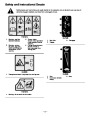
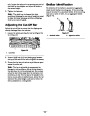
DANGER
1.
Jam nut
2. Bedbar bolt
Contact with the reel or other moving parts can
result in personal injury.
4.
Remove each bedbar bolt allowing the bedbar to be
pulled downward and removed from the machine.
Save the 2 nylon and 2 stamped steel washers on
each end of bedbar (Figure 49).
•
•
Stay away from the reel while backlapping.
Never use a short handled paint brush for
backlapping. Part No. 29-9100 Handle
assembly complete or individual parts are
available from your local Authorized Toro
Distributor.
Installing the Bedbar
1.
Install the bedbar, positioning the mounting ears
between the washer and the bedbar adjuster.
Note: For a better cutting edge, run a file across
the front face of the bedknife when the lapping
operation is completed. This will remove any burrs
or rough edges that may have built up on the cutting
edge.
2.
Secure the bedbar to each side plate with the bedbar
bolts (jam nuts on the bolts) and 8 washers. Position
a nylon washer on each side of the side plate boss.
Place a steel washer outside each of the nylon
washers.
4.
Install the plug in the cover when finished.
3.
4.
Torque bolts to 240 to 320 inch-lb (27 to 36 N-m).
Tighten the jam nuts until the thrust washers just
rotate freely.
32
| Categories | Lawn Mower Manual, Toro Lawn Mower Manual |
|---|---|
| Tags | Toro 04052, Toro 04060, Toro Greensmaster 1000, Toro Greensmaster 1600 |
| Model Year | 2011 |
| Download File |
|
| Document Type | Operator's Manual |
| Language | English |
| Product Brand | Toro. Customer Service Representatives are available by phone:
Monday - Friday 7:30 a.m. to 9:00 p.m. (CDT) - Saturday 8:00 a.m. to 8:00 p.m. (CDT) - Sunday 10:00 a.m. to 8:00 p.m. (CDT)
Canada 1-888-225-4886 USA 1-888-384-9939, Lawn Mower |
| Document File Type | |
| Publisher | toro.com |
| Wikipedia's Page | Toro Company |
| Copyright | Attribution Non-commercial |
(0 votes, average: 0 out of 5)