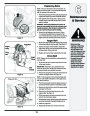


5
WARNING: Do not over-tighten the
cable. Over-tightening may prevent the
auger from disengaging and compro-
mise the safety of the snow thrower.
Operating Tips
•
•
•
Forimmediatelymost efficientafter itsnowfalls.removal, remove snow
Dischargeoverlap eachsnowpreviousdownwindpath.whenever possible. Slightly
Set the skid shoes 1/4-inch below the shave plate
for normal usage. The skid shoes may be adjusted
upward for hard-packed snow.
NOTE: It is not recommended that you operate this snow
thrower on gravel as loose gravel can be easily picked up
and thrown by the auger causing personal injury and/or
damage to the snow thrower.
If for some reason, you have to operate the snow
thrower on gravel, keep the skid shoe in the highest
position for maximum clearance between the ground
and the shave plate.
2.
In a well-ventilated area, start the snow thrower
engine as instructed earlier in this section under the
heading Starting Engine. Make sure the throttle is set
in the FAST position.
Operation
3.
4.
While standing in the operator’s position (behind the
snow thrower) engage the auger.
Allow the auger to remain engaged for approximately
10
seconds before releasing the auger control. Repeat
this several times.
•
5.
6.
With the engine running in the FAST position and the
auger control in the disengaged “up” position, walk to
the front of the machine.
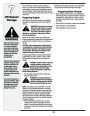
WARNING
Do not over-tighten the
cable. This may prevent the
auger from disengaging
and compromise
Confirm that the auger has completely stopped
•
Clean the snow thrower thoroughly after each use.
rotating and shows NO signs of motion.
IMPORTANT: If the auger shows ANY signs of rotating,
immediately return to the operator’s position and shut
off the engine. Wait for all moving parts to stop before
readjusting the auger control cable as shown in the
“Setup and Adjustment” section.
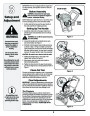
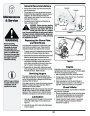
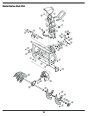
Cleaning The Chute Assembly
The clean-out tool is conveniently fastened to the rear of
the auger housing with a mounting clip. When snow and
ice collect in the chute assembly during operation, use
this tool to safely clean the chute and chute opening.
the safety of the snow
thrower.
Stop engine by moving
throttle lever to stop posi-
tion and wait for all moving
parts to stop before using
the clean-out tool.
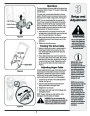
Clearing The Snow
WARNING: Stop engine by moving
throttle lever to stop position and wait
for all moving parts to stop before using
the clean-out tool.
Release both auger and drive controls.
2. Stopposition.the engine by moving throttle lever to stop
3. itRemoveto the rearthe ofclean-outthe augertoolhousing.from the clip which secures
4. Use the shovel-shaped end of the clean-out tool to
dislodge and scoop any snow and ice which has
formed in and near the chute assembly.
WARNING: Never use your hands to
clean snow and ice from the chute
assembly or auger housing.
CAUTION: Check the area to be cleared for foreign
objects. Remove, if any.
1
2.
. Start the engine following starting instructions.
1.
Allow the engine to warm up for a few minutes as
the engine will not develop full power until it reaches
operating temperature.
Never use your hands to
clean snow and ice from
the chute assembly or
auger housing.
3.
4.
Rotate the chute assembly to the desired direction,
away from bystanders and/or buildings.
Making certain no bystanders or obstacles are in
front of the unit, squeeze the auger control completely
against the upper handle to fully engage the augers.
When preparing to clear
snow, be sure to check
the area to be cleared for
foreign objects. Remove
objects, if any.
5.
6.
7.
While the auger control is engaged, squeeze the drive
control completely against the upper handle to engage
the wheels. Do not “feather” the drive control.
As the snow thrower begins to move, maintain a firm
hold on the handle, and guide the snow thrower along
the path to be cleared.
5. Refastenrear of thetheaugerclean-outhousing.tool to the mounting clip on the
Release the auger and drive controls to stop the snow
throwing action and forward motion.
NOTE: Your unit is equipped with a clutch in the transmis-
sion. If the wheels stop turning while trying to discharge
large volumes of snow, immediately disengage the drive
control and allow the rotating augers to discharge snow
from the housing. Reduce the clearing width and continue
operation.
8.
On each succeeding pass, readjust the chute
assembly to the desired position and slightly overlap
the previously cleared path.
11
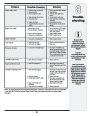
| Categories | MTD Snow Blower Manuals, Snow Blower Manuals |
|---|---|
| Tags | MTD 3AA, MTD 3CA, MTD Snow Blower Manual |
| Download File |
|
| Document Type | Owner's Manual |
| Language | English |
| Product Brand | MTD, Snow Blower |
| Document File Type | |
| Publisher | mtdproducts.com |
| Wikipedia's Page | MTD Products |
| Copyright | Attribution Non-commercial |
(0 votes, average: 0 out of 5)