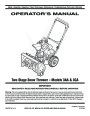


3
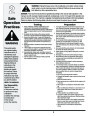
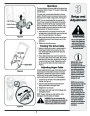
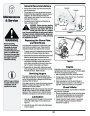
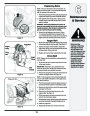
Skid Shoe
The space between the shave plate and the ground can
be adjusted. Refer to Figure 7 for location of shave plate
and skid shoes.
For close snow removal, place skid shoes in the low
position. When the area to be cleared is uneven, place
skid shoes in the middle or high position. See Figure 4.
NOTE: It is not recommended that you operate this
snow thrower on gravel as loose gravel can be easily
picked up and thrown by the auger causing personal
injury or damage to the snow thrower. However, if you
have to operate it on gravel, keep the skid shoe in the
highest position for maximum clearance.
Setup and
Adjustment
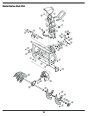
High Position
Middle Position
Low Position
1.
Adjust skid shoes by loosening two hex nuts and
carriage bolts on each skid shoe, and move the skid
shoe to the desired position. See Figure 4.
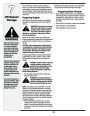
WARNING
Do not over-tighten the
cable. Over-tightening
may prevent the auger
from disengaging and
compromise the safety of
the snow thrower.
Figure 4
2. Make certain the entire bottom surface of skid shoe
is against the ground to avoid uneven wear on the
skid shoes.
3.
Tighten nuts and bolts securely.
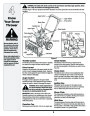
Routing The Drive Cable
1.
Make sure that the drive cable is routed parallel to
the left upper handle, then across the top of the
lower handle and finally parallel to the right lower
handle. See Figure 5.
Drive Cable
2.
Three cable ties have been used to loosely tie the
two control cables to the lower handle. Two of these
cable ties are on each arm, and the third on the top
cross bar of the lower handle. Tighten these cable
ties to secure the cable to the lower handle. See
Figure 5.
Cable Ties
IMPORTANT: Check
the adjustments as
Auger Cable
instructed and make any
final adjustments neces-
sary before operating
the unit. Check all nuts
and bolts for tightness.
Failure to follow these
instructions may cause
damage to unit.
Adjusting Auger Cable
Periodic adjustment to the auger control cable may be
required due to normal stretch and wear on the belt.
Adjustment is needed if the augers seem to hesitate
while turning, but the engine maintains speed, or
continue turning with the auger control disengaged.
Figure 5
1.
Loosen the rear hex bolt on the cable adjustment
bracket. See Figure 6.
NOTE: It is not recom-
mended that you operate
this snow thrower on
gravel as loose gravel
can be easily picked
up and thrown by the
auger causing personal
injury or damage to the
snow thrower. However,
if you have to operate
it on gravel, keep the
skid shoe in the highest
position for maximum
clearance.
2
. Slide the cable adjustment bracket backwards
taking out the slack in the auger cable.
3.
4.
Retighten the rear hex bolt.
Start engine and verify auger control engages and
disengages properly.
NOTE: If auger continues to rotate with the control
disengaged, shut off engine and readjust.
WARNING: Do not over-tighten the
cable. Over-tightening may prevent the
auger from disengaging and compro-
mise the safety of the snow thrower.
Figure 6
7
| Categories | MTD Snow Blower Manuals, Snow Blower Manuals |
|---|---|
| Tags | MTD 3AA, MTD 3CA, MTD Snow Blower Manual |
| Download File |
|
| Document Type | Owner's Manual |
| Language | English |
| Product Brand | MTD, Snow Blower |
| Document File Type | |
| Publisher | mtdproducts.com |
| Wikipedia's Page | MTD Products |
| Copyright | Attribution Non-commercial |
(0 votes, average: 0 out of 5)