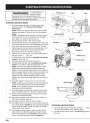


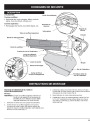


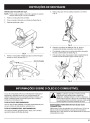


STARTING/STOPPING INSTRUCTIONS
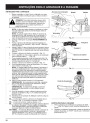
WARNING: Topersonalavoid seriousinjury,
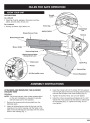
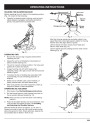
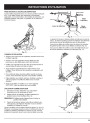
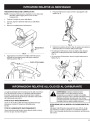
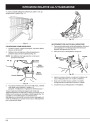
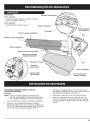
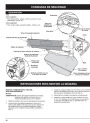
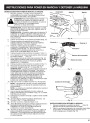
Throttle Lever
Idle
Fast
always remove the vacuum bag prior to
refueling the unit. The bag may become a fire
hazard when saturated with petrol.
STARTING INSTRUCTIONS
1.
Mix petrol (gasoline) with oil. Fill petrol tank with
petrol/oil mixture. See Oil and Petrol Mixing
Instructions.
NOTE: Before you start the unit, put on the shoulder
harness and adjust it, but don’t clip it to the support
fitting.
Ignition Switch
Position 1
NOTE: The throttle control will remain in the position
it’s placed until moved. Fast position is to the right.
Also, there is no need to turn the unit on.
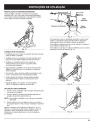
Put the Ignition Switch in the ON (I) position.
Set the blower/vacuum mode change-over lever to the
up position (Blower Mode). See Operating as a Blower.
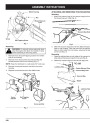
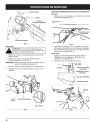
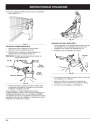
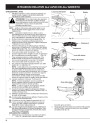
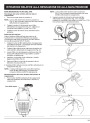
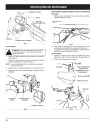
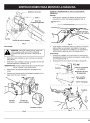
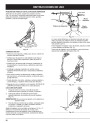
Fully press and release primer bulb slowly 10 times.
Petrol should be felt and visible in the bulb (Fig. 11). If
petrol hasn’t entered the bulb, press until it does.
Place the choke lever in Position 1 (Fig. 11).
Fig. 10
2.
3.
Position 3
4.
Position 2
5.
6.
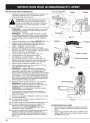
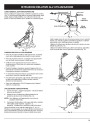
With the unit on the ground, move the throttle lever to
the fast position (
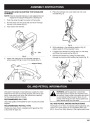
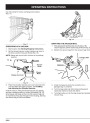
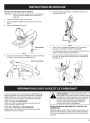
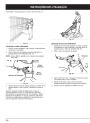
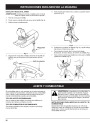
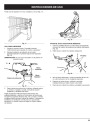
Pull the starter rope out with a controlled and steady
motion 5 times (Fig. 12).
) (Fig. 10).
Choke Lever
Primer Bulb
7.
8.
9.
Place the choke lever in Position 2 (Fig. 11).
Pull the starter rope out with a controlled and steady
motion 1 to 5 times to start the engine (Fig. 12).
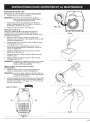
NOTE: The unit uses Spring Assist Starting™, which
significantly reduces the effort required to start the
engine. You must pull the starter rope out far enough to
hear the engine attempt to start. There is no need to pull
the rope briskly-- there is no harsh resistance when
pulling. Be aware that this starting method is vastly
different from (and much easier than) what you may be
used to.
Fig. 11
10.
Allow the engine to warm up for 15 to 30 seconds.
NOTE: Engine may take longer to warm up and reach
maximum operating speed at colder temperatures.
NOTE: Unit is properly warmed up when engine
accelerates without hesitation.
Starter Rope
11.
12.
Once the engine is warmed up, place the blue choke
lever in Position 3 (Fig. 11). The unit is ready for use.
Stand in the operating position and clip the shoulder
harness to the support fitting.
IF... the engine hesitates, return choke lever to Position 2
(Fig. 7) and continue warm up.
IF... the engine does not start, go back to step 4.
IF... the engine fails to start after a few attempts, place the
blue choke lever in Position 3 and squeeze the throttle
control. Pull the starter rope 3 to 8 times. The engine
should start. If not, repeat.
IF... the engine is already warm, make sure the On/Off
Stop control is in the ON position and start the unit
with the blue choke lever in Position 2. After the unit
starts, move the blue choke lever to Position 3.
Fig. 12
STOPPING INSTRUCTIONS
1.
Move the throttle lever to the idle position (
Allow the engine to cool down by idling.
Put the ignition switch down in the STOP [O] position
) (Fig.
10).
2.
(Fig. 10).
GB8
| Categories | Blower Vacuum and Sweeper Manuals, Lawn Mower Manual, MTD Blower and Vacuum Manuals, MTD Lawn Mower Manuals |
|---|---|
| Tags | MTD BV3100 |
| Download File |
|
| Document Type | Owner's Manual |
| Language | English |
| Product Brand | MTD, Lawn Mower |
| Product Type | Walk Behind Mower |
| Document File Type | |
| Publisher | mtdproducts.com |
| Wikipedia's Page | MTD Products |
| Copyright | Attribution Non-commercial |
(1 votes, average: 4 out of 4)
Lawn and Garden readers have rated MTD BV3100 2 Cycle Mulching Blower Vacuum Owners Manual 4.0 out of 4.0 based on 1 product reviews. have just purchased one seconhand so I need this manual to see how it works. Also need to know about how to maintain it to proform as intended also including how to serviceit.