


•
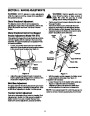
Loosen the jam nut on the traction control cable
(located opposite the auger control cable) and
UNTHREAD the cable one full turn.
Recheck the adjustment.
Retighten the jam nut to secure the cable when the
correct adjustment is reached.
•
•
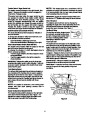
Loosen, but do NOT remove, the three hex nuts
which fasten the skid shoe to the auger housing.
Move the skid shoe to the desired position.
•
•
NOTE: Make certain the entire bottom surface of the
skidshoe is against the ground to avoid uneven wear on
the skid shoes.
If the machine can be moved freely both forward and
rearward with the traction control fully depressed,
proceed as follows:
•
•
Retighten the hex nuts loosened earlier.
Repeat this adjustment on the skid shoe found on
the opposite side of the snow thrower.
•
•
•
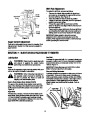
Loosen the jam nut on the traction drive cable and
THREAD the cable in one full turn.
Recheck the adjustment and repeat the adjustment
as necessary.
Retighten the jam nut to secure the cable when the
correct adjustment is reached.
NOTE: The skid shoes are reversible on this machine.
When one side wears out, it can be rotated 180° and
the other flat skid surface can be used.
NOTE: If you are uncertain that you have reached the
correct adjustment, refer to the Traction Control
Adjustment in the previous column.
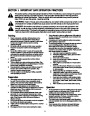
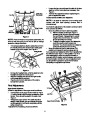
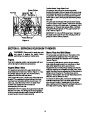
Skid Shoe Adjustment
The space between the shave plate and the ground can
be adjusted by repositioning the skid shoes found on
either side of the snow throwers auger housing. For
smooth surface snow removal such as on an asphalt
driveway, place the skid shoes in a lower position. Use
a higher position when the area to be cleared is
uneven. See Figure 6.
Shave Plate
Carriage Bolts
IMPORTANT: When operating your snow thrower on a
gravel driveway, ALWAYS adjust the skid shoes into
the HIGHEST position.
Skid Shoes
High
Low
Hex Nuts
Figure 6
Adjust skid shoes as follows:
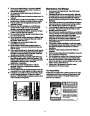
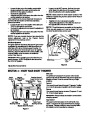
SECTION4: KNOWYOURSNOWTHROWER
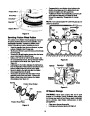
Shift Lever
The shift lever is located in the center of the handle
panel and is used to determine both ground speed and
direction of travel. It can be moved into any of eight
positions.
Auger
Control Chute-Rotation
Electric
Traction Control /
Auger Control Lock
Switch
Heated Handles
Switch
Forward
Your snow thrower has six forward (F) speeds. Position
one (1) is the slowest and position six (6) is the fastest.
Handles
Reverse
Your snow thrower has two reverse (R) speeds. R1 and
R2, R2 is the faster speed.
Shift
Lever
IMPORTANT: Always release the traction control before
changing speeds.
Auger Control
Chute
Tilt
Control
The auger control is located on the left handle. See
Figure 7. Squeeze the auger control lever to engage
the augers. Release to stop the snow throwing action
(the traction control must also be released).
Left Track
Steering Control
Right Track
Steering Control
Model 926 STE shown
Figure 7
7
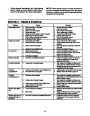
| Categories | Cub Cadet Snow Blower Manuals, MTD Snow Blower Manuals, Snow Blower Manuals |
|---|---|
| Tags | Cub Cadet 724 STE, Cub Cadet 926 STE, MTD 724 STE, MTD 926 STE, MTD Snow Blower Manual |
| Download File |
|
| Document Type | Owner's Manual |
| Language | English |
| Product Brand | MTD, Snow Blower |
| Document File Type | |
| Publisher | mtdproducts.com |
| Wikipedia's Page | MTD Products |
| Copyright | Attribution Non-commercial |
(0 votes, average: 0 out of 5)