

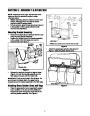

Attaching Blades
•
Remount the cutting deck following instructions in
the owner’s manual of the tractor.
WARNING: Always protect your hands while
servicing blades by wearing heavy work gloves
or using heavy rags.
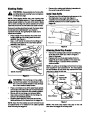
Install Deck Baffle
•
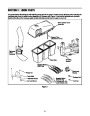
Remove two of the self-tapping deck screws on the
front right side of your deck. See Figure 6.
Install the front deck baffle using two hex nuts,
belleville washers and hex bolts supplied in this
bagger kit.
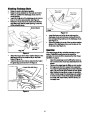
NOTE: Three bagging blades with a star mounting hole
are included in the grass catcher kit. These will replace the
blades already installed on the deck of the tractor. Blades
with a round mounting hole will be included with all Cub
Cadet kits and are for use with select Cub Cadet mowers.
•
Remove the cutting deck from beneath the tractor (refer
to instructions for Deck Removal in your tractor’s
operator’s manual), then gently flip the deck over to
expose its underside.
Hex Nut
•
Place a block of wood between the center deck
housing baffle and the cutting blade to act as a
stabilizer. See Figure 5.
Deck Baffle
•
Use a 1-1/8" wrench to remove the hex flange nut
that secures the blade to the outer blade spindle
assembly. See Figure 5.
Washer
Hex Bolt
Figure 6
Hex Flange Nut
Wood Block
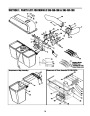
Attaching Chute Stop Bracket
•
Remove the carriage bolt and lock nut holding the
chute stop to the deck. See Inset A of Figure 7.
Save the hardware.
•
Replace with new chute stop bracket, from the
bagger kit, at the same position on the deck. See
Inset B of Figure 7. Secure with the hardware
removed earlier.
NOTE: An extra set of carriage bolt and lock nut have
been supplied in your accessory kit. You may replace
the old hardware for the chute stop bracket with these
new ones, or save for later use.
Spindle Assembly
Figure 5
Lock Nut
Remove this
chute stop
WARNING: The hex flange nut has a right-
handed thread pattern. Do not attempt to force
the nut in an incorrect direction; it may damage
the nut and create a safety hazard.
Carriage Bolt
A
B
Install this
chute stop
•
•
•
Place a new blade on top of the outer blade spindle
so that side of the blade with part number faces the
ground when the mower is in the operating position.
Secure with the hex flange nut removed earlier.
Use a torque wrench to tighten the hex flange nut
between 70 to 90 foot-pounds.
Deck
Chute Deflector
Replace blades from the other outer and center
blade spindles with the blades from the bagger kit.
Figure 7
NOTE: Save the three blades you just removed to use
as replacements or to reinstall on the blade spindles
when not using the bagger kit
NOTE: This chute stop bracket may stay on the unit
even when the bagger is not being used.
8
| Categories | Lawn Mower Manual, MTD Lawn Mower Manuals, Troy-Bilt Lawn Mower Manuals |
|---|---|
| Tags | MTD 100, MTD 190, MTD 192, Troy-Bilt 100, Troy-Bilt 190, Troy-Bilt 192 |
| Download File |
|
| Document Type | Owner's Manual |
| Language | English |
| Product Brand | MTD, Lawn Mower |
| Product Type | Walk Behind Mower |
| Document File Type | |
| Publisher | mtdproducts.com |
| Wikipedia's Page | MTD Products |
| Copyright | Attribution Non-commercial |
(0 votes, average: 0 out of 5)