


Controls & Operation
OPERATING THE SNOWTHROWER
OFF-SEASON STORAGE
Before you store your snowthrower for the off-season,
read the Maintenance and Storage instructions in the
Safety Rules section and take the following precautions:
Before operating snowthrower, review the Checks Before
Each Use under General Operation on page 8 of this
manual.
NOTE: Gasoline, if permitted to stand unused for extend-
ed periods (30 days or longer), may develop gummy
deposits which can adversely affect the engine carbure-
tor and cause engine malfunction. To avoid this condi-
tion, add Simplicity Gasoline Stabilizer to the fuel tank, or
drain all fuel from the system before placing unit in stor-
age.
1.
2.
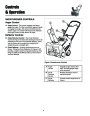
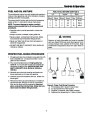
Rotate the discharge chute to the desired direction.
Pull the Auger Control back against the handle to
engage the auger.
NOTE: The snow thrower will be pulled forward by
the auger when the auger contacts the ground or with
the snow to be thrown.
1.
2.
3.
Prepare your snowthrower engine for storage as
instructed in the Engine Owner’s Manual.
3.
4.
Begin snow removal by clearing a path down the cen-
ter of walk or driveway, then gradually widen path,
throwing snow off to both sides.
Lubricate the snowthrower as described in the
LUBRICATION section of this manual.
Release the Auger Control to stop both the auger
and the forward motion of the snowthrower.
Clean the snowthrower thoroughly. Coat exposed
bare metal parts with a quality paint (available from
you dealer) or a light film of grease, oil or automotive
wax.
WARNING
Do not use snow thrower on surfaces above ground
level, such as the roof of a building.
4. Store snowthrower in the wheels down, operating
position. Note: If the unit is stored in any other posi-
tion, fluids may leak.
SNOWTHROWING TIPS
5. Store the unit in a protected area and cover.
STARTING AFTER STORAGE
Varying snow conditions will affect performance of
snow thrower. The snow thrower should be allowed to
move into the snow at it's own pace.
1. Remove the spark plug and wipe dry. Then reinstall
plug.
Wet, heavy snow — When clearing wet, heavy snow,
the forward movement of the snowthrower may have to
be slowed by pushing down on handle while allowing
engine to operate at full throttle.
2. Fill fuel tank with fresh gasoline (unless a fuel stabi-
lizer was used).
3. Check to be sure engine fins are clean and air flow is
unobstructed.
Do not operate on gravel or crushed rock surfaces.
Avoid picking up this type of material with auger since
damage to unit could result and particles can be dis-
charged with considerable force that could cause serious
injury.
4. Start the engine outdoors. Warm up engine by run-
ning at SLOW speed for a a few minutes before run-
ning at FAST speed, or blowing snow.
5.
Check the operation of all the controls. If necessary,
lubricate the snowthrower to improve operation of the
chute control.
Always be alert to hidden hazards that might be struck
by the auger. Should a foreign object be struck by the
auger, immediately stop the engine and inspect machine
for any damage. Repair damage before continuing oper-
ation.
AFTER EACH USE
Allow snow thrower to run a few minutes after clearing
snow to reduce the likelihood of parts freezing while
machine is not is use.
If you will be storing the unit for the season, see the
STORAGE section for instructions on properly preparing
the unit for long-term storage.
11
| Categories | Simplicity Snow Blower Manuals, Snow Blower Manuals |
|---|---|
| Tags | Simplicity 1692917, Simplicity 1692918, Simplicity 1692977, Simplicity 1692978, Simplicity 1692979, Simplicity 1692980, Simplicity 1692981, Simplicity 1692984, Simplicity 1692985, Simplicity 1692986, Simplicity 1692991, Simplicity 1692992, Simplicity 1693166, Simplicity 520 |
| Download File |
|
| Document Type | Owner's Manual |
| Language | English |
| Product Brand | Simplicity, Snow Blower |
| Document File Type | |
| Publisher | simplicitymfg.com |
| Wikipedia's Page | Simplicity Outdoor |
| Copyright | Attribution Non-commercial |
(0 votes, average: 0 out of 5)