


3
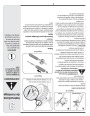
IMPORTANT: The snow thrower is shipped with oil and
WITHOUT GASOLINE. After assembly, refer to separate
engine manual for proper fuel and engine oil recom-
mendations.
Loose Parts
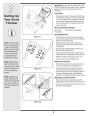
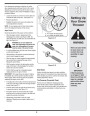
Setting Up
Your Snow
Thrower
•
The augers are secured to the auger shaft with shear
pins and bow tie cotter pins. If you hit a foreign object
or ice jam, the snow thrower is designed so that the
pins may shear. Replacement shear pins and cotter
pins are provided for your convenience. Store these
safely until needed.
Items Required For Assembly
Pair of pliers
7/16” Wrenches or adjustables
Fresh gasoline
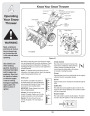
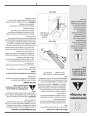
Assembling Handle
•
Look at the lower rear of the snow thrower frame to
be sure the spring (found at the end of each cable) is
attached to its actuator bracket.
Figure 3-1
NOTE: This Operator’s
Manual covers several
models. Snowthrower
featrues vary by model.
Not all features refer-
enced in this manual
are applicable to all
•
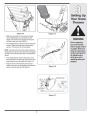
Remove the lower handle knobs, washers and
carriage bolts from each side of the upper handle.
See Figure 3-2.
•
•
Raise the upper handle assembly until it locks over
the lower handle. See Figure 3-1.
Secure the upper handle and lower handle with the
handle knobs and carriage bolts previously removed.
• Tighten the handle knobs already in place on the
snowthrower models.
upper holes and secure the handles firmly.
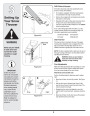
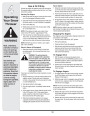
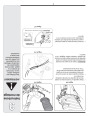
Attaching Chute Crank
NOTE: References to
right or left side of the
snow thrower are deter-
mined from behind the
unit in the operating
position.
•
Remove the flat washer and hairpin clip from the end
of the chute directional control. See Figure 3-3.
•
Insert the end of the chute directional control into
the lower bracket and secure with the flat washer
and hairpin clip just removed. If necessary, the lower
bracket can be adjusted. Refer to Chute Bracket
Adjustment, in the Adjustment Section of this manual.
Figure 3-2
NOTE: Replacement
auger shear pins and
cotter pins are provided
for your convenience.
Store these safely until
needed.
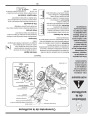
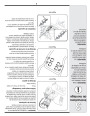
Attaching the Chute Assembly
• Remove locknuts and screws securing one of the
flange keepers to the chute assembly. See Figure 3-4.
• Loosen but do not remove the locknuts and screws on
the other two flange keepers.
Figure 3-3
6
| Categories | MTD Snow Blower Manuals, Snow Blower Manuals, Yard Man Snow Blower Manuals |
|---|---|
| Tags | MTD 769-04095, MTD Snow Blower Manual, Yard Man 769-04095 |
| Download File |
|
| Document Type | Owner's Manual |
| Language | English |
| Product Brand | Yard-Man, 769-04095, Snow Blower |
| Document File Type | |
| Publisher | mtdproducts.com |
| Wikipedia's Page | MTD Products |
| Copyright | Attribution Non-commercial |
(0 votes, average: 0 out of 5)