


5.
6.
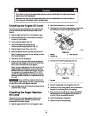
Lift the carburetor heater box up and away from the
engine.
Important
engine has been running and is hot. Excessive priming may
flood the engine and prevent it from starting.
Do not use the primer or the choke if the
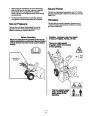
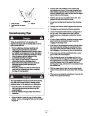
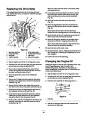
Disconnect the green ground wire clip under the throttle
(Fig. 19).
7.
8.
9.
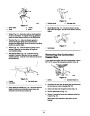
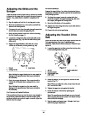
Cover the hole in the center of the primer (Fig. 14) with
your thumb and slowly push in the primer 3 times,
pausing a moment between pushes.
Grasp the recoil starter handle (Fig. 17) and pull it out
slowly until positive engagement results; then pull the
handle vigorously to start the engine.
Keep a firm grip on the starter handle and return the
rope slowly.
1
Note:–10_ If engine_
does not start or if the air temperature is
mĆ4947
F (–23 C) or colder, the engine may need additional
priming. After pushing in the primer, try to start the engine
before priming again.
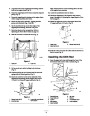
Figure 19
1.
Green ground wire clip
10.
After the engine starts, immediately rotate the choke
(Fig. 14) to the 3/4 position. As the engine warms up,
rotate the choke to the 1/2 position. When the engine
warms up sufficiently, rotate the choke to the Off
position.
7.
8.
9.
Install the choke knob.
Insert the ignition key.
Connect the wire to the spark plug.
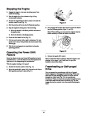
Important
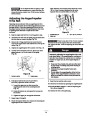
Ensure that the auger and impeller do not
Important
choke and throttle positions.
Use the heater box as a reference for the
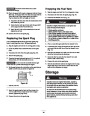
rotate while the auger/impeller drive control lever is in the
Disengaged position. Stand in the operating position and
look around to the side of the auger housing (Fig. 20). A
large screw head on the side of the auger housing rotates
when the auger and impeller rotate (Fig. 20). If the auger
and impeller rotate while the engine runs and the
auger/impeller drive control lever is disengaged, stop
the snowthrower immediately. Refer to Adjusting the
Auger/Impeller Drive Belt on page 21. If the problem
persists, take the snowthrower to an Authorized Service
Dealer for service.
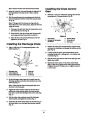
Installing the Carburetor
Heater Box
To install the carburetor heater box, reverse steps 1 through
9
of Removing the Carburetor Heater Box on page 14.
Remove the fasteners from their holes before installing the
carburetor heater box.
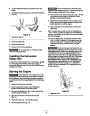
Starting the Engine
Important
Ensure that there are no obstructions in the
auger/impeller and the discharge chute before you operate
the snowthrower. Use a stick, not your hand, to remove
an obstruction from the auger/impeller or the discharge
chute.
1.
2.
Connect the wire to the spark plug.
Move the speed shift control to the N (Neutral)
position and the throttle to the Fast position.
m-2680
1
3.
4.
Release the auger/impeller drive control lever and the
traction control lever (Fig. 13).
Figure 20
1.
Large screw head
Open the fuel shutoff valve below the fuel tank
(Fig. 15).
5.
6.
Rotate the choke (Fig. 14) to the On position.
Insert the ignition key (Fig. 14).
15
| Categories | Snow Blower Manuals, Toro Snow Blower |
|---|---|
| Tags | Toro 38543, Toro 824 Power Shift |
| Model Year | 2003 |
| Download File |
|
| Document Type | Operator's Manual |
| Language | English |
| Serial Number | 230000001 - 230999999 |
| Product Name | 38543 |
| Product Brand | Toro. Customer Service Representatives are available by phone:
Monday - Friday 7:30 a.m. to 9:00 p.m. (CDT) - Saturday 8:00 a.m. to 8:00 p.m. (CDT) - Sunday 10:00 a.m. to 8:00 p.m. (CDT)
Canada 1-888-225-4886 USA 1-888-384-9939, Snow Blower |
| Product Type | Snowthrower |
| Product Series | Two Stage Power Shift |
| Swath | 24 inch |
| Discharge | Two Stage |
| Engine Manufacturer | Tecumseh |
| Engine Oil Type | 24 oz. (.7l) 5w-30 or 10w / API SH or higher |
| Gearbox Lubricant | Auger 4.5 oz. (133ml) SAE 90 Gl-5 or 6 / Trans. 14.5 oz. (411.8 gm) Lubriplate Mag 1 |
| Engine Motor Model # | HMSK80-155645W |
| Engine Motor Size | 8 hp |
| Engine Motor Type | 4 Cycle CARB2, EPA2 |
| Transmission Speed | 4 Forward/2 Reverse |
| Transmission Type | Gear |
| Document File Type | |
| Publisher | toro.com |
| Wikipedia's Page | Toro Company |
| Copyright | Attribution Non-commercial |
(0 votes, average: 0 out of 5)