


Important
Do not adjust the belt too tightly; a tight
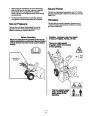
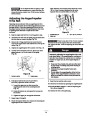
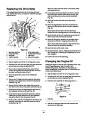
Note: With the lever released, there should be at least
in. (3 mm) clearance between the tab on the
impeller idler arm and the brake arm (Fig. 29).
1/8
belt can cause the snowthrower to creep even after you
release the traction control lever. If this occurs, decrease
the belt tension.
Adjusting the Auger/Impeller
Drive Belt
Operating the snowthrower with an auger/impeller drive
belt that slips decreases the snowthrowing performance and
damages the belt. Check the auger/impeller drive belt for
the proper tension after the first operating hour, after every
3
1
2
184
5
operating hours thereafter. Adjust the belt when
necessary.
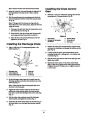
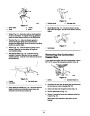
Figure 29
1.
2.
Stop the engine and wait for all moving parts to stop.
1.
2.
Impeller idler arm
Brake arm
3. 1/8 in. (3 mm) minimum
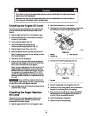
Disconnect the wire from the spark plug and ensure that
the wire does not contact the plug (Fig. 24).
Important
If there is less than 1/8 in. (3 mm) clearance
3.
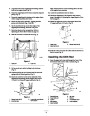
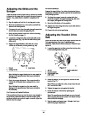
Remove the 3 flange-head bolts that secure the belt
cover to the engine frame and slide the belt cover up the
cables (Fig. 5).
between the tab on the impeller idler arm and the brake
arm, replace the belt. Refer to Replacing the Drive Belts on
page 22.
4.
5.
Depress the auger/impeller drive control lever (Fig. 13).
Danger
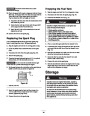
Hold the lever and insert a 0.010 in. (0.25 mm) feeler
gauge between a coil in the center of the spring
(Fig. 28).
Improperly adjusting the auger/impeller drive belt
may cause injury if the auger/impeller continues to
turn after you release the control lever. A rotating
impeller or auger can cut off or injure fingers or
hands.
•
Keep your face, hands, feet, and any other part
of your body or clothing away from moving or
rotating parts.
•
•
Maintain the proper impeller brake arm
clearance.
Do not adjust the auger/impeller drive belt too
tightly. If the auger/impeller continues to turn
after you release the control lever, decrease the
belt tension.
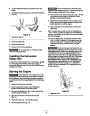
1
907
2
Figure 28
1.
Center of spring
2. Feeler gauge
6.
If the space between the coils is not 0.010 in.
mm), adjust the cables as follows:
9.
Install the belt and the cable covers.
(0.25
10.
11.
Check the belt tension by operating the auger/impeller.
A. Loosen the upper jam nut that secures the
auger/impeller cable to the mounting bracket
(Fig. 27).
If belt still slips, replace it. Refer to Replacing the
Drive Belts on page 22.
12.
Connect the wire to the spark plug.
B. Rotate the bottom jam nut upward to increase the
belt tension.
C. Tighten the upper jam nut against the bracket.
Repeat steps 4 through 6.
7.
8.
Check the impeller brake arm clearance by releasing the
auger/impeller drive control lever.
21
| Categories | Snow Blower Manuals, Toro Snow Blower |
|---|---|
| Tags | Toro 38543, Toro 824 Power Shift |
| Model Year | 2003 |
| Download File |
|
| Document Type | Operator's Manual |
| Language | English |
| Serial Number | 230000001 - 230999999 |
| Product Name | 38543 |
| Product Brand | Toro. Customer Service Representatives are available by phone:
Monday - Friday 7:30 a.m. to 9:00 p.m. (CDT) - Saturday 8:00 a.m. to 8:00 p.m. (CDT) - Sunday 10:00 a.m. to 8:00 p.m. (CDT)
Canada 1-888-225-4886 USA 1-888-384-9939, Snow Blower |
| Product Type | Snowthrower |
| Product Series | Two Stage Power Shift |
| Swath | 24 inch |
| Discharge | Two Stage |
| Engine Manufacturer | Tecumseh |
| Engine Oil Type | 24 oz. (.7l) 5w-30 or 10w / API SH or higher |
| Gearbox Lubricant | Auger 4.5 oz. (133ml) SAE 90 Gl-5 or 6 / Trans. 14.5 oz. (411.8 gm) Lubriplate Mag 1 |
| Engine Motor Model # | HMSK80-155645W |
| Engine Motor Size | 8 hp |
| Engine Motor Type | 4 Cycle CARB2, EPA2 |
| Transmission Speed | 4 Forward/2 Reverse |
| Transmission Type | Gear |
| Document File Type | |
| Publisher | toro.com |
| Wikipedia's Page | Toro Company |
| Copyright | Attribution Non-commercial |
(0 votes, average: 0 out of 5)