


Adjusting the Skids and the
Scraper
For Gravel Surfaces:
Support the auger blades a few inches (centimeters) above
the ground, and adjust the skids to prevent the snowthrower
from picking up rocks.
Adjust the skids and the scraper initially and then as needed
to ensure that the auger does not contact the paved or gravel
surface. Also, adjust them as needed to compensate for
wear.
8.
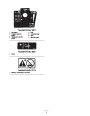
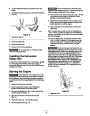
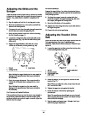
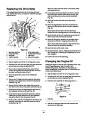
To adjust the scraper, loosen the carriage bolts that
secure the scraper to the auger housing (Fig. 26), level
the scraper, and tighten the carriage bolts.
1.
2.
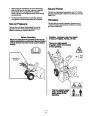
Stop the engine and wait for all moving parts to stop.
9.
Move the skids down as far as possible.
Move the snowthrower to a level surface and shift the
wheels to the front position.
10.
Tighten the 2 front flange bolts that secure both skids to
the auger side plates.
3.
4.
5.
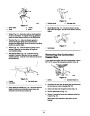
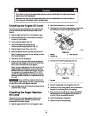
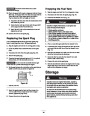
Disconnect the wire from the spark plug and ensure that
the wire does not contact the plug (Fig. 24).
11.
Connect the wire to the spark plug.
Check the tire pressure in the tires. Refer to Checking
the Tire Pressure on page 13.
Adjusting the Traction Drive
Belt
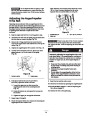
Loosen the 4 flange bolts that secure both skids to the
auger side plates (Fig. 10) until the skids slide up and
down easily.
Check the traction drive belt for the proper tension after the
first operating hour, after every 5 operating hours
thereafter. Adjust the belt when necessary or whenever you
replace it.
6.
Support the auger blades so that they are at least
1/8
inch (3 millimeters) off the ground (Fig. 26).
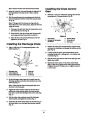
1.
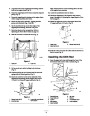
Loosen the upper jam nut that secures the traction cable
to the mounting bracket (Fig. 27).
4
1
171
1
2
Figure 26
3.
3
2
3
183
1.
2.
Scraper
Auger blades
Figure 27
Carriage bolt (6)
1.
2.
3.
Jam nut
4.
Traction cable (inner
cable)
Mounting bracket
Auger/impeller cable
(outer cable)
Note: Setting the auger blades too low may result in
damage to the snowthrower that is not covered by
the warranty.
2.
Rotate the bottom jam nut upward to increase the belt
tension (Fig. 27).
7.
Check the scraper adjustment. The scraper should be
1/8
inch (3 millimeters) above and parallel to a level
surface.
Note: When you adjust the cable, always rotate the jam
nut 1 full turn at a time.
Note: Setting the scraper too low may result in
damage to the snowthrower that is not covered by
the warranty.
3. Tighten the upper jam nut against the bracket.
4.
Check the tension of the belt by operating the
snowthrower.
For Concrete and Asphalt Surfaces:
If the snowthrower does not clear the snow close enough to
the pavement, adjust the skids to lower the scraper; if the
pavement surfaces are cracked, rough, or uneven, adjust the
skids to raise the scraper.
Note: The snowthrower should begin to move forward
when you press the traction control lever about halfway
down toward the handgrip.
5.
Stop the engine and repeat steps 1 through 4 until you
achieve the proper adjustment.
20
| Categories | Snow Blower Manuals, Toro Snow Blower |
|---|---|
| Tags | Toro 38543, Toro 824 Power Shift |
| Model Year | 2003 |
| Download File |
|
| Document Type | Operator's Manual |
| Language | English |
| Serial Number | 230000001 - 230999999 |
| Product Name | 38543 |
| Product Brand | Toro. Customer Service Representatives are available by phone:
Monday - Friday 7:30 a.m. to 9:00 p.m. (CDT) - Saturday 8:00 a.m. to 8:00 p.m. (CDT) - Sunday 10:00 a.m. to 8:00 p.m. (CDT)
Canada 1-888-225-4886 USA 1-888-384-9939, Snow Blower |
| Product Type | Snowthrower |
| Product Series | Two Stage Power Shift |
| Swath | 24 inch |
| Discharge | Two Stage |
| Engine Manufacturer | Tecumseh |
| Engine Oil Type | 24 oz. (.7l) 5w-30 or 10w / API SH or higher |
| Gearbox Lubricant | Auger 4.5 oz. (133ml) SAE 90 Gl-5 or 6 / Trans. 14.5 oz. (411.8 gm) Lubriplate Mag 1 |
| Engine Motor Model # | HMSK80-155645W |
| Engine Motor Size | 8 hp |
| Engine Motor Type | 4 Cycle CARB2, EPA2 |
| Transmission Speed | 4 Forward/2 Reverse |
| Transmission Type | Gear |
| Document File Type | |
| Publisher | toro.com |
| Wikipedia's Page | Toro Company |
| Copyright | Attribution Non-commercial |
(0 votes, average: 0 out of 5)