


SERVICE AND MAINTENANCE
9
.
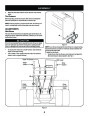
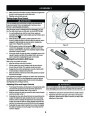
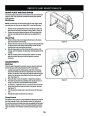
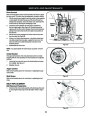
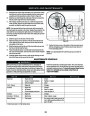
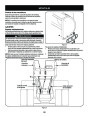
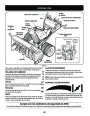
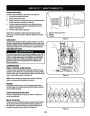
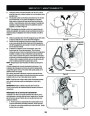
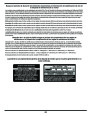
Reposition the friction wheel assembly in the snow thrower frame.
Insert the pin from the shift arm assembly into the friction wheel
assembly and hold assembly in position. Refer to Figure 33.
10. Slide the hex shaft through the right side of the frame toward the
left side and through the friction wheel assembly.
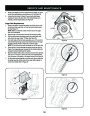
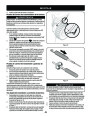
11. After making certain that the chain is on both the large and the
small sprocket, align the hex shaft with the hex hub of the small
sprocket, and slide the shaft through the sprocket.
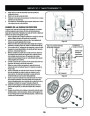
NOTE: If the sprocket fell from the snow thrower while removing the
hex shaft, place the sprocket on the chain. Realign the sprocket on the
chain with the hex hub facing the right side of unit. Position the hex
hub of the sprocket toward the friction wheel when sliding the sprocket
on to the hex shaft.
12.
13.
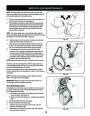
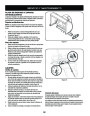
Slide the spacer onto the end of the hex shaft.
Align the bearing on the right end of the hex shaft with the hole
in the right side of the frame, then push the hex shaft to the left
into position in the frame.
Figure 33
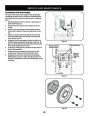
17.
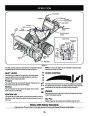
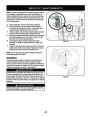
Position the frame cover on the bottom of the frame and secure
with the self-tapping screws. Pivot the snow thrower down to it
normal operating position.
14.
15.
Slide the bearing onto the left end of the hex shaft and press into
the hole on the left side the frame.
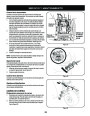
Place the belleville washer (rounded side toward head) onto the
hexholescrewof theremovedhex shaft.earlier, and insert the screw into the threaded NOTEremove: Ifit.you placed plastic film under the gas cap, be certain to
16.
Gradually tighten the hex screw to fully seat the bearings in each
side of the frame and to secure the hex shaft.
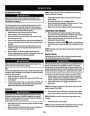
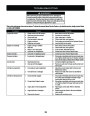
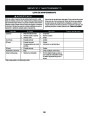
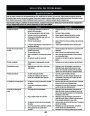
Ma inTenanCe SCHeDULe
War ning
Before performing any type of maintenance/service, disengage all
Follow the maintenance schedule given below. This chart describes
service guidelines only. Use the Service Log column to keep track of
completed maintenance tasks. To locate the nearest Sears Service
Center or to schedule service, simply contact Sears at
1-800-4-MY-HOME®.
controls and stop the engine. Wait until all moving parts have come to
a complete stop. Disconnect spark plug wire and ground it against the
engine to prevent unintended starting. Always wear safety glasses during
operation or while performing any adjustments or repairs.
interval
Each Use
item
Service
Service Log
1. Engine oil level
1.
Check
2
.
.
Loose or missing hardware
Unit and engine.
2. Tighten or replace
3
3.
1.
1.
Clean
Change
Change
1st 5 - 8 hours
hours
1. Engine oil
1. Engine oil†
25
2.
.
Air cleaner
2. Clean or replace
3. Lube with light oil
3
Control linkages and pivots
50
hours
Annually or 100 hours
Before Storage
1. Engine oil
1. Spark plug
1. Fuel system
1.
Change
1. Clean, replace, re-gap
1. Run engine until it stops from lack of
fuel or add a gasoline additive to the
gas in the tank.
†
Under heavy load or in high temperatures
1
| Categories | Craftsman Snow Blower Manuals, Snow Blower Manuals |
|---|---|
| Tags | Craftsman 247.88045 |
| Model Number | 247.88045 |
| Download File |
|
| Document Type | Operator's Manual |
| Language | English, Español |
| Product Name | Craftsman 45-Inch Snow Thrower |
| Product Brand | Craftsman. Customer Service Representatives are available by phone: Canada 1-888-225-4886 USA 1-888-384-9939, Snow Blower |
| Product Type | Snowthrower |
| Swath | 45 inch |
| Engine Manufacturer | Craftsman |
| Engine Oil Type | SAE 5W30, 4-Cycle Engine Oil (Quart) Recommended for Temperature: - Above 32°F: SAE 30W Straight Grade; - 0°F to 32°F: SAE 5W-30 or SAE 10W-30 Multi Grade; - Below O°F: SAE 0W-30 Synthetic |
| Engine Motor Model # | OH358SA-223828 |
| Document File Type | |
| Publisher | craftsman.com |
| Wikipedia's Page | Craftsman (tools) |
| Copyright | Attribution Non-commercial |
(0 votes, average: 0 out of 5)