


•
•
•
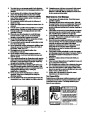
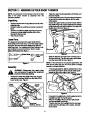
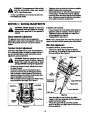
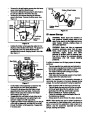
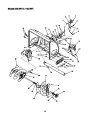
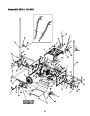
Remove the six self-tapping screws from the frame
cover underneath the snow thrower.
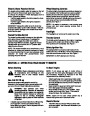
Screws
Friction Wheel Rubber
Hub
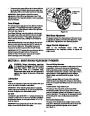
Remove the click pin that secures the left wheel to
the axle and slide the wheel from the axle.
Remove the four screws securing the left drive
cover to the frame. Remove the drive cover. See
Figure 16.
Screws
Drive
Cover
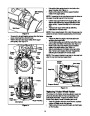
Screw
Friction Wheel
Plates
Figure 18
Off-season Storage
Left Axle
WARNING: Never store the machine or
Left Drive
Cover
fuel container indoors where there is an
open flame, spark, or pilot light such as on
water heater, furnace, clothes dryer, or
other gas appliance.
Figure 16
•
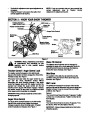
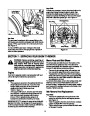
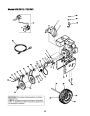
Holding the friction wheel assembly, slide the hex
shaft out of the left side of the frame. The spacer on
the right side of the hex shaft will fall and the
sprocket should remain hanging loose in the chain.
See Figure 17.
WARNING: Drain fuel into an approved
container outdoors, away from an open
flame. Allow engine to cool. Extinguish
cigarettes, cigars, pipes, and other
sources of ignition prior to draining fuel.
Fuel left in engine for extended periods
deteriorates and will cause starting
problems.
Shift Rod
Assembly
Gear Shaft
If unit is to be stored over 30 days, prepare for storage
as follows:
Pin
•
Remove gasoline from carburetor and fuel tank to
prevent gum deposits from forming on these parts
and causing possible malfunction of engine.
Run engine until fuel tank is empty and engine
stops due to lack of fuel.
Sprocket
•
•
Friction
Drain carburetor by pressing upward on bowl drain,
located below the carburetor cover.
Drive Shaft
Wheel
Assembly
NOTE: Fuel stabilizer is an acceptable alternative in
minimizing the formation of fuel gum deposits during
storage. Do not drain carburetor if using fuel stabilizer.
Figure 17
•
•
Lift the friction wheel assembly out between the
axle shaft and the drive shaft assemblies.
Remove the six screws from the friction wheel
assembly (three from each side). Remove the
friction wheel rubber from between the friction
wheel plates. See Figure 18.
Reassemble the new friction wheel rubber to the
friction wheel plates and hub, tightening the six
screws in rotation and with equal force.
Position the friction wheel assembly up onto the pin
of the shift rod assembly, and slide the hex shaft
through the friction wheel assembly. Reassemble
in reverse order.
•
•
Wipe equipment with an oiled rag to prevent rust.
Remove spark plug and pour one ounce of engine
oil through spark plug hole into cylinder. Cover
spark plug hole with rag. Crank engine several
times to distribute oil. Replace spark plug.
Follow the lubrication recommendations found in
the Maintenance Section.
•
•
•
•
Always store the snow thrower in a clean, dry area.
NOTE: When storing any type of power equipment in
an unventilated or metal storage shed, care should be
taken to rust proof the equipment. Using a light oil or
silicone, coat the equipment, especially any chains,
springs, bearings and cables.
14
| Categories | Cub Cadet Snow Blower Manuals, MTD Snow Blower Manuals, Snow Blower Manuals |
|---|---|
| Tags | Cub Cadet 1130 SWE, Cub Cadet 850 SWE, MTD 1130 SWE, MTD 850 SWE, MTD Snow Blower Manual |
| Download File |
|
| Document Type | Owner's Manual |
| Language | English |
| Product Brand | MTD, Snow Blower |
| Document File Type | |
| Publisher | mtdproducts.com |
| Wikipedia's Page | MTD Products |
| Copyright | Attribution Non-commercial |
(0 votes, average: 0 out of 5)