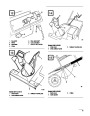


Replacing Scraper
5.
Reinstall belt cover. Tighten fasteners securely,
but DO NOT OVERTIGHTEN.
Before each season, inspect scraper for wear. If
thickness of bottom of scraper is less than 1/16”
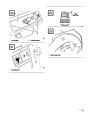
Replacing Spark Plug
(1.6
mm), replace scraper (Fig. 16).
Before each snow season, check the spark plug. If
electrodes in center of plug are dark or have
deteriorated, install a new plug. Use an NGK
BPMR4A spark plug and set gap at .032” (.81 mm).
Note:
Scraper wear rates are determined by
the running time and the roughness of
the driveway or sidewalk.
1.
2.
Turn ignition key to OFF.
1.
2.
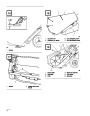
REMOVE CONTROL PANEL
(Fig. 20)—Remove (3) capscrews securing
control panel to housing. Remove ignition key
and lift off panel, allowing it to hang on recoil
rope.
Drain gasoline from fuel tank; refer to Draining
Gasoline, page 13.
3.
4.
Tip snowthrower forward onto front housing.
REMOVE SPARK PLUG (Fig. 21)—Pull wire
off spark plug and remove plug. Examine the
plug and replace if cracked, fouled or dirty. DO
NOT SANDBLAST, SCRAPE OR CLEAN
SPARK PLUG BECAUSE DIRT MAY
RELEASE AND FALL INTO CYLINDER
CAUSING ENGINE DAMAGE.
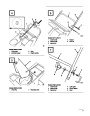
Remove (3) carriage bolts and lock nuts holding
scraper in place (Fig. 17). Remove scraper by
sliding it to right and down.
5.
Install new scraper to housing using carriage
bolts and nuts.
3.
INSTALL SPARK PLUG—Set air gap (Fig. 22)
Replacing Drive Belt
between electrodes at .032” (.81 mm). Install
plug and tighten to 15 ft–lb (20.4 N m). If torque
wrench is not used, tighten plug firmly. Push
wire onto spark plug and reinstall control panel
with (3) capscrews.
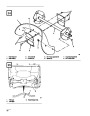
Inspect drive belt before each season. If ribs on inside
of belt are damaged or belt is worn, replacement is
necessary.
1.
2.
Turn ignition key to OFF.
Adjusting Carburetor
Remove (3) self tapping screws, (2) capscrews,
The carburetor has been factory set, and no
adjustment is required.
(1)
washer and (2) nuts securing belt cover to
snowthrower frame (Fig. 18). Set belt cover
aside.
Replacing Rotor Blades
3.
4.
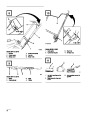
REMOVING BELT (Fig. 19)—Push down on
idler pulley allowing belt to be removed from
rotor pulley, brake arm assembly, and engine
pulley.
Before each snow season, inspect rotor blades for
wear. When blade edge has worn to the wear indicator
hole (Fig. 23), the blades must be replaced to ensure
proper performance and prevent damage to underside
of snowthrower. Always replace both blades at the
same time.
INSTALLING BELT (Fig. 19)—Loop belt
around engine pulley, under idler pulley, over
roller, through brake assembly, and around rotor
pulley.
Note:
Whenever rotor blades are replaced,
scraper should also be replaced to
ensure proper snowthrower operation
and performance.
IMPORTANT: Belt must be on top of roller as
shown.
14
| Categories | Snow Blower Manuals, Toro Snow Blower |
|---|---|
| Tags | Toro 38412, Toro 38418, Toro 38433, Toro 38438, Toro CCR 2400, Toro CCR 3000 |
| Model Year | 1999 |
| Download File |
|
| Document Type | Operator's Manual |
| Language | English |
| Serial Number | 9900001 - 9999999 |
| Product Name | 38412, 38418, 38433, 38438 |
| Product Brand | Toro. Customer Service Representatives are available by phone:
Monday - Friday 7:30 a.m. to 9:00 p.m. (CDT) - Saturday 8:00 a.m. to 8:00 p.m. (CDT) - Sunday 10:00 a.m. to 8:00 p.m. (CDT)
Canada 1-888-225-4886 USA 1-888-384-9939, Snow Blower |
| Product Type | Snowthrower |
| Product Series | CCR 1000/2400/2500, Single Stage, Snowthrower |
| Swath | 20 inch |
| Discharge | Single Stage |
| Engine Manufacturer | Toro |
| Engine Oil Type | Toro 2 cycle / NMMA-TCW3 |
| Engine Motor Model # | R-tek |
| Engine Motor Size | 4 hp |
| Engine Motor Type | 2 Cycle EPA1 |
| Document File Type | |
| Publisher | toro.com |
| Wikipedia's Page | Toro Company |
| Copyright | Attribution Non-commercial |
(0 votes, average: 0 out of 5)