


Storage
Note:
Rotor blades wear rates are determined
by the running time and the roughness
of the driveway or sidewalk.
1.
FUEL SYSTEM PREPARATION–
Note:
A fuel stabilizer/conditioner is most
effective when mixed with fresh
gasoline.
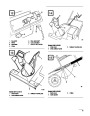
Removing Old Blade
1.
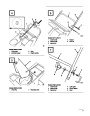
Remove (4) torx screws and (4) lock nuts
securing outer edges of rotor blade to rotor shaft
assembly (Fig. 24).
•
•
Add Toro Stabilizer/Conditioner to the fuel tank
(one ounce per gallon of fuel).
Run engine for five minutes to distribute
conditioned fuel through fuel system.
2.
Next, remove (2) hex–head capscrews, spacers
and lock nuts securing center of blade to rotor
halves (Fig. 24).
•
•
•
Stop engine, allow it to cool, and drain fuel tank.
Restart the engine again and run it until it stops.
Either choke or prime the engine, restart it a
third time and run engine until it will not restart.
3.
4.
Loosen the hex–head screw securing the rotor
halves to the auger shaft assembly (Fig. 24).
•
Dispose of fuel properly. Recycle per local
codes.
Slide the blade out from between the rotor halves
(Fig. 24).
•
DO NOT store STABILIZED gasoline over 90
days.
2.
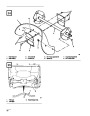
CYLINDER/PISTON CARE—Slowly pull
recoil starter until resistance is felt due to
compression pressure, then stop. Release starter
tension slowly to prevent engine from reversing
due to compression pressure. This position
closes both the intake and exhaust ports which
prevents corrosion of the cylinder bore.
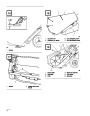
Installing New Blade
1.
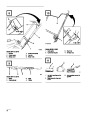
The rotor blades are made of laminated rubber.
Examine the edge of a blade to see the difference
in layer thicknesses (Fig. 25). (Some blades have
a part number on the thick side of the blade.)
3.
4.
TIGHTEN FASTENERS AND
Both blades must be installed with the thick
layer on the inside of the curve. If one blade is
installed with the thick layer on the outside of
the curve and the other blade installed with the
thick layer on the inside of the curve, the blades
will be unbalanced, causing the snowthrower to
“hop” or “bounce.”
CLEAN—Tighten screws, bolts, and nuts if
necessary. Repair or replace damaged parts.
Clean unit thoroughly.
STORE SNOWTHROWER—Cover
snowthrower and store in a clean, dry place out
of the reach of children. NEVER STORE
SNOWTHROWER IN HOUSE (LIVING
AREA) OR BASEMENT WHERE
2.
Insert the new blade between the rotor halves.
Secure it to the rotor halves with (2) hex–head
capscrews, (2) spacers and (2) lock nuts
(Fig. 24). Position bolt heads on thick (bottom)
side of blade. Curve the blade, and secure it with
the remaining (4) torx screws and lock nuts
(position screw heads on thick side of blade).
Tighten all screws and nuts securely.
IGNITION SOURCES MAY BE PRESENT
SUCH AS HOT WATER AND SPACE
HEATERS, CLOTHES DRYERS, AND THE
LIKE BECAUSE GASOLINE AND FUMES
ARE HIGHLY FLAMMABLE,
EXPLOSIVE, AND DANGEROUS IF
INHALED. Allow engine to cool before storing
in any enclosure.
15
| Categories | Snow Blower Manuals, Toro Snow Blower |
|---|---|
| Tags | Toro 38412, Toro 38418, Toro 38433, Toro 38438, Toro CCR 2400, Toro CCR 3000 |
| Model Year | 1999 |
| Download File |
|
| Document Type | Operator's Manual |
| Language | English |
| Serial Number | 9900001 - 9999999 |
| Product Name | 38412, 38418, 38433, 38438 |
| Product Brand | Toro. Customer Service Representatives are available by phone:
Monday - Friday 7:30 a.m. to 9:00 p.m. (CDT) - Saturday 8:00 a.m. to 8:00 p.m. (CDT) - Sunday 10:00 a.m. to 8:00 p.m. (CDT)
Canada 1-888-225-4886 USA 1-888-384-9939, Snow Blower |
| Product Type | Snowthrower |
| Product Series | CCR 1000/2400/2500, Single Stage, Snowthrower |
| Swath | 20 inch |
| Discharge | Single Stage |
| Engine Manufacturer | Toro |
| Engine Oil Type | Toro 2 cycle / NMMA-TCW3 |
| Engine Motor Model # | R-tek |
| Engine Motor Size | 4 hp |
| Engine Motor Type | 2 Cycle EPA1 |
| Document File Type | |
| Publisher | toro.com |
| Wikipedia's Page | Toro Company |
| Copyright | Attribution Non-commercial |
(0 votes, average: 0 out of 5)