
3
Assembly & Set-Up
Contents of Carton
•
•
One Snow Thrower
•
•
Two Replacement Auger Shear Pins
•
•
One Chute Assembly
One Snow Thrower Operator’s
Manual
One Tecumseh Engine Operator’s
Manual
One Product Registration Card
Assembly
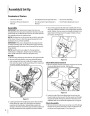
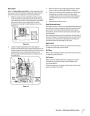
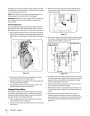
4. Secure the upper handle and lower handle with the two
wing nuts, belleville washers, and carriage bolts removed
earlier. Tighten the two wing nuts already installed in the
upper holes to firmly secure the upper handle and sup-
port tubes. See Figure 3-2.
IMPORTANT: Two replacement auger shear pins are
included with this manual (or stowed in the plastic handle
panel). Refer to the Maintenance section for more informa-
tion regarding shear pin replacement.
NOTE: All references in this manual to the left or right side
of the snow thrower is from the operating position only.
Exceptions, if any, will be specified.
IMPORTANT: This unit is shipped with the engine full of
oil. After assembly, refer to the Tecumseh Engine manual
packed separately with your snow thrower for fuel and oil
fill-up details.
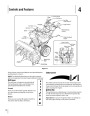
NOTE: Specifications are subject to change without
notification or obligation. Images may not reflect your
exact model and are for reference purposes only.
Handle
1
2
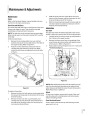
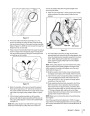
. Remove any packaging material from the upper handle.
. Remove the lower plastic wing nut, belleville washer
and carriage bolt from each side of the upper handle;
then raise the upper handle assembly until it snaps over
the lower handle. See Figure 3-1.
Figure 3-
Chute Directional Control
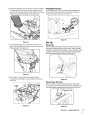
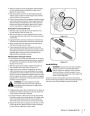
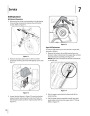
1. Remove the flat washer and hairpin clip from the end of
the chute directional control. See Fig. 3-3.
B
A
Figure 3-3
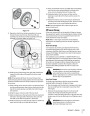
2
. Insert the end of the chute directional control into the
lower bracket and secure with the flat washer and hairpin
clip just removed. If necessary, the lower bracket can be
adjusted. Refer to Chute Bracket Adjustment on Page 16.
Figure 3-1
3
. Looking beneath the handle panel, check that all of the
cables (steering, auger, shift, and drive) are properly
routed and not pinched or kinked. Make certain the
springs at the lower end of the auger and drive cables are
securely hooked into their respective actuator bracket.
Chute Assembly
1. Remove lock nuts and screws securing one of the flange
keepers to the chute assembly. Loosen the fasteners of
the other two flange keepers. See Figure 3-4.
6
| Categories | Cub Cadet Snow Blower Manuals, MTD Snow Blower Manuals, Snow Blower Manuals |
|---|---|
| Tags | Cub Cadet 930 SWE, Cub Cadet 933 SWE, MTD 930 SWE, MTD 933 SWE, MTD Snow Blower Manual |
| Download File |
|
| Document Type | Owner's Manual |
| Language | English |
| Product Brand | MTD, Snow Blower |
| Document File Type | |
| Publisher | mtdproducts.com |
| Wikipedia's Page | MTD Products |
| Copyright | Attribution Non-commercial |
(0 votes, average: 0 out of 5)