


Service
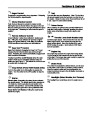
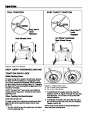
BELT REPLACEMENT
Auger Drive Belt
The drive belts are of special construction and must be
replaced with original factory replacement belts available
from your nearest authorized service center. Some
steps require the assistance of a second person. If the
auger drive belt is damaged, the snow thrower will not
discharge snow. Replace the damaged belt as follows.
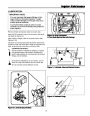
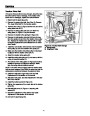
A
A
C
B
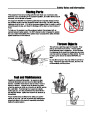
1.
2.
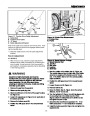
Disconnect the spark plug wire.
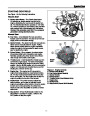
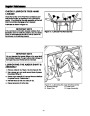
Loosen the capscrews (A, Figure 25) on each side of
the bottom panel (B).
Figure 25. Bottom Cover
A. Capscrews
3.
4.
Remove the bottom panel (B).
Loosen screw (B, Figure 21) from belt cover (A).
Remove belt cover (A).
B. Bottom Panel
C. Auger Housing
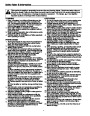
5.
6.
7.
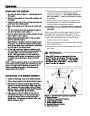
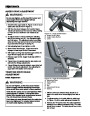
Loosen the belt guide (B, Figure 26). Pull the belt
guide away from the auger drive pulley (A).
Pull the auger idler pulley (K) away from the auger
drive belt (D) and slip the belt off of the idler.
A
Remove the auger drive belt (D) from the engine pul-
ley. To remove the auger drive belt (D), the auger
drive pulley (C) may have to be partially rotated.
B
F
8.
Index or point the spout rotator to the center of the
machine so the rotator control is in the center of the
dash panel.
C
L
D
K
9.
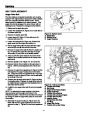
Remove special nut (A, Figure 27) and cover (B).
E
10.
Remove hair pin (C) and slide rod forward about 3
inches. Until hex shaft separates from handle con-
trol.
A
11.
Remove the upper four capscrews (A, Figure 29) that
hold together the auger housing (C) and the frame
(D). Loosen the lower two capscrews (B). The auger
housing (C) and the frame (D) can now be split apart
for removal of the belt.
J
G
I
12.
13.
.Remove the old auger drive belt (D, Figure 26) from
the impeller pulley . Replace the auger drive belt with
an original factory replacement belt available from an
authorized service center.
H
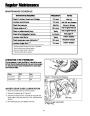
Figure 26. Pulleys and Belts
A. Traction Drive Belt
B. Belt Guide
C. Auger Drive Pulley, Engine
D. Auger Drive Belt
.Install the new auger drive belt (D) onto the impeller
pulley.
NOTE: To assemble the auger housing to the frame,
have someone hold the auger clutch lever in the
E. Traction Drive Spring
ENGAGED position. This will move the idler arm and pul- F. Traction Drive Pulley, Engine
ley enough to allow the auger drive pulley to move back
into position.
G. Traction Drive Pulley
H. Impeller Pulley
I. Swing Plate Axle Rod
J. “E”-Ring
K. Auger Idler Pulley
L. Traction Drive Idler Pulley
14.
Assemble the auger housing (C, Figure 29) to the
frame with the four upper capscrews (A) that were
removed in step 11. Tighten the two lower capscrews
(B)
28
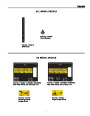
| Categories | Lawn Mower Manual, Sprinkler and Irrigation Manuals, Toro Sprinkler and Irrigation Manuals |
|---|---|
| Tags | Toro 99040SL |
| Download File |
|
| Document Type | Catalog |
| Language | English |
| Product Brand | Toro. Customer Service Representatives are available by phone:
Monday - Friday 7:30 a.m. to 9:00 p.m. (CDT) - Saturday 8:00 a.m. to 8:00 p.m. (CDT) - Sunday 10:00 a.m. to 8:00 p.m. (CDT)
Canada 1-888-225-4886 USA 1-888-384-9939, Lawn Mower |
| Document File Type | |
| Publisher | toro.com |
| Wikipedia's Page | Toro Company |
| Copyright | Attribution Non-commercial |
(0 votes, average: 0 out of 5)