


en
11.
(Figure 15) To check the adjustment,
depress the drive lever and check the length
“A” of the drive spring (7). In correct
adjustment, the length “A” of the drive
spring (7) is as follows:
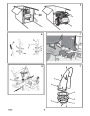
3. Remove the bottom panel (2).
7. Make sure the traction drive idler pulley
(12) is properly aligned with the traction
drive belt (13).
8. Attach the traction drive spring (16).
9. Install the swing plate axle rod (18) and
4.
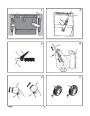
(Figure 18) Remove screw (2) from belt
cover (1). Remove the belt cover (1).
5.
(Figure 19) Loosen the belt guide (9). Pull
the belt guide (9) away from the auger
drive pulley (10).
minimum 3 inches (76 mm)
secure with the e−ring (17) removed earlier.
maximum 3-3/8 inches (85 mm).
(Figure 23) Install the bottom panel (2).
Tighten the bolts (3) on each side of the
bottom panel (2).
10.
(Figure 31) The bottom of the swing plate
must be positioned between the
6.
7.
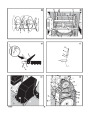
Pull the idler pulley (3) away from the auger
12.
13.
(20)
drive belt (4) and slip the auger drive belt
alignment tabs (19). Make sure the swing
(4)
off of the idler pulley (3).
plate (20) is properly secured.
Remove the auger drive belt (4) from the
engine pulley (11). To remove the auger
drive belt (4), the engine pulley (11) may
have to be partially rotated.
NOTE: If the drive will not engage after
the traction drive belt has been replaced,
then check to make sure that the swing
plate is positioned between the alignment
tabs (19).
(Figure 19) Install and adjust the auger
drive belt (4). See “How To Remove The
Auger Drive Belt” in the Maintenance section.
How To Adjust The Belts
The belts will stretch during normal use. If you
need to adjust the belts due to wear or stretch,
proceed as follows.
8.
(Figure 20) Remove the top four bolts (21)
that hold together the auger housing (22)
and the motor box (23). Loosen the bottom
two bolts (24). The auger housing (22) and
the motor box (23) can now be split apart for
removal of the belt.
11.
How To Adjust The Auger Drive Belt
12.Adjust the belt guide (9). See “How To
Adjust The Belt Guide” in the Maintenance
section.
If the snow thrower will not discharge snow,
check the adjustment of the auger drive cable.
See “How To Check And Adjust The Cables” in
the Maintenance section. If the adjustment is
correct, then check the condition of the auger
drive belt. If the auger drive belt is damaged,
replace the auger drive belt. See “How To
Replace The Belts” in the Maintenance section.
If the auger drive belt is loose, adjust as follows.
9.
(Figure 19) Remove the old auger drive
belt (4) from the auger drive pulley (10).
Replace the auger drive belt (4) with an
original factory replacement belt available
from an authorized service center.
13.
(Figure 23) Install the bottom panel (2).
14.Tighten the bolts (3) on each side of the
bottom panel (2).
15.(Figure 18) Install the belt cover (1). Tighten
screw (2).
10.
Install the new auger drive belt (4) onto the
auger drive pulley (10).
16.
Check the adjustment of the cables. See
“How To Check And Adjust The Cables” in
the Maintenance section.
11. Assemble the auger housing (22) to the
motor box (23) with the four bolts (21) that
were removed in step 8. Tighten the bottom
two bolts (24).
1.
2.
Disconnect the spark plug wire.
(Figure 18) Remove screw (2) from belt
cover (1). Remove the belt cover (1).
17.Connect the spark plug wire.
12.
13.
14.
Install the auger drive belt (4) onto the
3.
(Figure 19) Loosen the nut (2) on the idler
pulley (3) Move the idler pulley (3) 1/8 inch
engine pulley (11).
How To Adjust The Belt Guide
1. Disconnect spark plug wire.
Slip the auger drive belt (4) under the idler
pulley (3).
Adjust the auger drive belt (4). See “How To
Adjust The Auger Drive Belt” in the
Maintenance section.
(3
mm) toward the auger drive belt (4).
2.
(Figure 18) Remove screw (2). Remove the
belt cover (1).
4.
5.
Tighten the nut (2).
(Figure 22) Depress the auger drive lever.
Check the tension on the auger drive belt
3.
(Figure 1) Engage the auger drive lever (5).
(4)
. In correct adjustment, the auger drive
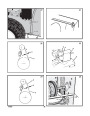
4. (Figure 24) Measure the distance between
the belt guide (2) and auger drive belt (3).
The correct distance (4) is 1/8 inch (3 mm).
15.
Adjust the belt guide (9). See “How To
Adjust The Belt Guide” in the Maintenance
section.
belt (4) will deflect 1/2 inch (12.5 mm) (5)
with moderate pressure. If the adjustment is
not correct, repeat the adjustment.
5. If an adjustment is necessary, loosen the
mounting bolt for the belt guide (2). Move
the belt guide (2) to the correct position
(4). Tighten the mounting bolt for the belt
guide (2).
6.
7.
(Figure 18) Install the belt cover (1). Tighten
screw (2).
Check the adjustment of the auger drive
cable. See “How To Check And Adjust The
Cables” in the Maintenance section.
16.(Figure 18) Install the belt cover (1). Tighten
screw (2).
17.Check the adjustment of the cables. See
“How To Check And Adjust The Cables” in
the Maintenance section.
6. (Figure 18) Install the belt cover (1). Tighten
screw (2).
Connect the spark plug wire.
8.
Attach the spark plug wire.
18.Connect the spark plug wire.
7.
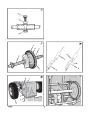
Traction Drive Belt
How To Remove the Traction Drive Belt
How To Adjust Or Replace The Friction
Wheel
The traction drive belt has constant spring
pressure and does not require an adjustment. If
the traction drive belt is slipping, replace the
belt. See “How To Replace The Belts” in the
Maintenance section.
If the snow thrower will not move forward, check
the traction drive belt for wear or damage. If the
traction drive belt is worn or damaged, replace
the belt as follows.
How To Check The Friction Wheel
If the snow thrower will not move forward, check
the traction drive belt, the traction drive cable or
the friction wheel. If the friction wheel is worn or
damaged, it must be replaced. See “How To
Replace the Friction Wheel” in this section. If the
friction wheel is not worn or damaged, check as
follows.
1. (Figure 1) Remove the gas from the gas
tank. Stand the snow thrower up on the front
end of the auger housing (4).
1.
2.
Disconnect the spark plug wire.
Remove the auger drive belt. See “How To
Remove The Auger Drive Belt” in the
Maintenance section.
How To Replace The Belts
The drive belts are of special construction and
must be replaced with original factory
replacement belts available from your nearest
authorized service center.
Some steps require the assistance of a second
person.
3.
(Figure 19) Remove the e−ring (17) from
one end of the swing plate axle rod (18).
Remove the swing plate axle rod (18) to
allow the the swing plate to pivot forward.
4.
5.
Remove the traction drive spring (16).
WARNING: Drain the gasoline
outdoors, away from fire or flame.
Remove the old traction drive belt (13) from
the traction drive pulley (14) and from the
engine pulley (15). Replace the traction
drive belt (13) with an original factory
replacement belt available from an
authorized service center.
How To Remove the Auger Drive Belt
If the auger drive belt is damaged, the snow
thrower will not discharge snow. Replace the
damaged belt as follows.
2. Disconnect the spark plug wire.
3. (Figure 23) Loosen the bolts (3) on each
side of the bottom panel (2).
4. Remove the bottom panel (2).
5. (Figure 1) Position the shift speed lever (6)
in the lowest forward speed.
1.
2.
Disconnect the spark plug wire.
(Figure 23) Loosen the bolts (3) on each
side of the bottom panel (2).
6. Install the new traction drive belt (13) onto
the traction drive pulley (14) and onto
engine pulley (15).
1
742237
13
| Categories | Murray Snow Blower Manuals, Snow Blower Manuals |
|---|---|
| Tags | Murray 1695539 |
| Download File |
|
| Document File Type | |
| Copyright | Attribution Non-commercial |
(1 votes, average: 5 out of 5)
Lawn and Garden readers have rated Murray Walk Behind 1695539 8.0 24-Inch Dual Stage Snow Blower Owners Manual 5.0 out of 5.0 based on 1 product reviews. very good snowblover