


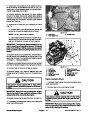


3.
4.
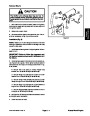
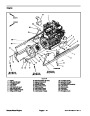
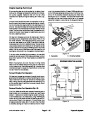
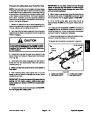
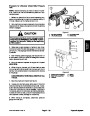
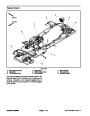
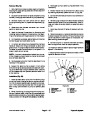
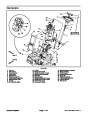
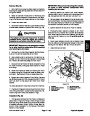
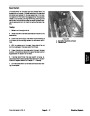
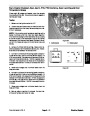
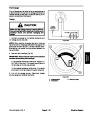
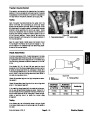
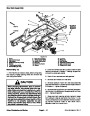
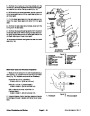
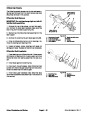
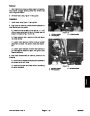
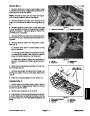
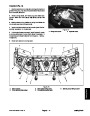
pumpinputshaft.Secureenginetoenginesupportswith
cap screws, rebound washers and flange nuts.
Slowly lower engine into the machine.
27
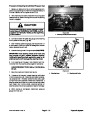
(37 to 44 N--m)
to 33 ft--lb
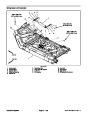
Align engine to the engine supports and hydraulic
1
10
11
5.
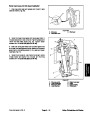
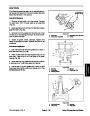
Pump Assembly Installation in the Service and Repairs
section of Chapter 4 -- Hydraulic System).
Secure hydraulic pump assembly to engine (see
2
9
8
3
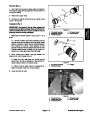
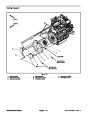
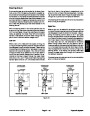
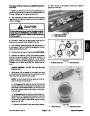
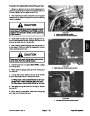
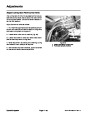
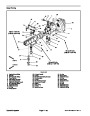
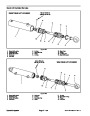
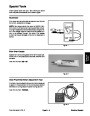
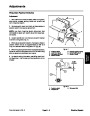
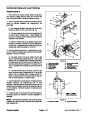
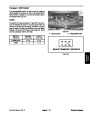
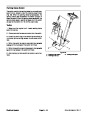
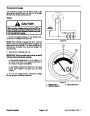
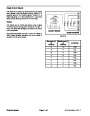
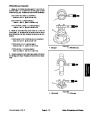
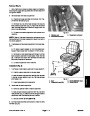
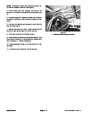
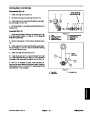
6.
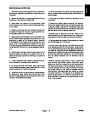
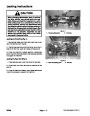
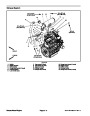
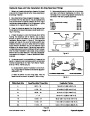
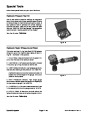
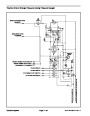
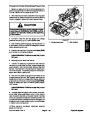
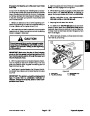
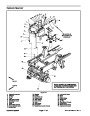
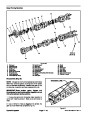
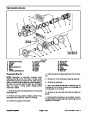
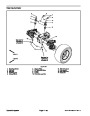
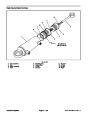
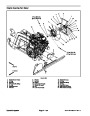
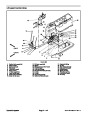
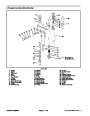
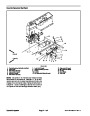
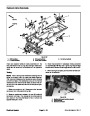
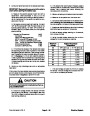
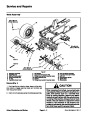
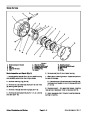
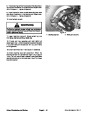
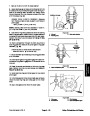
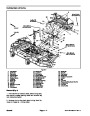
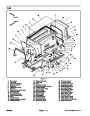
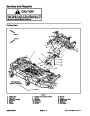
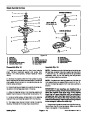
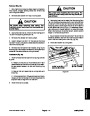
Thoroughly clean tapered surfaces of fan motor
shaft and fan hub. Position fan hub (with fan attached)
onto motor shaft and secure with washer and hex nut
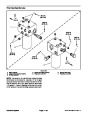
(Fig. 15). Torque nut from 27 to 33 ft--lb (37 to 44 N--m).
5
4
6
7
12
to 14 ft--lb
to 18 N--m)
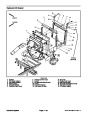
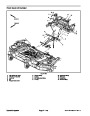
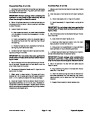
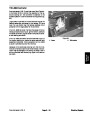
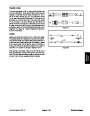
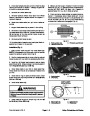
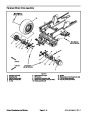
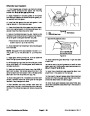
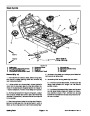
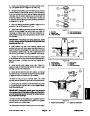
7.
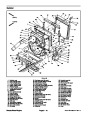
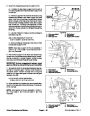
Position upper radiator shroud and coolant reservoir
(17
withbrackettotheradiator.Secureshroudandreservoir
bracket to the radiator and lower radiator bracket with
removed fasteners (seeRadiator Installation in thissec-
tion). Make sure thatclearance between shroud and fan
is at least 0.180” (4.6 mm) at all points.
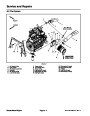
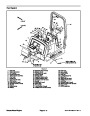
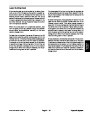
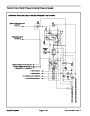
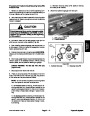
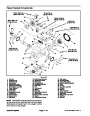
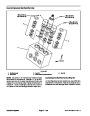
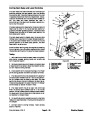
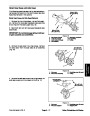
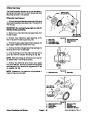
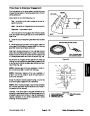
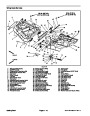
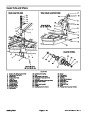
Figure 15
1.
Fan motor
7.
8.
9.
Cap screw (4 used)
Hex nut
2.
3.
4.
5.
6.
Cap screw (2 used)
Flat washer (2 used)
Fan motor bracket
Lock nut (2 used)
Washer (4 used)
Washer
10. Fan hub
11. Fan
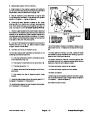
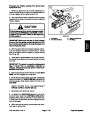
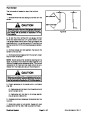
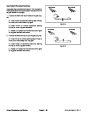
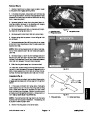
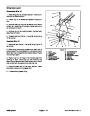
8.
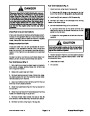
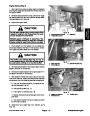
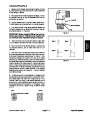
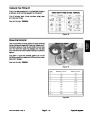
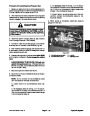
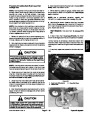
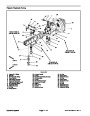
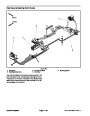
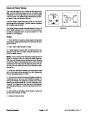
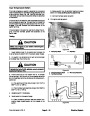
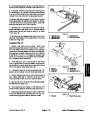
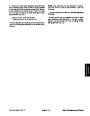
Connect throttle cable to the speed control lever with
washer and lock nut (Fig. 14). Secure cable to cable
support. Adjust throttle cable.
13.Connect
diator drain is shut. Fill radiator and reservoir with cool-
ant.
coolant hoses to the radiator.Make sure ra-
9.
Connect fuel line to the injection pump.
wires and/or electrical connections to the
10.Connect
14.Check position of wires, fuel lines, hydraulic hoses
and cables for proper clearance with rotating, high tem-
perature and moving components.
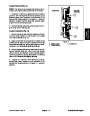
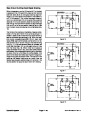
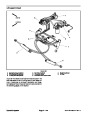
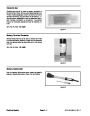
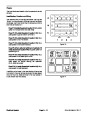
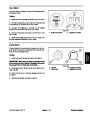
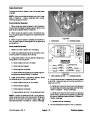
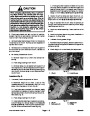
following electrical components:
A. The dual temperature switch, temperature send-
er and alternator (Fig 10).
15.Position battery to machine. Connect positive bat-
tery cable first and then negative battery cable. Secure
battery to machine with strap and cover.
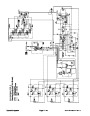
B. The engine run solenoid and fuel pump (Fig. 13).
C. The glow plug (Fig. 11).
16.Check and adjust engine oil as needed.
17.Check and adjust hydraulic oil as needed.
D. Battery,frameandwireharnessgroundtotheen-
gine block.
18.Bleed
fuel system.
E. The starter and low oil pressure switch (near
starter).
19.Start engine and operate hydraulic controls to prop-
erly fill hydraulic system (see Charge Hydraulic System
in Chapter 4 -- Hydraulic System).
11.
Installaircleanerassembly totheengine(seeAirFil-
ter System Installation in this section).
20.Close
and secure hood.
12.Install
exhaustsystemtomachine(seeExhaustSys-
tem Installation in this section).
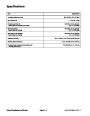
Groundsmaster 4100--D
Page 3 -- 15
Kubota Diesel Engine
| Categories | Lawn Mower Manual, Sprinkler and Irrigation Manuals, Toro Sprinkler and Irrigation Manuals |
|---|---|
| Tags | Toro Groundsmaster 30413, Toro Groundsmaster Groundsmaster 4100 D |
| Download File |
|
| Document Type | Service Manual |
| Language | English |
| Product Brand | Toro. Customer Service Representatives are available by phone:
Monday - Friday 7:30 a.m. to 9:00 p.m. (CDT) - Saturday 8:00 a.m. to 8:00 p.m. (CDT) - Sunday 10:00 a.m. to 8:00 p.m. (CDT)
Canada 1-888-225-4886 USA 1-888-384-9939, Lawn Mower |
| Document File Type | |
| Publisher | toro.com |
| Wikipedia's Page | Toro Company |
| Copyright | Attribution Non-commercial |
(0 votes, average: 0 out of 5)
At only 700mm wide the Mini Dumper is even at home on tight access
sites. No need to grunt, groan, and force the
mower about the yard. The US will be getting a revised 2011 Jeep Wrangler but the diesel option will not be offered in the United States.