Yardworks 603753-6 60-3754-4 Snow Blower Owners Manual by MTD

Push idler away from the chute and insert a Philips
head screwdriver in the hole on the idler as shown
in Figure 26. This will release tension on drive belt.
Re-install auger belt on the engine pulley.
Re-attach frame cover and put the equipment back
to operating position. Re-attach belt cover with two
self-tapping screws removed earlier.
Auger Belt
Engine
Pulley
Friction Wheel Rubber
Drive Belt
Check the rubber on the friction wheel after 25
hours of operation, and periodically thereafter.
Replace the rubber if any signs of wear or cracking
are found.
Idler
Drain the gasoline from the snow thrower, or place
a piece of plastic under the gas cap.
Move shift lever to the R2 position.
Tip the snow thrower so that it rests on the housing.
Remove two self-tapping screws from frame cover
underneath the snow thrower and move the frame
cover away. See Figure 24.
Remove the right-hand wheel by removing the
screw and bell washer which secure it to the axle.
Locate the hex shaft and snap ring on the right side
of the snow thrower frame, about two inches from
the wheel axle.
Using a suitable tool, carefully remove the outer E-
ring which secures the hex shaft to the snow
thrower frame and lightly tap the shaft’s end to
dislodge the ball bearing from the right side of the
frame.
Figure 26
Pull drive belt out and away from the engine pulley
to remove. See Figure 26.
Tip the snow thrower up and forward, so that it rests
on the housing. Remove two self-tapping screws
from frame cover underneath the snow thrower and
move the frame cover away. Refer to Figure 24.
Back out the stop bolt to create sufficient gap
between the friction wheel disc and the drive pulley.
Pull the drive belt from around the drive pulley and
clear it off the friction wheel disc. See Figure 27.
Slide the hex shaft downward and to the left while
carefully un-meshing the lower gears on the hex
shaft from the upper gears on the wheel axle. See
Figure 28.
Drive
Belt
Friction
Wheel
Set the hex shaft’s gears aside.
Carefully remove the inner E-ring from the hex
shaft and slide the friction wheel assembly off the
hex shaft.
Drive Pulley
NOTE: If you’re replacing the friction wheel assembly
as a whole, discard the worn part and slide the new part
onto the hex shaft. Follow the steps   above in reverse
order
to
reassemble
components.
If
you’re
disassembling the friction wheel and replacing only the
rubber ring, proceed as follows:
Stop
Bolt
Remove the four screws from the friction wheel
assembly and remove the bonded friction wheel.
Reassemble new bonded friction wheel rubber to
the friction wheel assembly, turn each screw
approximately 2 turns in order shown in Figure 29
until screws are tight. It is important for the rubber to
be assembled symmetrically.
Slide the friction wheel assembly back onto the hex
shaft and follow the steps above in revers order to
reassemble components.
Figure 27
Now moving to the other side of the snow thrower ,
slide the belt off the crankshaft.
Replace with new belt, first sliding it through the
crank shaft, then working it around the groove of
the drive pulley and finally wrapping it around the
engine pulley from where the old belt was removed.
Once the belt is firmly placed on the pulleys, make
sure to remove the screwdriver from the idler.
18
Product Specification
CategoriesMTD Snow Blower Manuals, Snow Blower Manuals, Yardworks Snow Blower Manuals
Tags, , , ,
Download File
Please Enter the Security Characters Shown Below. Letters are Case Sensitive. Your download link will appear upon completing this step.
- 52 pages
Document TypeOwner's Manual
LanguageEnglish
Product BrandYardworks, 60-3753-6, 60-3754-4, Snow Blower
Document File TypePDF
Publishermtdproducts.com
Wikipedia's PageMTD Products
CopyrightAttribution Non-commercial
(8 votes, average: 3.88 out of 5)
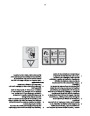
Lawn and Garden readers have rated Yardworks 603753-6 60-3754-4 Snow Blower Owners Manual by MTD 3.9 out of 5.0 based on 8 product reviews.
Submit your review (optional)
(will not be displayed)
* Required Field

Yardworks 603753-6 60-3754-4 Snow Blower Owners Manual by MTD SKU UPC Model
Marc Paul on Aug 11, 2018.

lost the manual, I need another one


Allan on Oct 20, 2017.

Just bought this machine off craigslist. Guy says it hasn't worked since last service. Can see the idler was set up wrong and it looks like the belt is the wrong size. Hopefully this manual will help diagnosis and repair.


brandon on Oct 29, 2016.

good smowplower but can't find instructions on what oil to use and how to change the oil.


John Laverty on Jan 23, 2016.

good smowplower but can't find instructions on what oil to use and how to change the oil.


lloyd on Jul 04, 2015.

Good machine but missing the manual


clair leger on Mar 20, 2015.

i have had this for 4 winters now and we get a lot of snow here works great blows snow with easy even 3 to 4 feet of snow only prob is with heavy slushy snow it tends to plug up other than that can^t say a bad word about it.i would recomend this blower to anyone


Wayne on Feb 21, 2015. good snowblower

It is a good snowblower. I have had no trouble with it and I have had it for10 years


leo larochelle on Feb 13, 2013.


3 thoughts on “Yardworks 603753-6 60-3754-4 Snow Blower Owners Manual by MTD

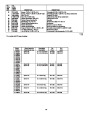
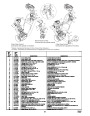
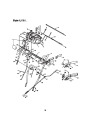
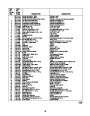
  1. I have a model 31AE295-515 (60-3752-8) Series 1HO 21B20 775. Can you advise me as to the proper size for the belt for this model. Thank you James Maxim

  2. I have a 28in snowblower I bought 3 years ago but I cant find a head light bulb to fit it

  3. I have the owners manual 60-3754-4 which tells me I should change the oil every season but nowhere does it say how much oil to use, what type, where it goes or how to drain it.

Leave a Reply

Your email address will not be published. Required fields are marked *

*
*
Website