


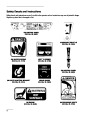


4.
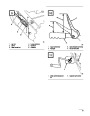
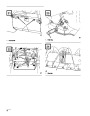
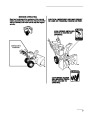
Install new belt around large auger/impeller
pulley (Fig. 26). Next, loop belt over engine
pulley, making sure that belt is on inside of idler
pulley and belt guide (Fig. 26).
8.
9.
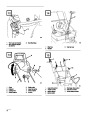
Set unit upright and remove traction drive belt
from engine pulley and large traction pulley
(Fig. 26).
Install new belt around large traction pulley.
Next, loop belt over engine pulley, making sure
that belt is on inside of belt guide (Fig. 26).
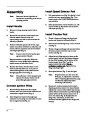
5.
6.
Adjust auger drive linkage. Refer to steps 4–6 of
Install Auger Drive Control Linkage, page 9.
Reinstall belt cover with (2) screws.
10. Tip snowthrower forward and block it so it
cannot fall.
Replacing Traction Drive Belt
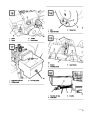
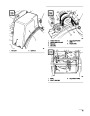
11. Hook spring into notch in bottom edge of side
plate (Fig. 27).
When traction drive belt becomes worn, stretched,
oil–soaked or otherwise defective, belt replacement is
required.
12.
13.
Replace bottom cover with four screws and set
unit upright.
Reinstall auger/impeller drive belt around large
auger/impeller pulley and engine pulley, making
sure that belt is on inside of idler pulley and belt
guide (Fig. 26).
1.
2.
3.
4.
5.
6.
7.
Pull wire off spark plug and make sure it does
not contact the plug accidentally.
Drain gasoline from fuel tank. Refer to Draining
Gasoline, page 14.
Note:
If auger/impeller drive belt is replaced
with a new belt, adjust auger drive
linkage. Refer to steps 4–6 of Install
Auger Drive Control Linkage, page 9.
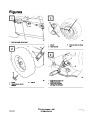
Remove (2) screws holding belt cover in place
and set cover aside (Fig. 25).
Remove auger/impeller drive belt from engine
pulley and large auger/impeller pulley (Fig. 26).
14.
Reinstall belt cover with (2) screws.
Tip snowthrower forward and block it so it
cannot fall.
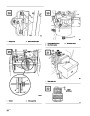
Adjusting Traction Drive
Remove (4) screws securing bottom cover to
frame (Fig. 26). Remove bottom cover.
If speed selector shifts properly but snowthrower does
not drive in reverse or forward speeds, an adjustment
may be required.
Disconnect spring from notch in bottom edge of
side plate (Fig. NO TAG).
1.
Check adjustment per steps 5 and 6 of Install
Traction Rod, page 8. Make adjustments if
required.
2.
If linkage is adjusted correctly and problem
persists, contact your local Authorized Toro
Service Dealer.
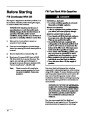
POTENTIAL HAZARD
•
Spring is under heavy tension.
WHAT CAN HAPPEN
•
Spring could be thrown in operator’s or
bystander’s direction.
Adjusting Speed Selector
HOW TO AVOID THE HAZARD
• Use caution when removing spring.
If there is slow or no ground speed in No.1 speed
selection, or speed selector cannot be moved into No.
3
speed selection, an adjustment of the speed selector
linkage is required.
16
| Categories | Snow Blower Manuals, Toro Snow Blower |
|---|---|
| Tags | Toro 38052 |
| Model Number | 38052 |
| Model Year | 1995 |
| Download File |
|
| Document Type | Operator's Manual |
| Language | English |
| Serial Number | 59000001 - 59999999 |
| Product Name | 521 Snowthrower |
| Product Brand | Toro. Customer Service Representatives are available by phone:
Monday - Friday 7:30 a.m. to 9:00 p.m. (CDT) - Saturday 8:00 a.m. to 8:00 p.m. (CDT) - Sunday 10:00 a.m. to 8:00 p.m. (CDT)
Canada 1-888-225-4886 USA 1-888-384-9939, Snow Blower |
| Product Type | Snowthrower |
| Product Series | Snowthrower, Two Stage Small Frame |
| Swath | 21 inch |
| Discharge | Two Stage |
| Engine Manufacturer | Tecumseh |
| Engine Motor Model # | HSSK50-67259N |
| Engine Motor Size | 5 hp |
| Engine Motor Type | 4 Cycle |
| Transmission Speed | 3 Forward/1 Reverse |
| Transmission Type | Friction Disc |
| Document File Type | |
| Publisher | toro.com |
| Wikipedia's Page | Toro Company |
| Copyright | Attribution Non-commercial |
(0 votes, average: 0 out of 5)