


Note:
Wait several seconds between each 1/8
turn setting so engine can adjust to the
new fuel mixture.
IMPORTANT: A cracked, fouled or dirty
spark plug must be replaced. Do not sand
blast, scrape or clean electrodes because grit
may eventually release from the plug and fall
into the cylinder. The result will likely be
engine damage.
6.
7.
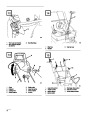
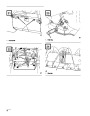
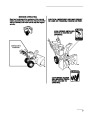
Move throttle to idle speed. Next, rotate idle
speed screw until engine idles fast—1750 rpm.
Rotate idle mixture screw (Fig. 30)
3.
4.
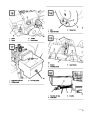
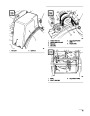
Set air gap between electrodes of new spark plug
at 0.030” (0.76 mm) (Fig. 32). Next, install
spark plug incylinder head. Tighten plug to 15
ft–lb (20.4 N m).
clockwise—in—1/8 turn at a time until engine
begins to miss because of a lean mixture. Then
rotate screw counterclockwise—out—1/8 turn at
a time until engine runs unevenly because of rich
mixture. Next, rotate idle mixture screw
clockwise, back to the mid–point between rich
and lean settings.
Push the wire onto the spark plug (Fig. 31).
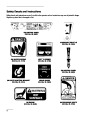
Storage
Note:
Wait several seconds between each 1/8
turn setting so engine can adjust to the
new fuel mixture.
1.
PREPARE THE FUEL SYSTEM:
8.
9.
Again, rotate idle speed screw (Fig. 30) until
engine idles at 1750 rpm.
•
Add Toro Stabilizer/Conditioner to the fuel tank
(one ounce per gallon of fuel).
Check carburetor adjustment by quickly moving
throttle from low speed to high speed. Engine
should accelerate without hesitation or
sputtering. If engine does not accelerate properly,
adjust carburetor to a slightly richer mixture.
Also, if engine falters under load, open power
adjusting screw 1/8 turn counterclockwise.
•
•
Run engine for five minutes to distribute
conditioned fuel through fuel system.
Stop engine, allow it to cool, and drain fuel tank
or run engine until it stops.
•
•
Restart the engine again and run it until it stops.
Either choke or prime the engine, restart it a
third time and run engine until it will not restart.
10.
After carburetor is adjusted, shut engine off
before replacing carburetor heater box.
•
Dispose of fuel properly. Recycle per local
codes.
Replacing Spark Plug
•
DO NOT store STABILIZED gasoline over 90
days.
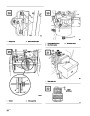
Use a Champion RJ–19LM spark plug or equivalent.
Set air gap at 0.030” (0.76 mm). Since air gap
between center and side electrodes of the spark plug
increases gradually during normal engine operation,
install a new plug after every 25 hours of engine
operation.
2.
Remove spark plug from cylinder head. Next,
pour two teaspoons of engine oil into spark plug
hole in cylinder head. Install spark plug in
cylinder head, but do not install wire on the
plug. Then pull recoil starter slowly to distribute
oil on inside of cylinder.
1.
Clean area around spark plug so foreign matter
cannot fall into cylinder when plug is removed.
3.
Lubricate the snowthrower: refer to Lubricating
Snowthrower, page 14. Change crankcase oil:
see Changing Crankcase Oil, page 15.
2.
Pull wire off spark plug (Fig. 31) and remove
plug from cylinder head.
18
| Categories | Snow Blower Manuals, Toro Snow Blower |
|---|---|
| Tags | Toro 38052 |
| Model Number | 38052 |
| Model Year | 1995 |
| Download File |
|
| Document Type | Operator's Manual |
| Language | English |
| Serial Number | 59000001 - 59999999 |
| Product Name | 521 Snowthrower |
| Product Brand | Toro. Customer Service Representatives are available by phone:
Monday - Friday 7:30 a.m. to 9:00 p.m. (CDT) - Saturday 8:00 a.m. to 8:00 p.m. (CDT) - Sunday 10:00 a.m. to 8:00 p.m. (CDT)
Canada 1-888-225-4886 USA 1-888-384-9939, Snow Blower |
| Product Type | Snowthrower |
| Product Series | Snowthrower, Two Stage Small Frame |
| Swath | 21 inch |
| Discharge | Two Stage |
| Engine Manufacturer | Tecumseh |
| Engine Motor Model # | HSSK50-67259N |
| Engine Motor Size | 5 hp |
| Engine Motor Type | 4 Cycle |
| Transmission Speed | 3 Forward/1 Reverse |
| Transmission Type | Friction Disc |
| Document File Type | |
| Publisher | toro.com |
| Wikipedia's Page | Toro Company |
| Copyright | Attribution Non-commercial |
(0 votes, average: 0 out of 5)