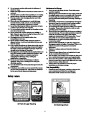
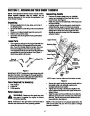


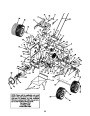
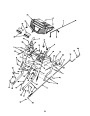
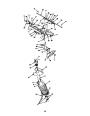

Wheel Drive Control
Chute Assembly
If you are uncertain about correct adjustment, proceed
as follows:
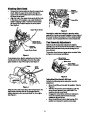
The distance snow is thrown can be adjusted by
adjusting the angle of the chute assembly. Refer to
page 9 for instructions.
•
Drain the gasoline out of your snow thrower’s
engine, and place a piece of plastic film under the
gas cap to avoid spillage.
The remote chute control cables have been pre-
adjusted at the factory. Move the remote chute lever on
the control panel back and forward to adjust angle of
the chute assembly.
•
•
•
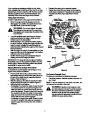
Tip the snow thrower forward, allowing it to rest on
the auger housing.
Remove the frame cover underneath the snow
thrower by removing six self-tapping screws.
Locate the opening between the axle support
bracket and the front frame support (See Figure
12). Looking through the opening, perform the
following checks and adjust as necessary:
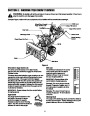
a. With the wheel drive control released, check if
there is clearance between friction wheel and
drive plate in all positions of the shift lever. See
Figure 12.
Skid Shoe
The space between the shave plate and the ground can
be adjusted by raising or lowering the skid shoes.
For close snow removal on a smooth surface such as a
concrete or asphalt driveway, place the skid shoes in
the low position.
Adjust the skid shoes to the middle or high position
when the area to be cleared is uneven.
b. With the wheel drive lever engaged, check if the
friction wheel solidly contacts the drive plate.
See Figure 12.
c. If there is no friction wheel clearance, or the
friction wheel does not solidly contact the drive
plate, re-adjust the lock nut on the lower end of
the wheel drive cable following the instructions
on page 7.
When operating on gravel or stone driveways, always
put skid shoes in the high position.
Adjust skid shoes as follows (Refer to Figure 13):
•
Loosen, but do not remove, the three hex lock nuts
which fasten the skid shoe to the auger housing.
Raise or lower the skid shoe as needed to place the
shave plate in the desired position above the
ground.
•
•
•
Reassemble the frame cover.
If you placed plastic film under the gas cap earlier,
remove it now.
•
•
Retighten the hex lock nuts loosened earlier.
As close as possible, adjust the skid shoe on the
other side into the same position on the auger
housing .
Trigger Cables
Shift Arm
Drive Actuator
Bracket
Auger
Actuator
Bracket
Hex Screw &
Belleville
Washer
Hex Drive
Shaft
High
Rubber
Friction
Wheel
Shave
Plate
Low
Drive
Plate
Carriage
Bolts
Axle Support
Brkt. Opening
Hex Nuts
Skid
Shoes
Figure 12
Figure 13
Auger Control
Refer to instructions for adjusting the auger control on
page 7. Make certain to check for correct adjustment
as instructed before operating the snow thrower.
NOTE: Make certain the bottom surface of skid shoe is
flat against the ground to avoid uneven wear
12
| Categories | Cub Cadet Snow Blower Manuals, MTD Snow Blower Manuals, Snow Blower Manuals |
|---|---|
| Tags | Cub Cadet 928 SWE, Cub Cadet 933 SWE, Cub Cadet 945 SWE, MTD 928 SWE, MTD 933 SWE, MTD 945 SWE, MTD Snow Blower Manual |
| Download File |
|
| Document Type | Owner's Manual |
| Language | English |
| Product Brand | MTD, Snow Blower |
| Document File Type | |
| Publisher | mtdproducts.com |
| Wikipedia's Page | MTD Products |
| Copyright | Attribution Non-commercial |
(0 votes, average: 0 out of 5)