


If you experienced resistance rolling the unit, either
when repositioning the shift lever from 6 to R2 or when
attempting to move the machine with the drive control
released, adjust the drive control immediately. See
Adjusting Wheel Drive and Auger Drive Controls.
•
•
Reattach the spring to the actuator bracket.
Repeat the wheel drive and auger control tests to
verify proper adjustment. Repeat previous steps if
necessary to attain proper adjustment of each
cable.
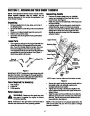
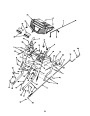
Testing Auger Drive Control
Check the adjustment of the auger control as follows:
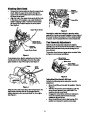
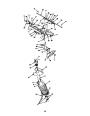
Auger Drive
Control Cable
Wheel Drive
Control Cable
•
When the auger control is released and in the
disengaged “up” position, the cable should have
very little slack, but should NOT be tight.
WARNING: Do not over-tighten the cable.
Over-tightening may prevent the auger from
disengaging and compromise the safety of the
snow thrower.
Wheel
Spring
•
•
In a well-ventilated area, start the snow thrower
engine as instructed on page 9. Make sure the
throttle is set in the fast position.
While standing in the operator’s position (behind
the snow thrower), engage the auger and allow the
auger to remain engaged for approximately ten
seconds before releasing the auger control. Repeat
this several times.
Wheel Drive
Actuator Bracket
Auger
Spring
Auger Drive
Actuator Bracket
•
•
With the engine running in the fast position and the
auger control lever in the disengaged “up” position,
walk to the front of the machine.
Confirm that the auger has completely stopped
rotating and shows no signs of motion.
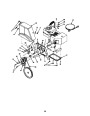
Figure 7
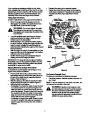
Coupler
Spring
IMPORTANT: If the auger shows any signs of rotating,
immediately return to the operator’s position and shut
off the engine. Wait for all moving parts to stop before
readjusting the auger control cable.
Cable
Lock Nut
Adjusting Wheel Drive and Auger Drive Controls
To readjust the control cables, refer to Figure 7 and
Figure 8 and proceed as follows:
Figure 8
•
From beneath the handle, pull downward on the
appropriate cable and unhook the spring found on
the end of the cable from its respective actuator
bracket. Refer to Figure 7.
Slide the spring up the cable to expose the cable
coupler threads and lock nut. Refer to Figure 8.
Adjust the lock nut as follows:
Tire Pressure (Pneumatic Tires)
The tires are overinflated for shipping purposes.
•
Check tire pressure. Maintain pressure between 10
and 14 psi.
•
•
NOTE: If the tire pressure is not equal in all tires, the
unit may pull to one side or the other.
-
-
If adjusting the wheel drive cable, thread the lock
nut outward (down the coupler) to lengthen the
cable and allow the unit to move freely when the
control is released. Thread the lock nut inward (up
the coupler) to shorten the cable to reduce slip-
page and prevent the machine from being easily
moved with the drive control engaged.
If adjusting the auger drive cable, thread the lock
nut down to lengthen the cable as necessary to
stop the auger from turning when the control is
released.
WARNING: Maximum tire pressure under
any circumstance is 30 psi. Equal tire pressure
should be maintained at all times. Excessive
pressure (over 30 psi) when seating beads
may cause tire/rim assembly to burst with force
sufficient to cause serious injury.
7
| Categories | Cub Cadet Snow Blower Manuals, MTD Snow Blower Manuals, Snow Blower Manuals |
|---|---|
| Tags | Cub Cadet 928 SWE, Cub Cadet 933 SWE, Cub Cadet 945 SWE, MTD 928 SWE, MTD 933 SWE, MTD 945 SWE, MTD Snow Blower Manual |
| Download File |
|
| Document Type | Owner's Manual |
| Language | English |
| Product Brand | MTD, Snow Blower |
| Document File Type | |
| Publisher | mtdproducts.com |
| Wikipedia's Page | MTD Products |
| Copyright | Attribution Non-commercial |
(0 votes, average: 0 out of 5)