


SECTION 7: SERVICING YOUR SNOW THROWER
WARNING: Before servicing, repairing, or
inspecting, disengage all clutch levers and stop
engine. Wait until all moving parts have come
to a complete stop. Disconnect spark plug wire
and ground it against the engine to prevent
unintended starting.
Shave Plate
Carriage Bolts
Augers
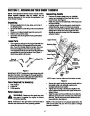
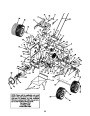
The auger spirals are secured to the auger shaft with
shear pins and bowtie cotter pins. If you hit a foreign
object or ice jam, the snow thrower is designed so that
the pins may shear. Refer to Figure 14.
If the augers do not turn, check if the pins have
sheared. Two replacement shear pins and bowtie cotter
pins have been provided with the snow thrower. When
replacing pins, spray an oil lubricant into shaft before
inserting new pins.
Skid
Shoe
Skid
Shoe
Bell Washers
Hex Lock Nuts
IMPORTANT: NEVER replace the auger shear pins with
standard hex bolts. Any damage to the auger gearbox
or other components, as a result of doing so, will NOT
be covered by your snow thrower’s warranty.
Figure 17
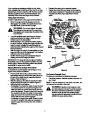
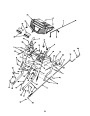
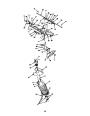
Replacing Belts
Snow Thrower Preparation
Shave Plate and Skid Shoes
•
Disconnect the chute crank assembly at the
The shave plate and skid shoes on the bottom of the
snow thrower are subject to wear. These should be
checked periodically and replaced when necessary.
discharge chute end by removing the internal cotter
pin and flat washer.
Remove the plastic belt cover, located near the
engine, by removing the three self-tapping screws
and flat washers.
•
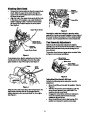
Skid Shoes
NOTE: The skid shoes on this machine have two wear
edges. When one side wears out, they can be rotated
180° to use the other edge.
Belt Cover
Bolts(3)
Internal
Cotter Pin
Flat
Washer
Belt Cover
•
Remove the six carriage bolts, hex nuts, and bell
washers that secure the two skid shoes to the sides
of the auger housing. Refer to Figure 13.
•
Position the new skid shoes and secure with the
carriage bolts, bell washers, and hex nuts. Make
certain the skid shoes are adjusted to be level.
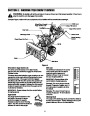
Shave Plate
Replace the shave plate as follows (See Figure 17):
•
Remove the five (seven on 45" S.T.), hex nuts, bell
washers, and carriage bolts that secure the shave
plate to the bottom of the housing.
•
Remove the rear most hex nut, bell washer, and
carriage bolt securing the back of each skid shoe to
the sides of the housing. Loosen the four remaining
hex nuts securing the skid shoes.
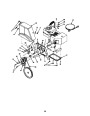
Upper Bolt
•
•
Slide the shave plate out of the off-set slot at the
bottom of the housing, and from between the skid
shoes and side panels of the housing.
With the mounting holes toward the back, slide the
new shave plate into position and secure with the
fasteners removed previously.
(remove)
Support
Tube Bolt
Shoulder Bolt
(do not remove)
Figure 18
15
| Categories | Cub Cadet Snow Blower Manuals, MTD Snow Blower Manuals, Snow Blower Manuals |
|---|---|
| Tags | Cub Cadet 928 SWE, Cub Cadet 933 SWE, Cub Cadet 945 SWE, MTD 928 SWE, MTD 933 SWE, MTD 945 SWE, MTD Snow Blower Manual |
| Download File |
|
| Document Type | Owner's Manual |
| Language | English |
| Product Brand | MTD, Snow Blower |
| Document File Type | |
| Publisher | mtdproducts.com |
| Wikipedia's Page | MTD Products |
| Copyright | Attribution Non-commercial |
(0 votes, average: 0 out of 5)