


5.
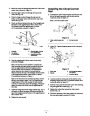
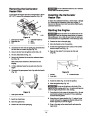
Loosen the 4 flange nuts that secure both skids to the
auger side plates (Fig. 22) until the skids slide up and
down easily.
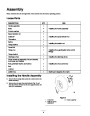
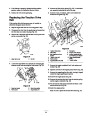
8. To adjust the scraper, loosen the 5 mounting screws
(Fig. 23), level the scraper, and tighten the mounting
screws.
9.
Move the skids down as far as possible.
10.
Tighten the 4 flange nuts that secure both skids to the
auger side plates (Fig. 22).
11.
Connect the wire to the spark plug.
1
3
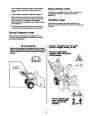
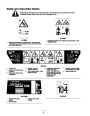
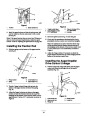
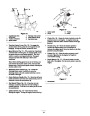
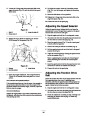
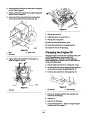
Adjusting the Speed Selector
651
2
Adjust the speed selector linkage initially and when the
snowthrower is slow, first gear has no speed, or the speed
selector does not move into fifth gear.
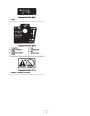
Figure 22
1.
2.
Skid (2)
3. Auger side plate (2)
Flange nuts (4)
1.
2.
Stop the engine and wait for all moving parts to stop.
Disconnect the wire from the spark plug and ensure that
the wire does not contact the plug (Fig. 18).
6.
Support the auger blades so that they are 1/8 inch
millimeters) off the ground (Fig. 23).
(3
3.
Move the speed selector (Fig. 15) on the control panel
to the R2 (Reverse) position.
3
4.
5.
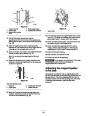
Remove the cotter pin and the flat washer (Fig. 6).
Pull the speed selector rod out of the hole in the speed
selector arm (Fig. 6).
2
2
6.
Adjust the forward speed by rotating the speed selector
rod in the trunnion (Fig. 7).
Note: Lengthening the rod makes the forward speed
faster; shortening the rod makes the forward speed
slower.
1
652
7.
Insert the speed selector rod into the speed selector arm
and secure it with the flat washer and cotter pin.
Figure 23
1.
2.
Scraper
3.
Auger blades
8. Connect the wire to the spark plug.
Mounting screws
Adjusting the Traction Drive
Belt
7.
Check the scraper adjustment. The scraper should be
1/8 inch (3 millimeters) above and parallel to a level
surface.
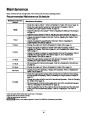
Check the traction drive belt for the proper tension after the
first operating hour, after every 5 operating hours
thereafter, and when the speed selector shifts properly but
the snowthrower does not drive in the forward or reverse
speeds. Adjust the belt when necessary.
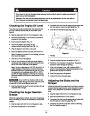
For Concrete and Asphalt Surfaces:
If the snowthrower does not clear the snow close enough to
the pavement, adjust the skids to lower the scraper; if the
pavement surfaces are cracked, rough, or uneven, adjust the
skids to raise the scraper.
1.
2.
Stop the engine and wait for all moving parts to stop.
Disconnect the wire from the spark plug and ensure that
the wire does not contact the plug (Fig. 18).
For Gravel Surfaces:
Support the auger blades a few inches (centimeters) above
the ground, and adjust the skids to prevent the snowthrower
from picking up rocks.
3.
Check the adjustment according to steps 3 through 6 of
Installing the Traction Rod on page 10. Make any
needed adjustments.
20
| Categories | Snow Blower Manuals, Toro Snow Blower |
|---|---|
| Tags | Toro 38053, Toro 521, Toro 824 Power Throw |
| Model Number | 38053 |
| Model Year | 2002 |
| Download File |
|
| Document Type | Operator's Manual |
| Language | English |
| Serial Number | 220000001 - 220999999 |
| Product Name | 824 Power Throw Snowthrower |
| Product Brand | Toro. Customer Service Representatives are available by phone:
Monday - Friday 7:30 a.m. to 9:00 p.m. (CDT) - Saturday 8:00 a.m. to 8:00 p.m. (CDT) - Sunday 10:00 a.m. to 8:00 p.m. (CDT)
Canada 1-888-225-4886 USA 1-888-384-9939, Snow Blower |
| Product Type | Snowthrower |
| Product Series | Snowthrower, Two Stage Intermediate Frame |
| Swath | 24 inch |
| Discharge | Two Stage |
| Engine Manufacturer | Tecumseh |
| Engine Motor Model # | HMSK80-155645W |
| Engine Motor Size | 8 hp |
| Engine Motor Type | 4 Cycle CARB1, EPA1 |
| Transmission Speed | 5 Forward/2 Reverse |
| Transmission Type | Friction Disc |
| Document File Type | |
| Publisher | toro.com |
| Wikipedia's Page | Toro Company |
| Copyright | Attribution Non-commercial |
(0 votes, average: 0 out of 5)