


SB2040 Snowblower
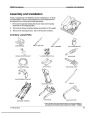
Assembly and Installation
Assemble the Snowblower
FOLLOW THESE INSTRUCTIONS CAREFULLY. Correct installation of this snowblower is essential for
safe, reliable operation.
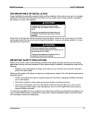
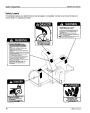
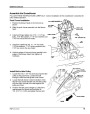
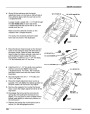
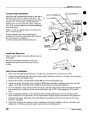
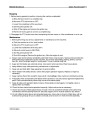
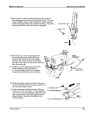
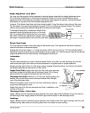
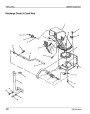
Push Frame Installation
1.
Position the blower head on its front end as
shown.
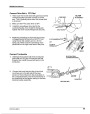
2.
Slide the push frame assembly into the blower
head.
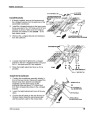
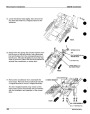
3.
Install and finger-tighten two 7/16 x 1-1/4" hex
bolts, 7/16" flat washers, 7/1 6" lock washers and
7/16"
hex nuts to the front holes.
4.
Install two additional 7/16 x 1 -1/4" hex bolts,
" flat washers, 7/16" locking washers and
hex nuts to the rear holes.
7/16
7/16"
5.
Hold the edges of the push frame parallel to the
edges of the blower head, then tighten all
hardware.
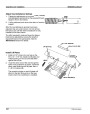
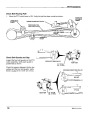
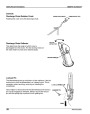
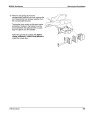
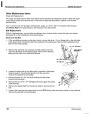
BELT
Install Belt to Idler Pulley
1.
Locate the 3/8 x 1-3/4" hex bolt securing the idler
pulley to the push frame. Loosen this bolt
enough to allow the belt guard to be moved.
2.
Locate the belt where it exits the bottom of the
blower head. Install the belt onto the idler pulley
with the wide, flat side of the belt against the
pulley as shown.
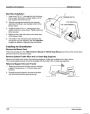
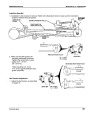
3.
Position the belt guard straight up. Adjust the
gap between the guard and the pulley to
1/8
- 3/16" (3 - 5 mm) and tighten the hex bolt.
PUSH FRAME
POP52152 (9610)
9
| Categories | Honda Snow Blower Manuals, Snow Blower Manuals |
|---|---|
| Tags | Honda SB2040 |
| Download File |
|
| Document Type | Owner's Manual |
| Language | English |
| Product Brand | Honda, Snow Blower |
| Document File Type | |
| Publisher | hondapowerequipment.com |
| Wikipedia's Page | Honda |
| Copyright | Attribution Non-commercial |
(0 votes, average: 0 out of 5)