


SB2040 Snowblower
Maintenance & Adjustments
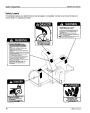
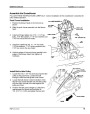
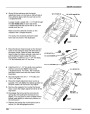
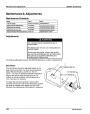
Height Adjustment Lever Effort
You may vary the amount of effort required to raise the blower head with the height adjustment lever.
This is done by lengthening or shortening the exposed threads on the two counterbalance spring
adjustment bolts. This balances the weight of the blower head against the springs, making the blower
head easier (or harder) to lift with the height adjustment lever.
However, if the blower head does not have enough weight, it may float above the surface of the snow.
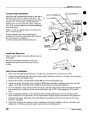
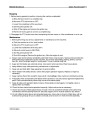
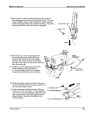
For this reason, the recommend setting is to leave 75 mm (3 inches) of exposed thread. This setting
offers a good compromise between lifting effort and blower head weight.
75
mm (3.0 in.)
To decrease lifting effort, increase the length of the
exposed threads by tightening the hex nut on each
bolt. To increase effort, loosen the hex nut on each
bolt. When making any adjustments, always make sure
the length of exposed thread is the same for both bolts.
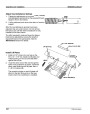
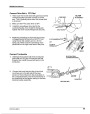
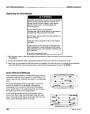
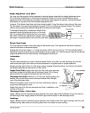
Blower Head Angle
You may adjust the angle of the lower edge of the blower head. This adjustment will allow the blower
head to tilt forward or backward slightly.
Engage the lockout pin (page 11). Locate and loosen (don't remove) the four 7/16" hex boltsthat attach
the blower head to the push frame (see illustration at top of page 10). Hold the blower head at the desired
angle and tighten the four bolts securely. Disengage the lockout pin.
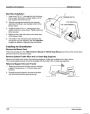
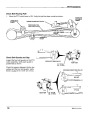
Lubrication
Chain
The drive belt operates two chains inside the blower head. One chain runs the discharge fan and the
other drives the auger. Both chains must be lubricated on a regular basis for proper operation.
Always park the lawn tractor on a flat, level surface, engage the parking brake, and remove the ignition
key before attempting to lubricate any of the chains.
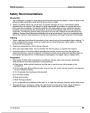
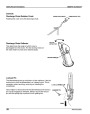
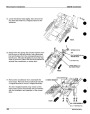
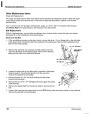
Auger Drive Chain: Apply chain saw oil to the main auger sprocket
and chain located on the right side of the blower head. Put on heavy
gloves and turn the auger to lubricate the rest of the chain.
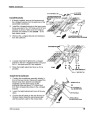
1/4 x 3/4" HEX BOLT
Discharge Fan Chain: Remove a 1/4" hex bolt, retaining plate, lock
washer, hex nut and chain cover hold-down bracket from the right
rear of the discharge chute.
Remove the plastic chain cover from the rear of the blower head to
expose the discharge fan chain.
1/4" L
1/4" HEX NUT
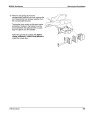
Apply chain saw oil to the two sprockets and chain. Installation is the
reverse of removal.
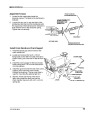
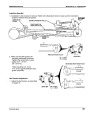
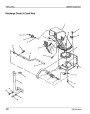
Discharge Chute & Worm Gear
Apply a liberal amount of general purpose grease to the outer edge of the antifriction ring on the base of
the discharge chute. Apply grease to the worm gear and the sector on the discharge chute.
Bushings
Apply a liberal amount of general purpose grease to the insides of the worm gear bushings and the crank
handle bushing. Wipe away any excess grease from the outside of each bushing.
POP 52152 (9610)
35
| Categories | Honda Snow Blower Manuals, Snow Blower Manuals |
|---|---|
| Tags | Honda SB2040 |
| Download File |
|
| Document Type | Owner's Manual |
| Language | English |
| Product Brand | Honda, Snow Blower |
| Document File Type | |
| Publisher | hondapowerequipment.com |
| Wikipedia's Page | Honda |
| Copyright | Attribution Non-commercial |
(0 votes, average: 0 out of 5)