


Twin 101 Plus - 140 Plus
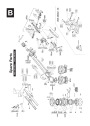
DRIVE ARM ALIGNMENT CONTROL
CONTRÔLE DE L’ALIGNEMENT
DU BRAS OSCILLANT
Pour contrôler l’alignement du bras oscillant après un dégât
accidentel, une chute sévère ou un renversement du chariot
porte-canon, suivre les instructions suivantes:
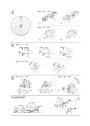
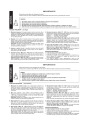
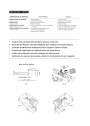
1) Monter le calibre à la place de la buse, Fig. 2. Le calibre
peut être construit selon les dimensions indiquées sur la
Fig. 1.
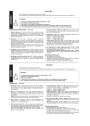
2) Contrôler l’alignement côté gauche et côté droit du déflec-
teur avec le calibre comme indiqué sur les Fig. 3 et 4, en
faisant basculer le bras oscillant de part et d’autre à l’aide
du levier d’inversion.
3) Si l’alignement des deux côtés du déflecteur est différent
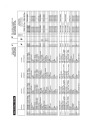
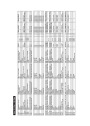
par rapport au calibre, le pivot de l’étrier F.1-P (voir liste
des pièces) a été très vraisemblablement tordu. Remplacer
par un étrier neuf (réf. pièce: F.00-1-P kit étrier ou D.00.2).
Pour le remplacement consulter les instructions contenues
dans la section D.
To control the alignment of the drive arm after accidental da-
mage, bad fall or turnover of the sprinkler cart, follow the in-
structions below:
1)
Mount the gauge in place of the nozzle, Fig. 2. The gauge
can be tooled according to the dimensions given in Fig. 1.
2)
Check the right hand and the left hand alignment of the de-
flector with the gauge as shown in Fig. 3 and Fig. 4 by flip-
ping the drive arm from side to side acting on the part cir-
cle lever to flip the arm.
3)
A major difference in the alignment of both sides of the de-
flector in respect to the gauge, is an indication that the
shaft in the bracket F. 1-P (see spare parts list) is most likely
bent. Replace with a new bracket (spare parts ref. Ass.
Bracket F.00-1-P or D.00.2). For replacement instruction
consult sectionD.
KONTROLLE DER AUSRICHTUNG
DES SCHWINGARMS
Um die Ausrichtung des Schwingarms nach Beschädigung
des Regners z.B. durch Umkippen des Regnerwagens zu
überprüfen, wie folgt vorgehen:
ENSAYO DE LA ALINEACIÓN
DEL BRAZO OSCILANTE
Para comprobar la alineación del brazo oscilante después de
un daño accidental, mala caida o vuelco del carrel porta-
aspersor, sigue las instrucciones a continuación:
1) Monte el calibrador en lugar de la boquilla, Fig. 2. Se pue-
de fabricar el calibrador secundo las dimensiones indica-
das en la Fig. 1.
2) Comprobe la alineación del lado izquierdo y derecho del
deflector con el calibrador como indicado en las Fig. 3 y 4,
haciendo bascular el brazo oscilante por las dos partes con
la palanca de inversión.
3) Si encontra-se diferencias en la alineación de los lados del
deflector respecto al calibrador, l’eje de la abrazadera
F.1-P (ver lista de los repuestos) muy posibilmente es tor-
cido. Sustituir con una abrazadera nueva (ref. recambio:
F.00-1-P kit abrazadera o D.00.2). Para la sustitución con-
sulte las instrucciones de servicio sección D.
1)
2)
3)
An Stelle der Düse die Lehre montieren, Fig. 2. Die Lehre
kann an Hand der Skizze Fig. 1, einfach selbst hergestellt
werden.
Durch Betätigen des Wendehebels die Fluchtung des
Ablenkers mit der Lehre auf beiden Seiten, wie in Fig. 3 und
Fig. 4 dargestellt, überprüfen.
Eine Differenz in der Fluchtung zwischen den beiden Sei-
ten ist Hinweiß, daß wahrscheinlich die Welle im Lagerbock
F.1-P (siehe E-Teile Liste) verbogen ist. Durch einen neuen
Lagerbock (E-Teil Ref. F.00.1-P oder D.00.2) ersetzen. Der
Austausch ist in der Sektion D beschrieben.
CONTROLLO ALLINEAMENTO
DEL BRACCIO OSCILLANTE
Per controllare l’allineamento del braccio oscillante dopo dan-
neggiamento accidentale, p.es. rovesciamento del carrello
porta irrigatore, seguire le istruzioni sotto descritte:
CONTROLE DE ALINHAMENTO DO BALANCIM
Para verificar o alinhamento do balancim após dano aciden-
tal causado por queda severa ou tombamento do carro asper-
sor, siga as instruções abaixo:
1)
Monte o calibrador no lugar do bocal (fig. 2). O calibrador
pode ser usinado de acordo com as medidas apresenta-
das na fig. 1.
1)
Montare la dima al posto del boccaglio, Fig. 2. La dima può
facilmente essere tornita come da Fig. 1.
2)
Controllare l’allineamento tra deflettore e dima su entram-
bi i lati, come da Fig. 3 e Fig. 4, azionando la leva settore
per esporre i singoli lati.
2)
Verifique o alinhamento direito e esquerdo do defletor com
o uso do calibrador, conforme mostrado nas fig. 3 e 4; faça
oscilar o balancim de um lado para outro, movimentando
manualmente a haste do dispositivo setorial do aspersor.
3)
Una differenza di allineamento sostanziale tra i due lati del
deflettore rispetto alla dima è indice che il perno centrale
nella staffa F.1-P (vedi lista ricambi) è probabilmente pie-
gato. Sostituire con una staffa nuova (rif. ricambi F.00.1-P
oppure D.00.2). Per la sostituzione consultare la sezione D
di questo manuale.
3)
Caso seja constatado um desalinhamento significativo dos
lados do defletor em relação ao calibrador, é bastante
provável que o eixo da abraçadeira F.1-P (veja relação de
peças de reposição) encontre-se torcido.
Nesse caso, providenciar a substituição do conjunto dani-
ficado por um novo (conjunto da abraçadeira F.00-1-P ou
D.00.2, conforme lista de peças de reposição). Para obter
instruções de desmontagem e montagem, consulte a
seção D de esto manual.
| Categories | Sprinkler and Irrigation Manuals, Toro Sprinkler and Irrigation Manuals |
|---|---|
| Tags | Toro 101 Plus, Toro 140 Plus, Toro 160 Pro, Toro 202 Pro |
| Download File |
|
| Language | English |
| Product Brand | Toro. Customer Service Representatives are available by phone:
Monday - Friday 7:30 a.m. to 9:00 p.m. (CDT) - Saturday 8:00 a.m. to 8:00 p.m. (CDT) - Sunday 10:00 a.m. to 8:00 p.m. (CDT)
Canada 1-888-225-4886 USA 1-888-384-9939 |
| Document File Type | |
| Publisher | toro.com |
| Wikipedia's Page | Toro Company |
| Copyright | Attribution Non-commercial |
(0 votes, average: 0 out of 5)