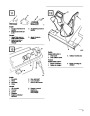


Maintenance
until struck by the rotor blades. Always be sure
to keep children and pets away from area of
operation.
NOTICE:
Maintenance, replacement or repair
of the emission control devices and
systems may be performed by any
nonroad engine repair establishment
or individual. However, to obtain no
charge repairs under the terms and
provisions of the Toro warranty
statement, any service or emission
control part repair or replacement
must be performed by an
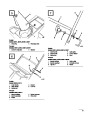
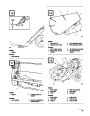
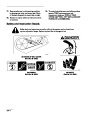
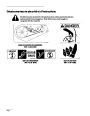
POTENTIAL HAZARD
•
Stones, toys and other foreign objects may
be picked up and thrown by the rotor
blades.
WHAT CAN HAPPEN
•
Thrown objects can cause serious personal
injury to operator or bystanders.
Authorized Toro Service Dealer.
Keep snowthrower in safe operating condition by
cleaning the unit and tightening nuts, bolts, and
screws. The scraper, drive belt, rotor blades, and
spark plug should be checked once a year.
HOW TO AVOID THE HAZARD
•
Keep the area to be cleared free of all
objects that could be picked up and thrown
by rotor blades.
•
Keep all children and pets away from area
of operation.
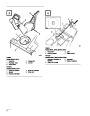
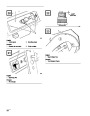
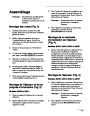
Adjusting Control Bar
Periodically check control bar for proper adjustment.
1.
2.
Turn key switch to OFF.
4.
5.
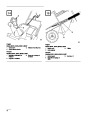
Should you find it necessary to clear snow from
crushed rock or gravel, push down on handle to
raise rotor blades clear of loose material that
could be thrown by the blades and push unit
forward.
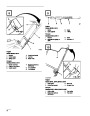
CHECK ADJUSTMENT (Fig. 8 & 10)—Move
control bar back toward handle until slack in
cable is removed. Gap between control bar
bracket and handle should be approximately
1/16”–1/8”.
If cable is too loose or too tight,
In some snow and cold weather conditions, some
controls and moving parts may freeze solid. DO
NOT USE EXCESSIVE FORCE WHEN
TRYING TO OPERATE FROZEN
CONTROLS. When any control or part
becomes hard to operate, start the engine and let
it run for a few minutes.
proceed to step 3 for adjustment procedure.
Note:
The control cable must always have
slack in it when in the disengaged
position.
3.
ADJUST CABLE
A.
Models 38409 & 38414 – Unhook spring
6.
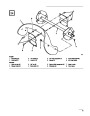
AFTER CLEARING SNOW–Let engine run
for a few minutes so ice does not freeze moving
parts solid. After engine is shut off, wipe ice and
snow off entire unit. On models 38422 & 38424,
operate chute crank several times to clear
mechanism of snow.
end from the top hole in control bar bracket
(Fig. 8). Slide spring cover off spring and
cable adjuster. Unhook Z fitting from cable
adjuster and reposition Z fitting in a higher
or lower hole on adjuster to obtain proper
gap of 1/16”–1/8” between control bar
bracket and handle (Fig. 9). (Positioning
cable end in a lower hole decreases gap;
positioning cable end in a higher hole
IMPORTANT: STORE SNOWTHROWER
IN OPERATING POSITION ON ITS
WHEELS. TIPPING OR STORING UNIT
FORWARD ONTO FRONT HOUSING
MAY CAUSE HARD STARTING.
increases gap.) Reinstall spring cover over
cable adjuster and spring. Rehook spring
into top hole of control bar bracket (Fig. 8).
EN–9
| Categories | Snow Blower Manuals, Toro Snow Blower |
|---|---|
| Tags | Toro 38432, Toro 38437, Toro CCR 3000 |
| Model Number | 9900001 - 9999999 |
| Model Year | 1999 |
| Download File |
|
| Document Type | Operator's Manual |
| Language | English, Français |
| Product Name | Toro CCR 3000 Snowthrower |
| Product Brand | Toro. Customer Service Representatives are available by phone:
Monday - Friday 7:30 a.m. to 9:00 p.m. (CDT) - Saturday 8:00 a.m. to 8:00 p.m. (CDT) - Sunday 10:00 a.m. to 8:00 p.m. (CDT)
Canada 1-888-225-4886 USA 1-888-384-9939, Snow Blower |
| Product Type | Snowthrower |
| Product Series | CCR 2000/3000/3600, Snowthrower |
| Swath | 20 inch |
| Discharge | Single Stage |
| Engine Manufacturer | Toro |
| Engine Motor Model # | Toro 2 cycle / NMMA-TCW3 |
| Engine Motor Size | 6 hp |
| Engine Motor Type | 2 Cycle EPA1 |
| Document File Type | |
| Publisher | toro.com |
| Wikipedia's Page | Toro Company |
| Copyright | Attribution Non-commercial |
(0 votes, average: 0 out of 5)