


B.
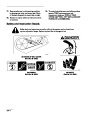
Models 38422, 38424, 38432 & 38437 –
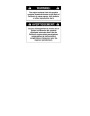
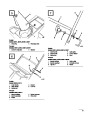
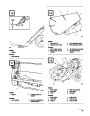
Unhook upper cable end from hole in
control bar bracket (Fig. 10). Slide spring
cover up cable to expose cable adjuster
(Fig. 15). Unhook Z fitting from cable
adjuster and reposition Z fitting in a higher
or lower hole on adjuster to obtain proper
gap of 1/16”–1/8” between control bar
bracket and handle (Fig. 10). (Positioning
cable end in a lower hole decreases gap;
positioning cable end in a higher hole
increases gap.) Reinstall spring cover over
cable adjuster. Reinstall upper cable end
into rear hole in control bar bracket (hole
with arrow) (Fig. 10).
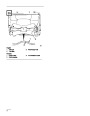
2.
Remove cap from fuel tank and use a pump type
syphon to drain fuel into a clean gas can.
Note:
This is the only procedure
recommended for draining fuel.
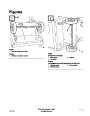
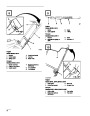
Replacing Scraper
Before each season, inspect scraper for wear. If
thickness of bottom of scraper is less than 1/16”
(1.6
mm), replace scraper (Fig. 16).
Note:
Scraper wear rates are determined by
the running time and the roughness of
the driveway or sidewalk.
1.
2.
Turn ignition key to OFF.
4.
After extended use the drive belt may wear and
proper belt tension may not be maintained.
Improper belt tension causes belt slippage and
decreases the snowthrower’s performance under
a heavy load. Belt slippage may occur after 2–3
seasons of normal usage (10–15 hours). If drive
belt slips (continuous squealing noise) under
heavy load, increase belt tension by:
Drain gasoline from fuel tank; refer to Draining
Gasoline, page 10.
3.
4.
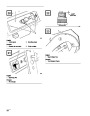
Tip snowthrower forward onto front housing.
Remove (3) carriage bolts and lock nuts holding
scraper in place (Fig. 17). Remove scraper by
sliding it to right and down.
A.
Models 38409 & 38414 – repositioning
spring end in bottom hole in control bar
bracket (Fig. 8).
5.
Install new scraper to housing using carriage
bolts and nuts.
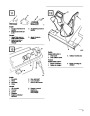
Replacing Drive Belt
B.
Models 38422, 38424, 38432 & 38437 –
repositioning upper cable end into forward
hole in control bar bracket (Fig. 10).
Inspect drive belt before each season. If ribs on inside
of belt are damaged or belt is worn, replacement is
necessary.
Readjust cable (see steps 2–3).
1.
2.
Turn ignition key to OFF.
IMPORTANT: Unnecessary use of forward or
bottom adjusting hole in control bar bracket
reduces drive belt life. Occasional belt slippage
(squealing) may occur in extremely wet
conditions due to moisture in drive system. To
remove moisture, start rotor and operate under
no load for 30 seconds. Once moisture is
removed, belt should not slip.
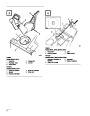
Remove (3) self tapping screws, (2) capscrews,
(1)
washer and (2) nuts securing belt cover to
snowthrower frame (Fig. 18). Set belt cover
aside.
3.
4.
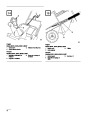
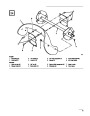
REMOVING BELT (Fig. 19)—Push down on
idler pulley allowing belt to be removed from
rotor pulley, brake arm assembly, and engine
pulley.
INSTALLING BELT (Fig. 19)—Loop belt
around engine pulley, under idler pulley, over
roller, through brake assembly, and around rotor
pulley.
Draining Gasoline
1.
Stop engine. Remove key from switch.
EN–10
| Categories | Snow Blower Manuals, Toro Snow Blower |
|---|---|
| Tags | Toro 38432, Toro 38437, Toro CCR 3000 |
| Model Number | 9900001 - 9999999 |
| Model Year | 1999 |
| Download File |
|
| Document Type | Operator's Manual |
| Language | English, Français |
| Product Name | Toro CCR 3000 Snowthrower |
| Product Brand | Toro. Customer Service Representatives are available by phone:
Monday - Friday 7:30 a.m. to 9:00 p.m. (CDT) - Saturday 8:00 a.m. to 8:00 p.m. (CDT) - Sunday 10:00 a.m. to 8:00 p.m. (CDT)
Canada 1-888-225-4886 USA 1-888-384-9939, Snow Blower |
| Product Type | Snowthrower |
| Product Series | CCR 2000/3000/3600, Snowthrower |
| Swath | 20 inch |
| Discharge | Single Stage |
| Engine Manufacturer | Toro |
| Engine Motor Model # | Toro 2 cycle / NMMA-TCW3 |
| Engine Motor Size | 6 hp |
| Engine Motor Type | 2 Cycle EPA1 |
| Document File Type | |
| Publisher | toro.com |
| Wikipedia's Page | Toro Company |
| Copyright | Attribution Non-commercial |
(0 votes, average: 0 out of 5)