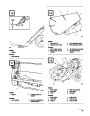


IMPORTANT: Belt must be on top of roller as
shown.
proper performance and prevent damage to underside
of snowthrower. Always replace both blades at the
same time.
5.
Reinstall belt cover. Tighten fasteners securely,
but DO NOT OVERTIGHTEN.
Note:
Whenever rotor blades are replaced,
scraper should also be replaced to
ensure proper snowthrower operation
and performance.
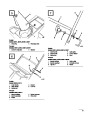
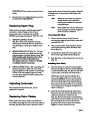
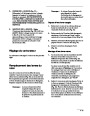
Replacing Spark Plug
Note:
Rotor blades wear rates are determined
by the running time and the roughness
of the driveway or sidewalk.
Before each snow season, check the spark plug. If
electrodes in center of plug are dark or have
deteriorated, install a new plug. Use an NGK
BPMR4A spark plug and set gap at .032” (.81 mm).
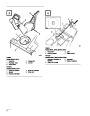
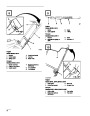
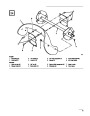
Removing Old Blade
1.
Remove (4) torx screws and (4) lock nuts
securing outer edges of rotor blade to rotor shaft
assembly (Fig. 24).
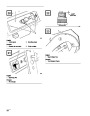
1.
2.
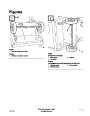
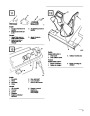
REMOVE CONTROL PANEL
(Fig. 20)—Remove (3) capscrews securing
control panel to housing. Remove ignition key
and lift off panel, allowing it to hang on recoil
rope.
2.
Next, remove (2) hex–head capscrews, spacers
and lock nuts securing center of blade to rotor
halves (Fig. 24).
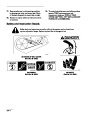
REMOVE SPARK PLUG (Fig. 21)—Pull wire
off spark plug and remove plug. Examine the
plug and replace if cracked, fouled or dirty. DO
NOT SANDBLAST, SCRAPE OR CLEAN
SPARK PLUG BECAUSE DIRT MAY
RELEASE AND FALL INTO CYLINDER
CAUSING ENGINE DAMAGE.
3.
4.
Loosen the hex–head screw securing the rotor
halves to the auger shaft assembly (Fig. 24).
Slide the blade out from between the rotor halves
(Fig. 24).
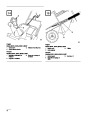
Installing New Blade
3.
INSTALL SPARK PLUG—Set air gap (Fig. 22)
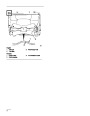
1.
The rotor blades are made of laminated rubber.
Examine the edge of a blade to see the difference
in layer thicknesses (Fig. 25). (Some blades have
a part number on the thick side of the blade.)
between electrodes at .032” (.81 mm).
Install
plug and tighten to 15 ft–lb (20.4 N m). If torque
wrench is not used, tighten plug firmly. Push
wire onto spark plug and reinstall control panel
with (3) capscrews.
Both blades must be installed with the thick
layer on the inside of the curve. If one blade is
installed with the thick layer on the outside of
the curve and the other blade installed with the
thick layer on the inside of the curve, the blades
will be unbalanced, causing the snowthrower to
“hop” or “bounce.”
Adjusting Carburetor
The carburetor has been factory set, and no
adjustment is required.
2.
Insert the new blade between the rotor halves.
Secure it to the rotor halves with (2) hex–head
capscrews, (2) spacers and (2) lock nuts
(Fig. 24). Position bolt heads on thick (bottom)
side of blade. Curve the blade, and secure it with
the remaining (4) torx screws and lock nuts
(position screw heads on thick side of blade).
Tighten all screws and nuts securely.
Replacing Rotor Blades
Before each snow season, inspect rotor blades for
wear. When blade edge has worn to the wear indicator
hole (Fig. 23), the blades must be replaced to ensure
EN–11
| Categories | Snow Blower Manuals, Toro Snow Blower |
|---|---|
| Tags | Toro 38432, Toro 38437, Toro CCR 3000 |
| Model Number | 9900001 - 9999999 |
| Model Year | 1999 |
| Download File |
|
| Document Type | Operator's Manual |
| Language | English, Français |
| Product Name | Toro CCR 3000 Snowthrower |
| Product Brand | Toro. Customer Service Representatives are available by phone:
Monday - Friday 7:30 a.m. to 9:00 p.m. (CDT) - Saturday 8:00 a.m. to 8:00 p.m. (CDT) - Sunday 10:00 a.m. to 8:00 p.m. (CDT)
Canada 1-888-225-4886 USA 1-888-384-9939, Snow Blower |
| Product Type | Snowthrower |
| Product Series | CCR 2000/3000/3600, Snowthrower |
| Swath | 20 inch |
| Discharge | Single Stage |
| Engine Manufacturer | Toro |
| Engine Motor Model # | Toro 2 cycle / NMMA-TCW3 |
| Engine Motor Size | 6 hp |
| Engine Motor Type | 2 Cycle EPA1 |
| Document File Type | |
| Publisher | toro.com |
| Wikipedia's Page | Toro Company |
| Copyright | Attribution Non-commercial |
(0 votes, average: 0 out of 5)