


Maintenance
5.
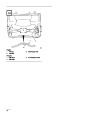
Secure new scraper to housing with carriage
bolts and flange nuts. Position heads of bolts
inside housing.
Keep snowthrower in safe operating condition by
cleaning the unit and tightening nuts, bolts, and
screws. The scraper, drive belt, rotor blades, and
spark plug should be checked once a year.
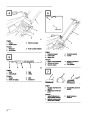
Replacing Drive Belt
(Fig. 12-13)
Draining Gasoline
After extended use, the drive belt may wear and
require replacement. If, after adjusting the control
bar, the drive belt continues to slip under a heavy load
or the rotor does not turn, check to see if the belt is
severely worn.
1.
2.
Stop engine. Remove key from switch.
Remove cap from fuel tank and use a pump type
syphon to drain fuel into a clean, approved fuel
container.
1.
2.
Turn ignition key to OFF.
Drain gasoline from fuel tank; refer to Draining
Gasoline, page 9.
3.
After fuel is drained, start engine and let it run
until all fuel is consumed and engine stops.
Repeat the starting procedure two more times to
ensure all fuel is removed from the engine.
3.
4.
Tip snowthrower on right side.
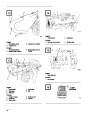
Remove (3) self tapping screws, (3) capscrews,
Note:
This is the only procedure
(1)
washer, and (3) nuts securing left side cover
recommended for draining fuel.
to snowthrower frame (Fig. 12). Lift off left side
cover and allow it to hang from the cable.
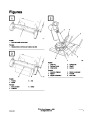
Replacing Scraper (Fig. 10-11)
5.
6.
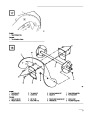
REMOVING BELT (Fig. 13)—Slip belt off idler
pulley. Push idler pulley downward, and slip belt
from rotor pulley, idler pulley, and engine pulley.
Before each season, inspect scraper for wear. If
thickness of bottom of scraper is less than 1/16”
(1.6
mm), replace scraper (Fig. 10).
INSTALLING BELT (Fig. 13)—Loop belt
around rotor pulley and engine pulley first
without slipping belt between rotor pulley and
brake. Next, push idler pulley downward and
slide belt between rotor pulley and brake.
Release idler pulley, and slip belt under idler
pulley.
Note:
Scraper wear rates are determined by
the running time and the roughness of
the driveway or sidewalk.
1.
2.
Turn ignition key to OFF.
Drain gasoline from fuel tank; refer to Draining
Gasoline, page 9.
7.
8.
Have a helper squeeze the control bar up against
the handle (rotor engaged position) and hold it in
that position.
3.
4.
Tip snowthrower forward onto nose.
Remove (3) carriage bolts and (3) flange nuts
holding scraper in place (Fig. 11). Remove
scraper.
Reinstall the left side cover while holding
control bar against handle. Tighten fasteners
securely, but DO NOT OVERTIGHTEN.
EN-9
| Categories | Snow Blower Manuals, Toro Snow Blower |
|---|---|
| Tags | Toro 38400, Toro 38405, Toro CCR 1000 |
| Model Number | 38405 |
| Model Year | 2000 |
| Download File |
|
| Document Type | Operator's Manual |
| Language | Français |
| Serial Number | 200000001 - 200999999 |
| Product Name | Toro CCR 1000 Snowthrower |
| Product Brand | Toro. Customer Service Representatives are available by phone:
Monday - Friday 7:30 a.m. to 9:00 p.m. (CDT) - Saturday 8:00 a.m. to 8:00 p.m. (CDT) - Sunday 10:00 a.m. to 8:00 p.m. (CDT)
Canada 1-888-225-4886 USA 1-888-384-9939, Snow Blower |
| Product Type | Snowthrower |
| Product Series | CCR 1000/2400/2500, Single Stage, Snowthrower |
| Swath | 20 inch |
| Discharge | Single Stage |
| Engine Manufacturer | Tecumseh |
| Engine Oil Type | Toro 2 cycle / NMMA-TCW3 |
| Engine Motor Model # | HSK635-1721A |
| Engine Motor Size | 3.5 hp |
| Engine Motor Type | 2 Cycle EPA1 |
| Document File Type | |
| Publisher | toro.com |
| Wikipedia's Page | Toro Company |
| Copyright | Attribution Non-commercial |
(0 votes, average: 0 out of 5)