


14.
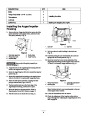
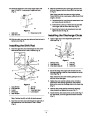
Mount the upper belt cover to the engine frame with
three 1/2-inch (1.3 centimeters) flange-head bolts
(Fig. 4).
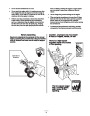
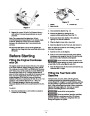
3. Shift the snowthrower into second gear and check the
shift rod alignment with the Power Shift slot (see inset
in Fig. 6).
1
Note: If the gear shift lever does not align with the
Power Shift slot in the control panel, adjust the shift rod
length as follows:
2
A. Disconnect the ball joint from the transmission lever
and loosen the jam nut (Fig. 6).
3
B. Rotate the ball joint up or down until the gear shift
lever aligns with the Power Shift slot (Fig. 6).
166
C. Install the ball joint to the transmission lever and
tighten the jam nut (Fig. 6).
Figure 5
1.
2.
Cable cover
3. Flange-head bolt (3)
Upper belt cover
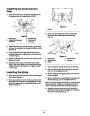
Installing the Discharge Chute
1.
Apply a light coat of low-temperature grease to the
chute ring (Fig. 7).
15.
Slide the cable cover onto the cables and into the hole in
the belt cover (Fig. 5).
Installing the Shift Rod
1
5
1.
Insert the upper ball joint stud through the front of the
shift bracket and secure it with a locknut (Fig. 6).
2
3
2
6
3
4
m-168
Figure 7
4
1.
2.
3.
Discharge chute
Chute retainer (3)
4.
5.
6.
Chute ring
Screw (3)
Locknut (3)
1
5
Chute retainer plate (3)
6
7
2. Set the discharge chute (open side forward) onto the
discharge opening so that the chute retainers are on the
chute ring (Fig. 7).
8
Note: Ensure that the chute retainer guide pins are in
the holes in the chute gear.
9
3
3.
Tighten the screw and the locknut on the left side to
position the chute retainer against the chute retainer
plate and to secure the discharge chute to the chute ring
(Fig. 7).
167
Figure 6
1.
2.
3.
4.
5.
Gear shift lever
Power Shift slot
Locknut
6.
7.
8.
9.
Jam nuts
Shift rod
4. Push the other chute retainers toward the discharge
chute (slotted), and tighten the screws (Fig. 7).
Transmission lever
Lower ball joint
Shift bracket
Upper ball joint
5.
Ensure that the chute rotates freely on the chute ring. If
the chute binds, move the right-hand retainer outward
(Fig. 7).
Note: Position the shift rod with the bend rearward.
2.
Insert the lower ball joint stud through the right side of
the transmission lever and secure it with a locknut
(Fig. 6).
9
| Categories | Snow Blower Manuals, Toro Snow Blower |
|---|---|
| Tags | Toro 1028 Power Shift, Toro 1332 Power Shift, Toro 38547, Toro 38560, Toro 38592, Toro 924 Power Shift |
| Model Number | 38547, 38560 and 38592 |
| Model Year | 2002 |
| Download File |
|
| Document Type | Operator's Manual |
| Language | English |
| Serial Number | 220000001 - 220999999 |
| Product Name | Toro 924 Power Shift Snowthrower |
| Product Brand | Toro. Customer Service Representatives are available by phone:
Monday - Friday 7:30 a.m. to 9:00 p.m. (CDT) - Saturday 8:00 a.m. to 8:00 p.m. (CDT) - Sunday 10:00 a.m. to 8:00 p.m. (CDT)
Canada 1-888-225-4886 USA 1-888-384-9939, Snow Blower |
| Product Type | Snowthrower |
| Product Series | Two Stage Power Shift |
| Swath | 24 inch |
| Discharge | Two Stage |
| Engine Manufacturer | Tecumseh |
| Engine Oil Type | 26 oz. (.8l) 5w-30 or 10w / API SH or higher |
| Engine Motor Model # | OHSK90-221413C |
| Engine Motor Size | 9 hp |
| Engine Motor Type | 4 Cycle CARB1, EPA1 |
| Transmission Speed | 4 Forward/2 Reverse |
| Transmission Type | Gear |
| Document File Type | |
| Publisher | toro.com |
| Wikipedia's Page | Toro Company |
| Copyright | Attribution Non-commercial |
(0 votes, average: 0 out of 5)