


ENGLISH
13.
(Electric Start) First disconnect the power
cord from the three-hole receptacle. Then,
disconnect the power cord from the switch
boxNOTE:(11)In. temperatures below 05F, allow
1. With the engine running, quickly pull the re-
coil starter handle (12) three or four times
with a continuous full arm stroke. This will
produce a loud clattering sound that is not
harmful to the engine or starter.
2. Stop the engine. Wipe all snow and moisture
from the carburetor cover, control levers and
cables. Also move the choke control (14)
and recoil starter handle (12) several times.
7. For safety and to prevent damage to the
snow thrower, keep the area to be cleared
free of stones, toys and other foreign objects.
8. Do not use the auger propelling feature when
clearing gravel or crushed rock driveways.
Move the handle down to slightly raise the
auger.
9. The forward speed of the snow thrower is
dependent on the depth and weight of the
snow. Experience will establish the most ef-
fective method of using the snow thrower un-
der different conditions.
the engine to warm up for several minutes
before blowing snow.
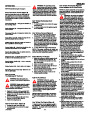
WARNING: Never run the engine
indoors or in enclosed, poorly ven-
tilated areas. Engine exhaust con-
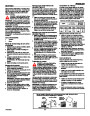
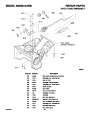
How To Remove Snow or Debris From
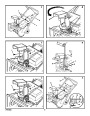
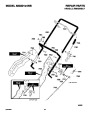
The Auger Housing (Figure 6)
WARNING: Do not attempt to re-
move snow or debris that may be-
come lodged in auger housing
tains carbon monoxide, an odorless and
deadly gas. Keep hands, feet, hair and
loose clothing away from any moving parts
located on the engine or the snow thrower.
The temperature of muffler and nearby
areas may exceed 150°F. Avoid these
areas.
10.
After each snow throwing job, allow the en-
gine to run for a few minutes. The snow and
accumulated ice will melt off the engine.
Clean the snow thrower after each use.
11.
without taking the following precautions.
12.Remove ice, snow and debris from the entire
snow thrower. Flush with water to remove all
salt or other chemicals. Wipe snow thrower
dry.
1.
2.
3.
4.
Release the auger drive lever (5).
Remove the ignition key (8).
Disconnect the spark plug wire.
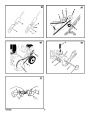
Do not place your hands in the auger hous-
ing (4) or the discharge chute (3). Use a
pry bar to remove any snow or debris.
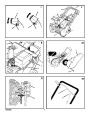
How To Start A Warm Engine (Figure 6)
If an engine has been running and is still warm,
leave the choke control (14) in the off position
and do not push the primer button (9). If the
engine fails to start, follow the instructions “How
To Start A Cold Engine”.
Dry And Average Snow
1.
Snow up to eight inches deep can be re-
moved rapidly and easily by walking at a
moderate rate. For snow or drifts of a greater
depth,slow your pace to allow the discharge
chute to dispose of the snow as rapidly as
the auger receives the snow.
Snow Throwing Tips
1. This snow thrower will propel itself forward
when the handle is raised enough to cause
the auger blades to contact the ground. The
auger should stop when auger control bar is
released. If it does not stop, see “How To Ad-
just The Auger Control Cable” in the adjust-
ment section.
NOTE: Do not use the primer button (9) to
start a warm engine.
2.
Plan to have the snow discharged in the di-
rection the wind is blowing.
How To Start An Engine With A Frozen Electric
Starter (Figure 6)
2.
Most efficient snow throwing is accomplished
when the snow is removed immediately after
if falls.
Wet Packed Snow
If the electric starter is frozen and will not turn
the engine, follow the instructions below.
Move slowly into wet, packed snow. If the wet,
packed snow causes the auger to slow down or
the discharge chute begins to clog, back off and
begin a series of short back and forth jabs into
the snow. These short back and forth jabs, four
to six inches, will “belch” the snow from the
chute.
3.
4.
5.
For complete snow removal, slightly overlap
each previous path.
Whenever possible, discharge the snow
down wind.
The distance the snow will be discharged
can be adjusted by moving the discharge
chute deflector. Raise the deflector for more
distance or lower the deflector for less dis-
tance.
1.
Pull out the recoil starter handle (12) as far
as possible.
Quickly release the recoil starter handle
2.
(12). Allow the recoil starter handle (12) to
snap back against the recoil starter.
If the engine still fails to start, repeat the two pre-
vious steps until the engine starts. Then, contin-
ue with the directions “How To Start A Cold
Engine”.
Snow Banks And Drifts
In snow of greater depth than the unit, use the
same “jabbing” technique described above. Turn
the discharge chute away from the snow bank.
More time will be required to remove snow of
this type than level snow.
6.
In windy conditions, lower the chute deflector
to direct the discharged snow close to the
ground where it is less likely to blow into un-
wanted areas.
To help prevent the possible freeze-up of the
recoil starter and of the engine controls, proceed
as follows after each snow removal job.
F-031022C
11
| Categories | Murray Snow Blower Manuals, Snow Blower Manuals |
|---|---|
| Tags | Murray 620301X4NB |
| Download File |
|
| Document File Type | |
| Copyright | Attribution Non-commercial |
(2 votes, average: 4.5 out of 5)
Lawn and Garden readers have rated Murray 620301X4NB Snow Blower Owners Manual 4.5 out of 5.0 based on 2 product reviews.