


ENGLISH
ASSEMBLY
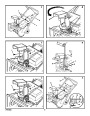
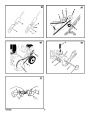
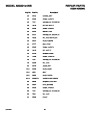
How To Assemble The Lower Chute
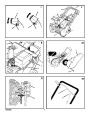
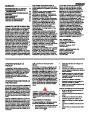
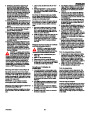
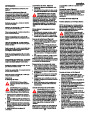
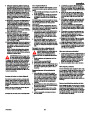
brication of the bearings and other moving parts.
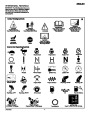
The correct fuel mixture ratio is 50:1 (2.6 oz. oil
per one gallon of gas - see the Fuel Mixture
Chart). Gasoline and oil must be pre-mixed in a
clean gasoline container. Always use fresh,
clean, unleaded gasoline.
(Figure 3)
Read and follow the assembly and adjustment
instructions for your snow thrower. All fasteners
are in the parts bag. Do not discard any parts or
material until the unit is assembled.
For shipping purposes, some models are
shipped with the rear nut and bolt removed from
the lower chute (3). If the lower chute is not at-
tached, assemble as follows.
WARNING: Before doing any
assembly or maintenance to the
snow thrower, remove the wire
from the spark plug.
1.
Use the bolt (1) and nut (2) found in the
parts bag to attach the lower chute (3).
Tip the lower chute (3) backward until the
hole in the chute ring is aligned with the hole
in the lower chute (3).
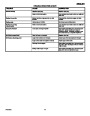
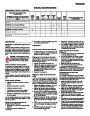
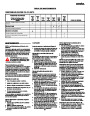
FUEL MIXTURE CHART (mixture 50:1)
2.
U.S.
IMPERIAL
SI. (Metric
NOTE: In this instruction book, left and right
describe the location of a part from the oper-
ator’s position behind the unit.
3.
Attach the lower chute (3) with bolt (1) and
nut (2). Make sure the nut (2) is tight.
GAS
OIL
GAS
OIL
GAS
OIL
1
Gal.
2.6
oz
1
Gal.
3.1
oz
1
liter
20
ML
NOTE: Torque is measured in foot pounds
(metric N.m). This measurement describes
how tight a nut or bolt must be. The torque is
measured with a torque wrench.
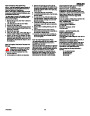
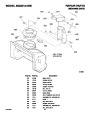
How To Assemble
The Chute Control Rod (Figure 4)
1.
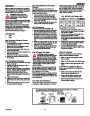
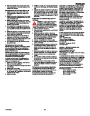
Mix gasoline and oil as follows:
1.
Pour one (1) U.S. quart of fresh, clean, un-
leaded automotive gasoline into a one gallon
size gasoline container.
Add 2.6 ounces of clean, high quality, two-
cycle oil to the gasoline container.
IMPORTANT: Do not use outboard motor
oil or multi-viscosity oils,such as 10W-30
or 10W-40.
Install the fuel cap onto the gasoline contain-
er. Vigorously shake the gasoline container
to mix the oil with the gasoline.
Remove the cotter pin (1), flat washer (2),
and wave washer (3) from the end of the
chute control rod (4). DO NOT DISCARD.
Mount the end of the chute control rod (4)
through the hole in the control rod bracket
(5). Make sure the worm gear (6) is aligned
with the notches (7) in the discharge chute
(8).
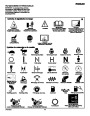
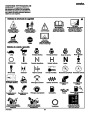
NOTE: Illustrations begin on page 3.
Tools Required
2.
2.
1
1
Knife
Pliers
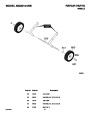
How To Remove The Snow Thrower
From The Carton
3. Fasten the chute control rod (4) to the con-
trol rod bracket (5) with cotter pin (1), flat
washer (2), and wave washer (3).
3.
1.
2.
3.
4.
Locate all parts that are packed separately
and remove from the carton.
Remove and discard the packing material
from around the snow thrower.
Cut down all four corners of the carton and
lay the side panels flat.
Hold onto the lower handle and pull the snow
thrower off the carton.
4.
Rotate the chute control rod (4) clockwise
and counterclockwise. Make sure the dis-
charge chute (8) rotates freely.
4. Add an additional three (3) U.S. quarts of
gasoline to the gallon container. Again shake
the gasoline container.
How To Prepare The Engine
Before You Operate
WARNING: Follow the engine
manufacturer’s instructions for the
type of fuel and oil to use. Always
use a safety fuel container. Do not smoke
when adding the fuel mixture to the engine.
When inside an enclosure, do not fill the
fuel tank. Before you add the fuel mixture,
stop the engine. Let the engine cool for
several minutes.
Before you operate your new snow thrower,
CAUTION: DO NOT back over cables.
G
5.
Remove the packing material from the han-
dle assembly.
Make sure all assembly instructions have
been completed.
G
Make sure the discharge chute rotates freely.
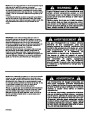
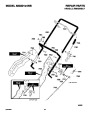
How To Assemble The Handle
G
1.
2.
3.
Remove the packing material from the upper
and lower handles.
(Figure 1) Loosen the knobs (1) on each
side of the handle (2).
Raise the upper handle (2) to the operating
position.. Hold the upper handle (2) apart to
prevent scratching the lower handle.
Make sure that no loose parts remain in the
carton.
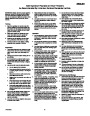
As you learn how to properly use the snow
thrower, pay extra attention to the following im-
See the engine manufacturer’s instructions for
the type of fuel and oil to use. Before you use
the unit, read the information on safety, opera-
tion, maintenance, and storage.
portant
G
G
G
items.
Make sure the fuel tank is filled with the
correct mixture of gasoline and oil.
NOTE: Make sure the cables are not
caught between the upper and lower han-
dle.
NOTE: Engine horsepower ratings may vary
by engine adjustments, manufacturing vari-
ances, altitude, atmospheric conditions, fuel
and maintenance.
Become familiar with the location of all
controls and understand their function.
4.
5.
Tighten the knobs (1).
(Figure 2) Cut and discard the cable tie (3)
from the lower end of the chute control rod
(4).
Before starting the engine, make sure all
controls operate correctly.
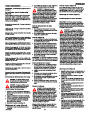
How To Mix The Fuel Mixture
6.
Turn the chute deflector (5) around toward
the front of the snow thrower.
The two cycle engine, used on this snow throw-
er, requires a mixture of gasoline and oil for lu-
Do not fill the fuel tank with gasoline that does not have oil mixed in it. Shake the
gasoline container before each filling of the fuel tank.
OIl
Add more gas
(3 U. S. Quarts)
(
2.6 oz)
Shake Can
Gasoline
1U.S.
Quart
1
U.S.
Gallon
Special
Gasoline
1
U.S. Gallon container
F-031022C
9
| Categories | Murray Snow Blower Manuals, Snow Blower Manuals |
|---|---|
| Tags | Murray 620301X4NB |
| Download File |
|
| Document File Type | |
| Copyright | Attribution Non-commercial |
(2 votes, average: 4.5 out of 5)
Lawn and Garden readers have rated Murray 620301X4NB Snow Blower Owners Manual 4.5 out of 5.0 based on 2 product reviews.