


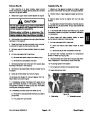


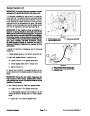
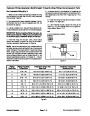


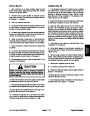


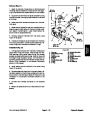


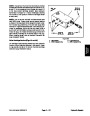


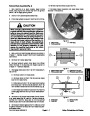

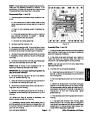

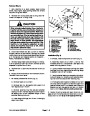


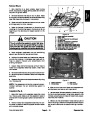


IMPORTANT: A properly installed and calibrated
traction pedal potentiometer is critical to accurate
traction system response and for reliable poten-
tiometer life. Use care when removing, installing
and calibrating the traction pedal potentiometer.
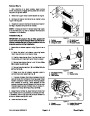
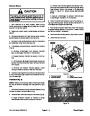
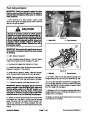
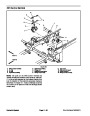
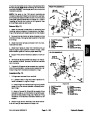
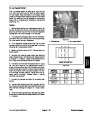
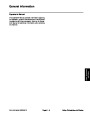
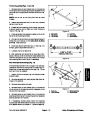
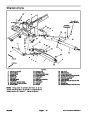
2. Plug machine wire harness connector into traction
pedal potentiometer (item 18).
3.
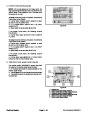
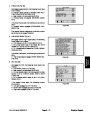
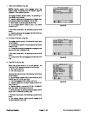
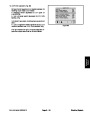
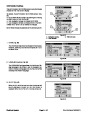
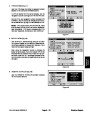
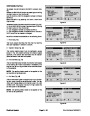
After assembly of the traction pedal, calibrate the
traction pedal potentiometer using the Info Center Dis-
play (see Traction Pedal Calibration in the Adjustments
section of Chapter 5 -- Electrical System).
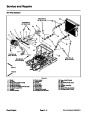
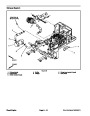
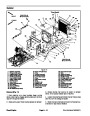
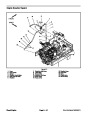
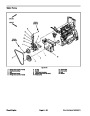
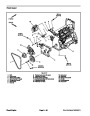
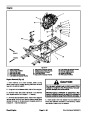
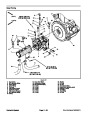
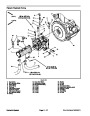
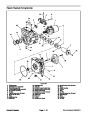
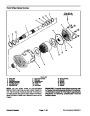
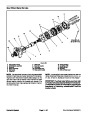
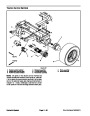
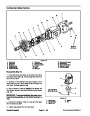
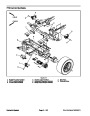
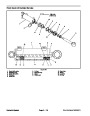
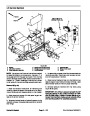
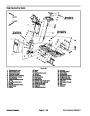
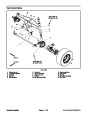
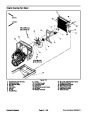
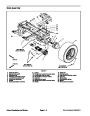
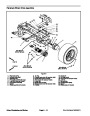
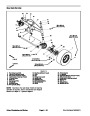
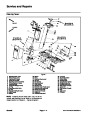
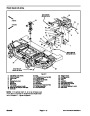
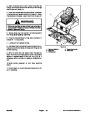
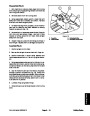
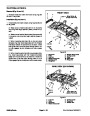
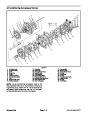
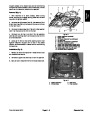
Disassembly (Fig. 16)
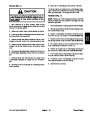
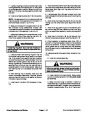
1.
decks, stop engine, apply parking brake and remove
key from the ignition switch.
Park machine on a level surface, lower cutting
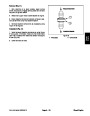
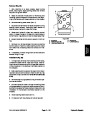
4. Makesurethathexnut(item24)istightenedafterpo-
tentiometer adjustment.
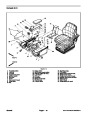
5.
Installspringcover(item15)andtractionpedalcover
2.
potentiometer (item 18) on traction pedal.
Disconnect machine wire harness connector from
(item 26).
1
3.
Ifthetractionpedalistoberemovedfromthetraction
pedalshaft,useamarkerorpaintpenonpedalandshaft
to identify location of pedal for assembly purposes.
2
3
4.
16
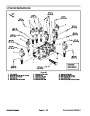
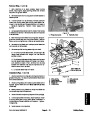
DisassembletractionpedalasneededusingFigures
and 17 as guides. When removing roll pins (items 6,
7
and 22), make sure tosupport shaft to prevent compo-
5
nent damage.
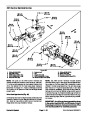
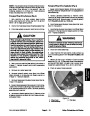
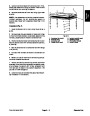
Assembly (Fig. 16)
1.
guides noting the following items:
Assemble traction pedal using Figures 16 and 17 as
4
A. Apply antiseize lubricant to spring shaft (item 23)
between hex head and roll pin hole.
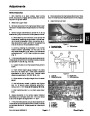
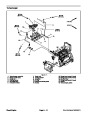
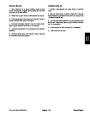
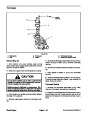
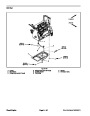
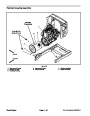
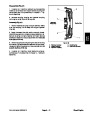
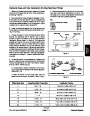
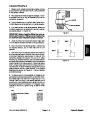
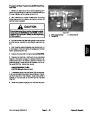
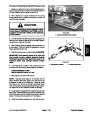
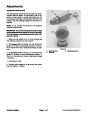
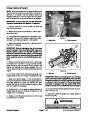
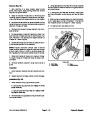
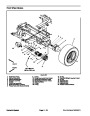
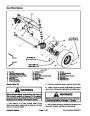
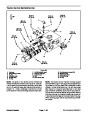
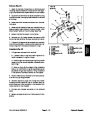
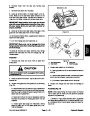
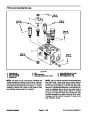
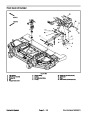
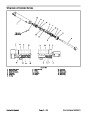
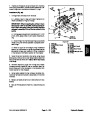
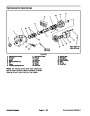
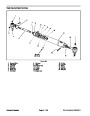
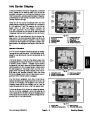
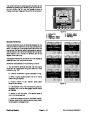
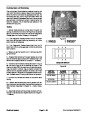
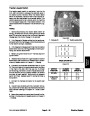
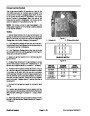
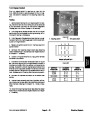
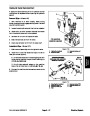
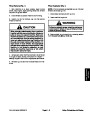
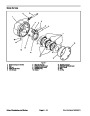
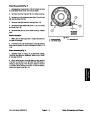
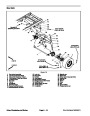
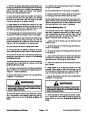
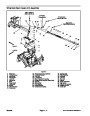
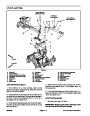
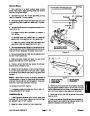
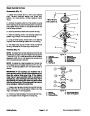
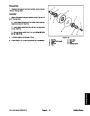
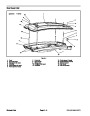
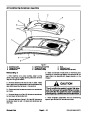
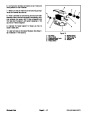
Figure 17
1.
2.
3.
Traction pedal
Pedal potentiometer
Traction pedal hub
4.
5.
Pedal hub bracket
Slotted roll pin
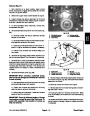
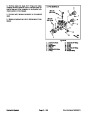
B. The bracket of the traction pedal hub (item 31)
should be closer tothetraction pedalthan theslotted
roll pin (Fig. 17).
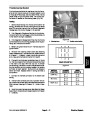
C. Use a press to install slotted roll pin (item 6) and
roll pin (item 7). DO NOT distort roll pins during as-
sembly.
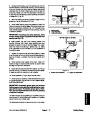
D. Make sure that roll pin (item 7) is fully inside the
groove oftheshimplate(item20).Therollpinshould
not contact the shim plate throughout the operating
range.
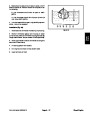
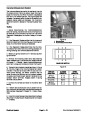
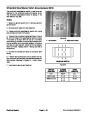
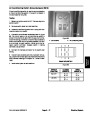
E. To install the traction pedal potentiometer (item
18),
press and hold the traction pedal in the reverse
direction slightly. Align the slot on the end of the ped-
al shaft with the slot in the potentiometer. Slide po-
tentiometer onto screws and release pedal. Hold
potentiometer in position while installing capture
plate (item 17) and lock nuts (item 16).
F. Torque lock nuts (item 16) from 13 to 17 in--lb
(1.5
to 1.9 N--m).
G. Leave the hex nut (item 24) loose so that the po-
tentiometer can be calibrated. Also, do not install
spring cover (item 15) and traction pedal cover (item
26)
until after calibration of potentiometer.
Groundsmaster 5900/5910
Page 7 -- 19
Chassis
| Categories | Lawn Mower Manual, Sprinkler and Irrigation Manuals, Toro Sprinkler and Irrigation Manuals |
|---|---|
| Tags | Toro Groundsmaster 5900, Toro Groundsmaster 5910 |
| Download File |
|
| Document Type | Service Manual |
| Language | English |
| Product Brand | Toro. Customer Service Representatives are available by phone:
Monday - Friday 7:30 a.m. to 9:00 p.m. (CDT) - Saturday 8:00 a.m. to 8:00 p.m. (CDT) - Sunday 10:00 a.m. to 8:00 p.m. (CDT)
Canada 1-888-225-4886 USA 1-888-384-9939, Lawn Mower |
| Document File Type | |
| Publisher | toro.com |
| Wikipedia's Page | Toro Company |
| Copyright | Attribution Non-commercial |
(0 votes, average: 0 out of 5)