


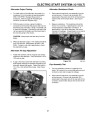
ENGINE
3.
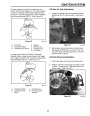
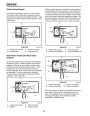
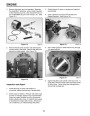
When replacing reeds, install smooth edge down
centered over openings in crankcase (see Figure
and use Loctite 271 on threads of screws.
Torque per specifications.
2. Several piston and ring combinations have been
used. Pistons have been plated and unplated.
Pistons have used two keystone rings and others
used one semi-keystone and one standard ring.
The pistons made for one type of ring will not accept
the other type. However, any piston and ring
assembly can be used in any cylinder.
78),
Install keystone piston ring in top groove with bevel
facing up. The square bottom ring can be installed
either way. Note that there are pins in the ring
grooves. The open ends of the rings must line up
with the pins.
3.
4.
Assemble ball bearings to crankshaft and install
crankshaft.
Note: One side of the paper is sticky; remove
paper carefully while installing needle bearings.
There should be 32 needle bearings on the lower
connecting rod. When reinstalling original needle
bearings, use a little #2 bearing grease to stick the
needles to the rod.
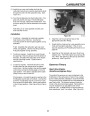
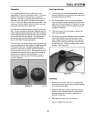
Figure 78
0720-020
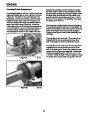
Reassembly
Assemble the piston and connecting rod. Note the
piston has the letters EX and an arrow stamped into
the top. The arrow should point towards the exhaust
port. The connecting rod can be assembled to the
piston two ways. As the rod is symmetrical, either way
is acceptable. We will phase in match marks on the
rod and rod caps. Some of the very early engines may
not have these marks. Use a permanent marker if
match marks are not visible.
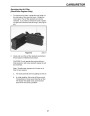
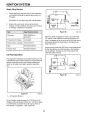
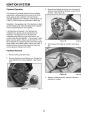
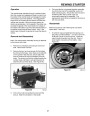
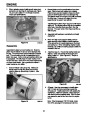
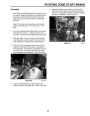
5. Install rod cap (A). Ensure that mating marks are
aligned. Clean old screws (B) thoroughly and
apply Loctite 271. (See Figure 80.) Torque to
specifications.
A
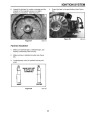
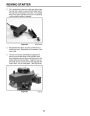
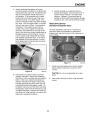
1.
Secure wrist pin using snap ring. Make sure
square edge of snap ring faces out and ring
opening faces up (toward top of piston). (See
Figure 79.)
B
Figure 80
0893-023
6.
Oil parts. Use ring compressor to install piston
with EX mark and arrow pointing towards the
exhaust port. Install seals before fully seating the
crankshaft. Install new oil seals. Clean seal bore
with alcohol before installing seals. Oil in the bore
may cause the seal to blow out when the engine
is hot.
Figure 79
Note: Ring Compressor P/N TOR 4089 (order
from OTC, see page 5 for address and phone).
0893-028
44
| Categories | Snow Blower Manuals, Toro Snow Blower |
|---|---|
| Tags | Toro 3650 GTS, Toro 38409, Toro 38412, Toro 38413, Toro 38414, Toro 38418, Toro 38419, Toro 38422, Toro 38424, Toro 38428, Toro 38429, Toro 38432, Toro 38433, Toro 38437, Toro 38438, Toro 38440, Toro 38441, Toro 38442, Toro 38445, Toro 38515, Toro 38516, Toro 38517, Toro 38518, Toro 38537, Toro 38538, Toro 38600, Toro 38601, Toro 38602, Toro 38603, Toro 38610, Toro 38611, Toro CCR 2400, Toro CCR 2400 GTS, Toro CCR 2450 GTS, Toro CCR 2500 GTS, Toro CCR 3000, Toro CCR 3000 GTS, Toro CCR 3650 GTS, Toro Power Max 6000, Toro Power Max 726TE, Toro Snow Commander |
| Model Number | 38412, 38418, 38413, 38419, 38422, 38424, 38440, 38428, 38429, 38432, 38433, 38437, 38438, 38439, 38440, 38441, 38442, 38445, 38515, 38537, 38538, 38600, 38601, 38602, 38603, 38610, 38611, 38419, 38516, 38517, 38518 |
| Model Year | 1999, 2000, 2001, 2002, 2004, 2005, 2007 |
| Download File |
|
| Document Type | Engine Service Manual |
| Language | English |
| Serial Number | 240000001 - 240999999 |
| Product Name | Toro Snow Commander Snowthrower |
| Product Brand | Toro. Customer Service Representatives are available by phone:
Monday - Friday 7:30 a.m. to 9:00 p.m. (CDT) - Saturday 8:00 a.m. to 8:00 p.m. (CDT) - Sunday 10:00 a.m. to 8:00 p.m. (CDT)
Canada 1-888-225-4886 USA 1-888-384-9939, Snow Blower |
| Product Type | Snowthrower |
| Product Series | Single Stage, Single Stage Snow Commander |
| Swath | 24 inch |
| Discharge | Single Stage |
| Engine Manufacturer | Toro |
| Engine Oil Type | Toro 2 cycle / NMMA-TCW3 |
| Engine Motor Model # | R-tek |
| Engine Motor Size | 7 hp |
| Engine Motor Type | 2 Cycle EPA2 |
| Document File Type | |
| Publisher | toro.com |
| Wikipedia's Page | Toro Company |
| Copyright | Attribution Non-commercial |
(0 votes, average: 0 out of 5)