


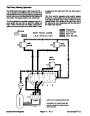
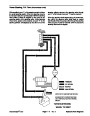
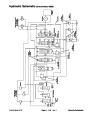

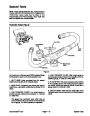


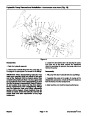
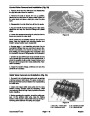
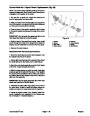
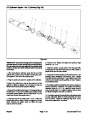
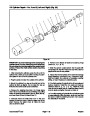


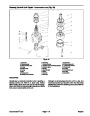
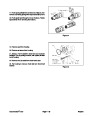


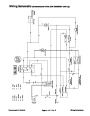
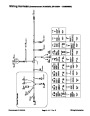


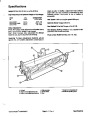
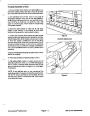


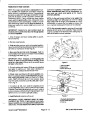
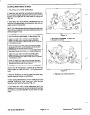

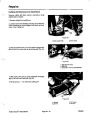


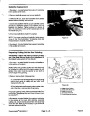
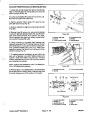

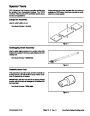
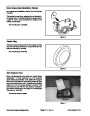


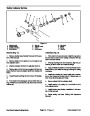

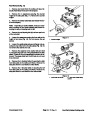

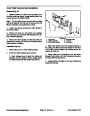


Reel Installation (Fig. 16)
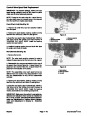
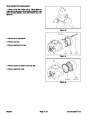
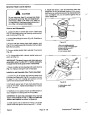
IMPORTANT: Wipe any excess grease from the inner
grease seals (13) where the reel shaft V–rings (3) make
contact. The V–rings should run dry.
1.
Slide the left hand side plate (6) onto the reel shaft.
Make sure the reel shaft threads do not damage the
grease seals in the side plate.
2.
Apply a film of No. 2 general purpose grease to the
reel shaft threads and install the left side reel bearing
locknut (8).
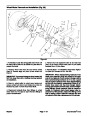
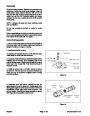
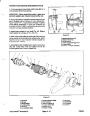
3.
shaft. Make sure the reel shaft threads do not damage
the grease seals in the side plate.
Slide the right hand side plate (10) onto the reel
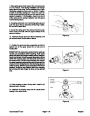
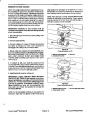
2
1
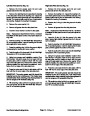
4.
reel shaft threads and install the right side reel bearing
locknut (8).
Apply a film of No. 2 general purpose grease to the
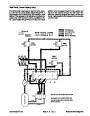
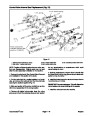
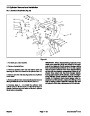
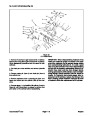
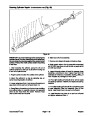
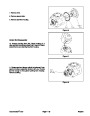
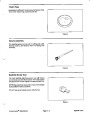
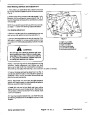
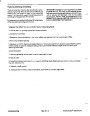
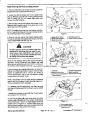
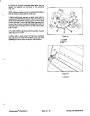
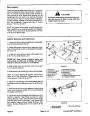
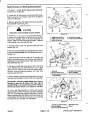
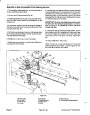
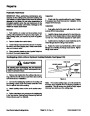
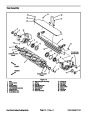
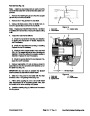
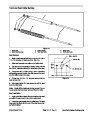
Figure 21
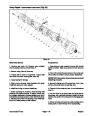
2.
1.
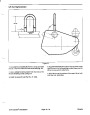
Rear roller
Saddle clamp
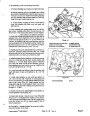
5.
with the four shoulder bolts (7). Torque the shoulder
bolts to 17 to 20 ft-lbs. ( 23 to 27 Nm).
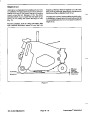
Mount the frame assembly (17) to the side plates
10.
this chapter).
Install the front roller (see Front Roller Installation in
11.
tor’s Manual for adjustment procedures.
Adjust the cutting unit. See the Cutting Unit Opera-
6.
two capscrews (24), washers (23), and lock nuts (25).
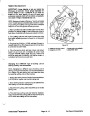
Secure the grass shield (22) to the side plates with
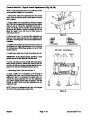
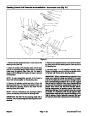
Note:
The parallel position of the rear roller to the reel
7.
Torque the reel bearing locknuts (8) to 50 to 60 ft-
lbs. (68 to 81 Nm).
is controlled by the precision machined components of
the assembled cutting unit. Only a limited amount of ad-
justment is possible if necessary due to tapered reel
wear. To adjust:
8.
in this chapter).
Install the bedbar assembly (see Bedbar Installation
A. Place the assembled cutting unit on a surface
plate.
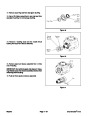
9.
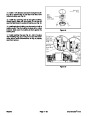
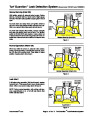
Install the rear roller as follows (Fig. 21):
A. On one of the saddle clamps, remove one of the
screws and nuts securing it to the side plate.
B. Loosen each bedbar adjuster assembly, both
cap screws (24), and all four shoulder bolts (7).
B. Install rear roller into saddle clamps and loosely
secure it with the screw and nut previously re-
moved.
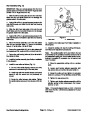
C. Adjust the cutting unit and tighten the shoulder
bolts (7) to a torque of 17 to 20 ft-lbs. ( 23 to 27 Nm).
D. Tighten the cap screws (24).
C. Center the roller between side plates. Tighten
the saddle clamp screws and nuts to secure the roll-
er.
E. Tighten each bedbar adjuster assembly until the
adjuster spring is fully compressed, then loosen
lock nut 1/2 turn.
Note:
For severely tapered reels, a .010 in. (.254 mm)
shim (Toro Part No. 106-6923) is available for the rear
roller mount.
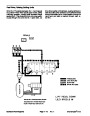
Dual Point Adjust Cutting Units
Page 10 - 18 Rev. D
Greensmaster 3100
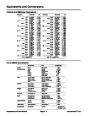
| Categories | Lawn Mower Manual, Sprinkler and Irrigation Manuals, Toro Sprinkler and Irrigation Manuals |
|---|---|
| Tags | Toro Groundsmaster 3050, Toro Groundsmaster 3100 |
| Download File |
|
| Document Type | Catalog |
| Language | English |
| Product Brand | Toro. Customer Service Representatives are available by phone:
Monday - Friday 7:30 a.m. to 9:00 p.m. (CDT) - Saturday 8:00 a.m. to 8:00 p.m. (CDT) - Sunday 10:00 a.m. to 8:00 p.m. (CDT)
Canada 1-888-225-4886 USA 1-888-384-9939, Lawn Mower |
| Document File Type | |
| Publisher | toro.com |
| Wikipedia's Page | Toro Company |
| Copyright | Attribution Non-commercial |
(0 votes, average: 0 out of 5)